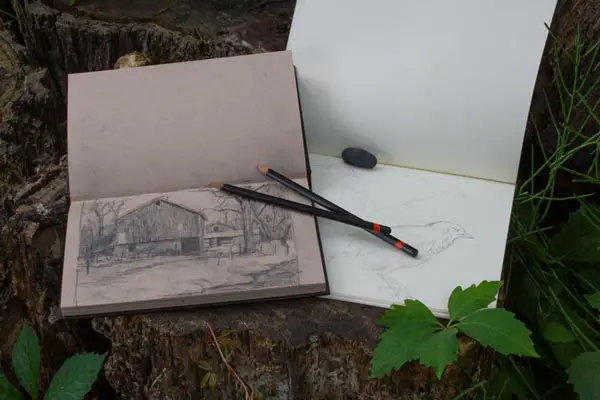
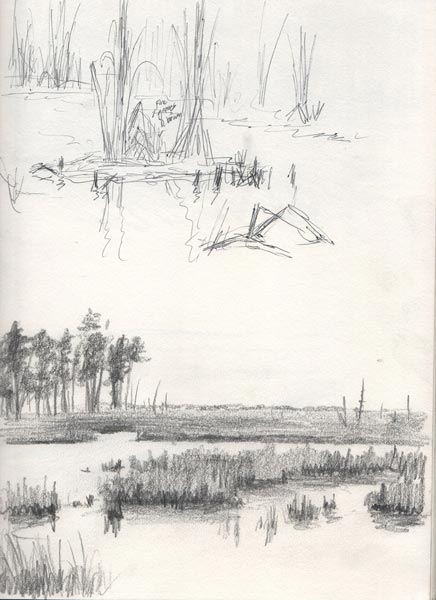
Having the right tools and materials for sketching outdoors can make the difference between a successful day of sketching or a miserable one. Nothing is more frustrating than arriving at your sketching destination and finding out you forgot your pencils or watercolor brushes. So that brings up the question, what are the essential items for a field sketching kit?
Sketching materials will be heavily dependent on two important factors: your medium, and where you are going to sketch. Pencil sketching requires the least amount of materials, watercolor requires additional items such as paints and brushes, and long-distance hiking requires portable materials.
Below we will discuss what items you would have on hand for sketching and drawing outdoors and some recommended materials to help you get started.
Make Sure You Have a Good Sketchbook or Sketchpad
The first thing you will need is something to draw on. Thankfully there are many sketchbooks and pads on the market for reasonable prices. I recommend a sketchbook over a drawing pad as the covers of a sketchbook tend to be more sturdy for transportation and do a better job of protecting the pages.
Case-Bound Verses Spiral-Bound Sketchbooks
There are essentially two types of sketchbooks: books with spiral binding, or case binding.
Case binding is basically what you get with a typical hardcover book. Sketchbooks with this type of binding are better for durability and preventing smudging. The one possible drawback is that with some brands you cannot get the pages toward the center of the book to lay flat when drawing. I recommend and use sketchbooks with case binding for outdoor and field sketching since they tend to be more durable.
Sketchbooks with spiral binding allow you to easily remove pages. This is great for extracting and framing sketches you really like, and you can get the pages to lie completely flat. But spiral-bound pads make your drawings more susceptible to smudging. I recommend and use sketchbooks with spiral binding for indoor sketches and developing ideas for paintings as I can easily remove the sketch for scanning and enlarging.
Sketchbooks for Pencil Drawing
I use three different sizes of sketchbooks depending on what I'm drawing. I like smaller books for planning compositions, medium (around 8 1/2 x 11 inches) for sketching outdoors, and larger books or pads for sketching subjects that require details and accuracy.
One of my favorite sketchbooks for field use is the Strathmore Softcover 400 Series Sketch Artist Journal. It's a nice compromise between a case-bound and a wire-bound book. The pages are securely bound, yet you can get them very flat. The softcover has enough support for the pages you are drawing on and it has a great classic feel. These usually run for $10-$15 depending on the size. Click links on the Resources Page to see the current price.
If you like drawing on toned paper as I do, Strathmore makes a great hardcover, case-bound book with tan or gray 400 Series paper. The book lies pretty flat and the paper is smooth high-quality stuff. See Resources Page for more information and availability on both the regular and toned paper.
There are many other options depending on what type of paper you like as well as binding and cover type. Check out places like Blick Art Supplies or Utrecht Art Supplies to see some of the many options available.
See below for watercolor sketchbooks.
Bring Along Several Pencils or Pens
The next thing you will need is something to draw with. Pencils are the primary instrument for sketching. But there are other options to consider. I spent a year sketching with just a ballpoint pen to break my over-dependence on erasers. Ballpoint pens are nice because they dry fast and don't smudge. Other options are charcoal (they will smudge), marker, watercolor, pastel, colored pencil, oil and so on. If it makes a mark it's game.
For the serious artist, it's always a good idea to have a small sketchbook and pencil on hand in case you ever want to sketch something spontaneously. You never know when an opportunity will present itself.
If you are doing any amount of traveling for the purpose of sketching, make sure you bring along at least several pencils or pens. There have been many times when I dropped a pencil in between rocks or some other unreachable place. In that situation, having only one pencil will end your sketching and even your sketching day very abruptly. See the Resources Page for recommended pencils.
Traditional pen and ink can be a fun way to sketch outdoors and was the method used by many artists from the 19th century on back. Make sure the ink is stored in a thick, glass, or plastic inkwell with a tight cover to avoid breaking and causing a mess. Also, ensure the pen is safely transported so as to not damage the fragile nib. Do this by removing the nib from the pen if possible. John Neal Books is my favorite resource for these items.
Pencil Cases for Sketching Outdoors
While you can sketch outdoors without one, having some type of case to store and transport your pencils is very handy. Pencils are not very big and can easily get lost (believe me, I've lost many). Keeping them in a case not only helps you keep track of them, but it can also protect them from damage.
Many art supply stores sell pencils cases. My pencil case is actually a small fishing tackle box that I picked up at Bass Pro Shop. It has adjustable dividers that come in handy. This used to be the most cost-effective box I could find, but Artbin now offers a pencil box for around the same price (see bottom of the Resources Page) and theirs has a convenient foam insert at the end to prevent your sharpened pencils from getting damaged.
Make Sure You Can Sharpen Your Pencils
It may seem obvious that you should bring your pencil sharpener with you when sketching outdoors, but there have been a number of times when I have forgotten mine. You can use a typical hand-held sharpener which is easy to carry. Bring a couple along in case you lose one. Another option is a small retractable razor and a small piece of sandpaper.
Have Several Good Erasers For Outdoor Sketching
For the same reason as mentioned above, you will want at least several erasers for outdoor sketching. Besides dropping an eraser in a spot you cannot reach, you may drop it in some mud which could make it unusable. Some kneaded erasers can get a little sticky and dropping it into some sand could ruin it.
It's always a good idea when sketching to not rely too much on an eraser. The purpose of field sketching is to capture a moment and make a visual note, not create and award-winning drawing. Yet it's nice to have the option to erase big blunders or get rid of a couple of lines on a page because the subject ran away right after you started drawing. Just make sure you have several onhand.
There are many erasers on the market. I tend to prefer a kneaded eraser because of its gentleness, longevity, and ability to move into different shapes (see Resources Page). Experiment and see which type you like best.
A Backpack for Carrying Your Items
A backpack is very handy, not just for hiking somewhere, but also for keeping all your items together for a convenient grab and go approach. You can also use a tote bag or anything else that will help you keep your sketching stuff together and get it to where you need to go.
For my pencil and watercolor sketching materials, I use a simple backpack. I can also carry food and water in it. For my plein air oil painting items (which is way more extensive), I use a large mountain hiking backpack. Military surplus stores can be great places to find quality backpacks at a reasonable price.
Consider Sunscreen, Bug Repellent and an Umbrella
If you are going to be outdoors for a while it's a good idea to bring sunscreen. I usually try to put it on before I leave. That way if I see something that I get really excited to draw or paint, or something that is fleeting (which happens a lot), I won't forget to apply it on location.
One note of caution, be sure not to rub sunscreen in your eyes. I've done that and was unable to draw or paint due to eye irritation.
I was raised in Minnesota which is mosquito country. I've literally been swarmed, making it impossible to paint. Depending on how bad the bugs are in your area, bring some bug repellent along. Also, be on the lookout for deer ticks that carry Lymes Disease. I've contracted it and know other artists who have contracted it at least five times or more.
I use an umbrella more for plein air painting than for drawing. When my painting surface and palette are in direct sunlight, I have a tendency to paint dark to compensate for the brightness. Painting under an umbrella keeps me from creating dark, drab field studies. Make sure the underside of the umbrella is dark so you don't have ambient light bouncing all over throwing off your colors.
Bring Food and Water for Long Sketching Trips
Bring some food and water if you will be out for a while, especially if it's going to be hot.
They make some great water bottles with built-in filters. You can fill these bottles up with clear lake or stream water and drink it (read the manufacturer's label before using). I used one while painting in the Rocky Mountains and it made an all-day painting hike so much easier. Rather than lugging eight bottles of water, I was able to fill up just one filter bottle with ice-cold alpine lake water whenever needed.
If you are painting, make sure you bring food that doesn't have to be exposed to your bare and possibly dirty or paint-stained hands. You don't want any toxic paint getting from your hands to your food. Hold your sandwich with a wrapper. Granola bars or something similar is good. Bananas are a really great option since you can hold the peel. Apples and oranges are probably out of the question.
Essential Items for Sketching Watercolor Outdoors
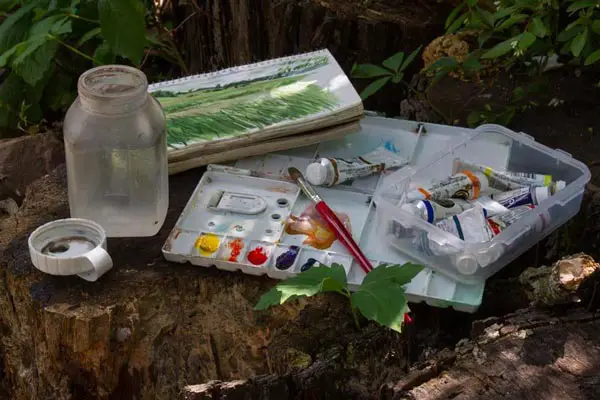
Next to colored pencils, watercolor is probably the most portable-friendly color medium for sketching outdoors. Here is a small list of what you will need for sketching outdoors with watercolor:
- A watercolor sketchbook
- Watercolor pigments (ether pan or tube paint)
- A palette (many pan watercolor kits come in a palette)
- Brushes
- Brush Box
- Some type of water container
- Paper towels
- A bag to transport and dispose of used paper towels
- A backpack to transport these materials
- A portable chair to sit on (not necessary but helpful)
Sketchbooks for Watercolor

Using watercolor on regular paper can be a nightmare. Not only will the pages buckle, but repeated washes can end up literally destroying the paper. Fortunately, there are many options for the watercolorist who wants to sketch outdoors. These range from hardbound books to spiral-bound pads. You can also find a wide variety of paper textures from smooth hot-press to rough cold-press.
The Aquabee Super Deluxe Sketchbook is a great option! I used this one a lot back in my watercolor days. The paper is very good quality and smooth so you can use it for both watercolor and pencil sketches. I used a combination of pen and ink and watercolor and it worked perfectly!
If you want to focus mostly on watercolor with a lot of washes, you may want to try a thicker cold-pressed paper with more texture. Once again Strathmore makes sketch journals with 400 Series paper that open flat and come in both landscape and portrait formats.
Another option is using a watercolor block. This is a pad of watercolor paper that is glued on all four sides of the paper. The nice thing about this is having all four sides glued helps keep the paper from buckling, which allows you to do repeated washes. I have to note that the paper will still buckle if enough water is applied, but the buckling is still less than a regular sketchpad. Arches makes great watercolor blocks. See the Resources Page for pricing and availability on the two above items.
There is a drawback to using blocks for field sketching. You need to use a razor to cut the binding on all four sides to remove the top paper before you can use the next sheet of paper underneath. Then you need to put the loose sheet of paper somewhere safe which could be a challenge if you have backpacked a long distance.
Watercolor Paints for Field Sketching
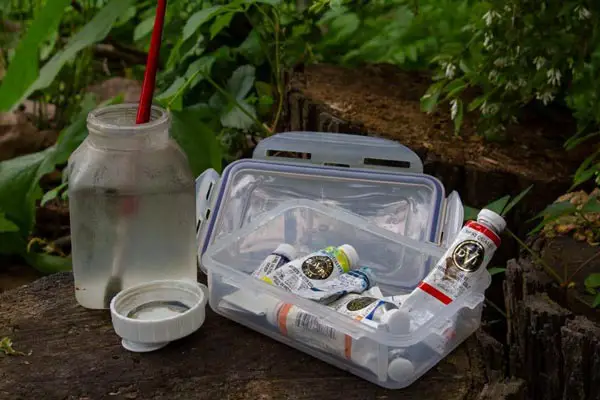
Watercolor paint come in two basic types, pan and tube pigments. Pan paint consists of dried pigment in a little square that is activated when water is applied. Tube paint is wet paint in a tube that you squeeze onto a palette. Tube paints eventually dry and becomes pan pigment which can be reused by activating with water.
I prefer to use tube paint. It more you have to lug along, but I like the options of being able to use thicker paint if need be. I prefer are Da Vinci watercolors, but also use M. Graham. If you intend to focus on more transparent washes and would like to significantly reduce your carrying load, pan colors would be a better option.
Sakura Koi makes a very convenient watercolor pan set that includes a palette and a brush that allows you to fill the handle with water. It comes in sets from 12 up to 72 colors and you can buy refill pans for just a few bucks. The paint is student grade, but for personal sketches, this has never been an issue for me. See the Resources Page for availability.
Watercolor Palettes for Field Sketching
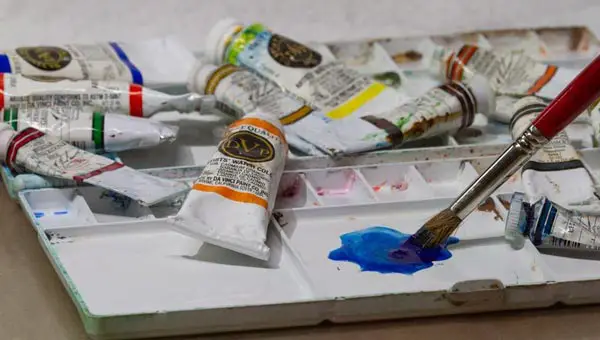
If you are going to use tube watercolors, or if your set of pan watercolors doesn't have an attached palette, you will need a separate palette for mixing colors. Folding watercolor palettes work great for field sketching. They have color wells and mixing areas and will close up to protect the pigments and the other items in your backpack.
I've used the Masters International Folding Watercolor Palette for years now and really like it. It's 4x8 inches, has 20 color wells, five mixing areas, three brush holes, and a thumbhole. You may want to wrap a rubber band around it to make sure it stays shut in your backpack (A good idea for any folding palette). See the Resources Page for availability.
Watercolor Brushes for Field Sketching
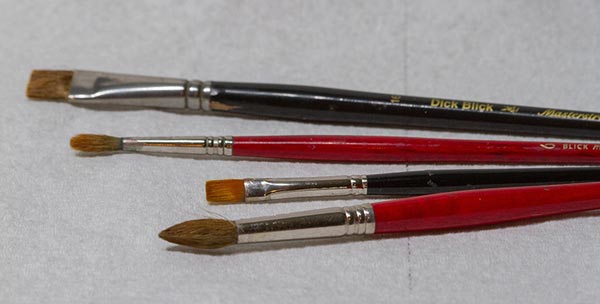
For watercolor brushes, I've used a combination of synthetic and natural sable in both flats and rounds. I primarily use Blick Masterstroke Finest Red Sable Brushes. I've found them to be a quality brush for a reasonable price (see the Resources Page for links to current price) especially for natural sable. I've had mine for years and they are still working well.
Another place to get great brushes is Rosemary & Co. in Great Britain. They have a wide variety of brushes and overseas shipping is generally quick and reasonable.
A note of caution, don't leave your brushes to soak in water for long periods of time. This can cause the glue that holds the brush together to weaken.
Brush Box for Watercolor Sketching
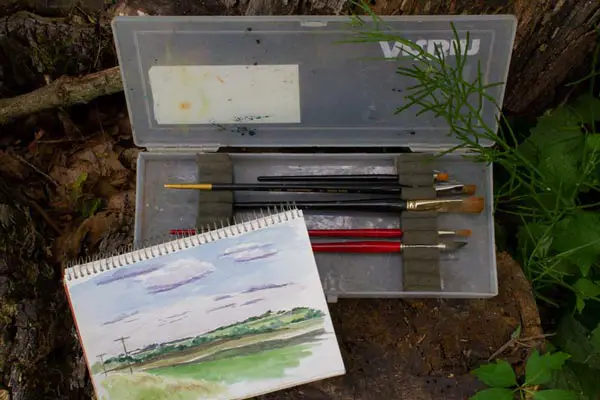
To carry my watercolor brushes into the field, I use a Brush Box made by ArtBin. It's large enough for long-handled brushes and has a foam insert to hold the brushes in place. This is important for protecting the delicate hairs on a watercolor brush. See the Resources Page for availability.
Water Container for Watercolor Field Sketching
You will need some type of container to hold water for sketching outdoors in watercolor. I just use whatever small water containers are available at any discount retail store. Just make sure it has a solid lid that won't come off. I've actually used lake or stream water to fill my container while out in the field. As long as it's clear water, it works fine.
Paper Towels for Watercolor Field Sketching
While any brand will suffice, my favorite paper towels for painting are Viva. They have a cloth-like feel and tend to absorb more than other brands. Just be careful when painting around water. I've dropped entire rolls in water which made them unusable.
Disposal Bag for Used Paper Towels
You will also want to have something to dispose of used paper towel sheets. I use the plastic bags you get at grocery and discount retailers. If it's windy you may have to weigh them down with a rock or some dirt. Just don't leave used paper towels out in the field. Some pigments contain toxins that you want to keep out of the environment.
Backpacks for Watercolor Sketching
This topic was already covered above. As said, you can also use a tote bag if you are not traveling very far.
Portable Chair for Watercolor Sketching
When I oil paint outside I usually stand, but since I'm using a sketchbook that I have to hold, I find it easier to sit for watercolor sketching. I use a fold-up three-legged stool. While not the most comfortable for long-term sitting (they sometimes cut off the circulation in my legs), they are small and easy to transport. They can be found at outdoor sporting good stores and certain discount retailers.
Sketching Outdoors is Unique to Every Artist
What I've provided is a list of what I use that hopefully will help you get started, and depending on the person, this list is by no means complete. I have been around many artists over the years and have yet to find one who uses the exact same materials that I do. Experiment until you find what works best for you and will make your outdoor sketching experience an enjoyable one.
Keep Sketching!
Heads up: my posts may contain affiliate links. If you buy something through one of those links, you won’t pay one penny more, but I receive a small commission, which helps keep this website going.
Jason Tako is a nationally known fine artist who specializes in western, wildlife, plein air, and Historical Native American subject matter. He spent his learning years sketching the wetlands and wooded areas of rural Minnesota. He has been featured in Plein Air Magazine and Western Art Collector Magazine and he was the Featured Artist for the 2020 Southeastern Wildlife Expo. See his work at www.JasonTako.com and his demonstrations on his YouTube Channel.
Using solvents to thin oil paint or clean brushes can present health problems for certain artists. But one does not need to abandon oil painting or resort to water-based oil paints due to intolerance of solvents. In this article, we will explore oil painting without solvents and what artists need to know.
Solvent-free oil painting can be done by thinning the paint with non-toxic mediums such as oils, natural alkyds, and even citrus-based thinners. Oil paint made from linseed or safflower oil does not produce harmful vapors and pigment toxicity is the same in both oil paint and water-based paint.
Below we will discuss some of these options in detail and what you need to know about each. I will also have links on my Resource Page showing where some of these items are available.
IMPORTANT NOTE: I'm using general descriptions for many painting mediums. When I say something such as linseed oil is non-toxic, it's not a guarantee since it's impossible to describe every manufacturer's production and refinement methods, and product misuse can make something non-toxic become toxic. Always check the brand label to confirm any possible toxicity or limitation of the medium.
Also, when trying a new product, I recommend purchasing a small amount and testing it first. People react differently to different things, and while something may be certified non-toxic, it doesn't mean you won't have a negative reaction to it.
One more note about oil paint toxicity. Many people mistakenly believe it's the oil paint itself that's toxic, and switching to acrylics or watercolor will remove all toxins, but this is false. As stated above, oil paint is just pigment in an oil binder, just as watercolor is just pigment in gum arabic. It's not the oil binder that's toxic, its pigments like cadmium or cobalt, and these are toxic whether the binder is oil or gum arabic.
So Cadmium Red watercolor is just as toxic as Cadmium Red oil paint. But bear in mind many pigments are non-toxic, and even the toxic pigments will not be toxic to you unless your skin is exposed to them or you sand a dry painting and breathe in the particles. Also, pigments do not turn into a breathable vapor unless your spray your paint onto the canvas.
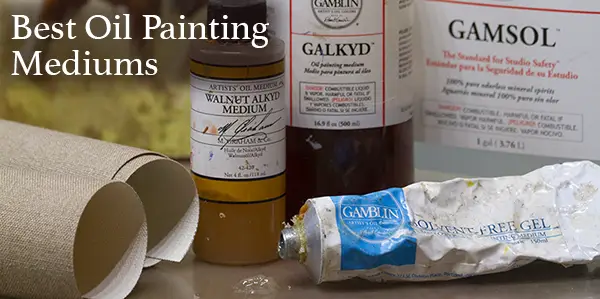
Generally Two Ways to Thin Oil Paint: Solvents and Oil
Traditionally there have been two ways for an artist to thin oil paints: oil mediums, and solvents. Oil mediums include vegetable-based oils made from linseed, poppy, safflower or walnut. Solvents include turpentine and mineral spirits AKA white spirits.
The Different Oils Used for Oil Painting
Vegetable-based artist-grade oils are generally non-toxic. They're derived from the plant they are named after. So unless you have any allergies, using one of these oils is a good substitute for solvents. Oils do not produce fumes. In fact, they will absorb oxygen during the drying process.
Some artists may wonder which oil is best to use for oil painting. Let's look at each one.

Linseed Oil
Linseed oil is the primary oil used in most oil paint. It's permanent and very stable, providing a solid foundation. It generally dries within 5 days, depending on the paint thickness, pigment, air temperature, and type of surface it's applied to. The one drawback is it can yellow over time. This is more noticeable in lighter and cooler colors. As a result, some manufacturers will use a different type of oil such as walnut, poppy, or safflower for these colors.
Walnut Oil
Walnut oil is a pale yellow-brown color. It dries a little slower than linseed and is very resistant to yellowing and cracking. Colors in walnut oil can have a more brilliant appearance. It was used by some renaissance masters and is a great choice for artists who want to keep their studio solvent-free.
Safflower Oil
Safflower oil is paler in color than linseed oil and has less of a tendency to yellow over time. Its drying time is slower than linseed oil. Unlike linseed oil, which dries by forming a top skin, safflower tends to dry evenly throughout the entire film. This causes it to have a more sticky feel during the drying process which may not be preferred by some artists.
Some express concern over safflower's long-term stability, but analysis has shown it's held up well over the centuries and is used by many top paint manufacturers.
Poppy Oil
The slowest drying time of the bunch, poppy oil is great for artists who like to work wet on wet. It can give your paint a nice buttery feel. However, it should be used in small amounts as there are questions about its long-term durability, and if you plan to layer your paints avoid using it in your initial layers.
Oil Painting with Stand Oil, Alkyds and Others
Over the centuries artists and chemists have experimented with heating oil and exposing it to the elements to alter is viscosity and drying time. This altering usually does not result in any toxicity, but as stated above always consult the manufacturer's label.
Stand Oil
Stand oil is linseed oil that has been thickened by heating. The result is a thicker medium that has less of a tendency to yellow with a slower drying time than regular linseed oil. When applied, it spreads out reducing brushstroke texture and dries with a smooth finish, similar to enamel. It's great for glazing and usually low or non-toxic and like most oils, it will not emit any harmful fumes.
Sun Thickened Oil
This is an oil that has been exposed to sunlight to change its viscosity to a thick, syrup-like consistency similar to stand oil but with faster drying time. Like stand oil, it has less of a tendency to yellow. Unlike other mediums, you can apply it to your pigment with a much higher pigment to oil ratio without any breaking. You can easily make this stuff yourself. Check out Michael Harding Oil Colors to learn more.
Alkyds
Most alkyd oil paints are made with an alkyd resin binder. They dry quickly and create a very permanent surface.
Some alkyds can be toxic, others non-toxic, depending on the manufacturing process and ingredients. Gamblin's Galkyd is less toxic than others but it does release Volatile Organic Compounds (VOC's) and petroleum distillate that may cause some people to have issues. I personally use it (with adequate ventilation), but someone who is concerned about harmful vapors may want to avoid it.
M. Graham & Co. makes walnut alkyd that is certified non-toxic. The Walnut alkyd dries very fast and leaves a glossy surface. It also doesn't have much of a smell which is great for people with sensitive noses. I love using this stuff if I have to touch up an area that needs to dry very quickly and glossy.
Natural Mediums and Thinners for Oil Painting
In recent years there has been a push to create alternatives for non-toxic oil painting. Here is what you need to know about some of these options.
Citrus-Based Turpentine
There are now several citrus-based turpentines on the market such as Zest-It and Seville Citrus Turpentine. They are technically turpentine, but these are derived from orange peels rather than pine trees or forest waste (which are the sources of traditional turpentine). They are also technically non-toxic provided they are used correctly. Always read the label.
I have never used Zest-It, which is made in Great Britain, but reviews say it has a mild citrus scent and doesn't seem to cause the same issues most people have with traditional solvents. They also say it does a nice job of thinning oil paint. There are reports of skin sensations such as tingling, but this may have been due to people leaving it on their hands long-term causing it to eliminate the natural oils on the skin.
IMPORTANT NOTE: No painting medium should be left on your skin for long periods of time. Even completely natural solutions can cause skin irritation if there is long-term exposure. Wipe your brush handles often as medium running from the bristles down the handle is one of the biggest sources of skin exposure. Another solution is to paint while wearing latex gloves.
Oil of Spike Lavender
Oil of Spike Lavender (Spike Lavender is a type of Lavender flower) has been used since the 16th century. It thins paint well but has a very strong scent and some people report being unable to use it due to the strong smell which can even stay in your oil painting. It is considered non-toxic but studies concerning long-term inhalation are lacking. I would test a small bottle first and use it with sufficient ventilation.
Thinning Oil Paint with Technique
Solvents and oils are not the only way to achieve the thinning of oil paint. You can also do this by laying down thin layers of paint straight from the tube. This may require a sturdy bristle brush and some good old fashioned elbow grease. It's also easier to do with a smooth canvas that has very little texture. The lack of texture means you don't have to work as hard to fill in all the little holes with paint.
You can also scrap excess paint off with a palette knife and then thin it more with a bristle brush.
Be Aware of the Fat Over Lean Principle
The fat over lean principle is very important to remember if you are using any type of oil or petroleum-based medium and paint. The basic concept is that you always want to make certain your top layers of paint have a higher oil content than your bottom layers.
So if you are thinning your paint with oil, the initial layers of pigment should have very little, if any additional oil applied; it should be applied with the consistency straight out of the tube. As you continue to add layers of paint, make sure they contain at least the same amount, but preferably more oil than the previous layer. Be careful not to add too much oil as this will break the pigment and not cover the preceding layer.
Ghosting-Dull Spots in Your Oil Painting
If you don't follow the fat over lean application method, you risk ghosting in your oil painting. Ghosting is when dull spots of faded color appear after the oil painting has dried. This is because the layers underneath, which incorrectly contain more oil, sucked the little bit of oil out from the top layers down to the lower layers. This can be fixed with a technique called oiling-out, which is basically brushing more oil onto the surface of the dried painting.
The other problem that can occur is cracking. Since the top layer doens't have as much oil, it becomes more brittle. When the lower layers expand or contract due to their higher oil content, the brittle top layer is not able to move along and cracks.
It's also a good idea to paint thick layers over thin layers. Thick layers by default should contain more oil than thin layers. You can glaze thin layers over thick layers, but the thin layer must contain a higher level of oil. Gamblin Oil Colors has a great tutorial on their website about oil paint structure.
Basically, if you use a layered approach to painting, keep your initial layers thin by using a medium that is not oil or petroleum-based (such as a citrus-based solvent), or just apply the paint thinly right out of the tube. Then increase the amount of oil as you proceed. Use the oiling out technique if ghosting appears.
Ventilation for Oil Painting
In theory, if you are not using any solvents or toxic chemicals, you shouldn't need to concern yourself with ventilation. However, it is always a good idea to have some kind of ventilation in your studio, and it is a must if you are using solvents that may contain even slightly harmful fumes. It is recommended that your studio air be changed 10 times per hour.
That brings me to an important note about odorless solvents. Keep in mind the term odorless is usually a misnomer. Even if they don't have an odor (many of the cheap ones have a very strong odor), they still release vapors that may be harmful and require adequate ventilation or could be outright unusable for people with health concerns.
Cleaning Your Oil Brushes Without Solvent
Linseed Oil
I personally use linseed oil to clean my brushes while painting. Bear in mind I use another technique for a final cleaning which I'll talk about below. The great thing about linseed oil is I can keep my brush cleaning jar open while painting and have no fumes or odor (except for the mild smell of the oil, which I don't even notice anymore).
This is not the cheapest method, but I usually buy a gallon of Richeson Shiva Linseed Oil for around $70 and this lasts me for several months or more (see my Resource Page on where to buy this). You can also use other oils like walnut oil to clean your brushes, though the cost will generally be higher.
IMPORTANT NOTE: If you use linseed oil, or any other type of oil as a medium or for cleaning your brushes, always dispose of any paper towels or rags that contain oil in a metal garbage can with a metal lid. Rags soaked with linseed or other oils have been known to spontaneously combust. In my 20 years of painting, this has yet to happen, but I'm not taking any chances and nor should you.
Turpenoid Natural
Weber Turpenoid Natural is certified non-toxic and non-flammable, and it's one of the best brush cleaners out there. If your oil painting brush has become stiff due to insufficient cleaning, Turpenoid Natural is one of your best bets for restoration. Just soak the bristles in it overnight and many times your brush will be ready to use the next day.
I previously used this as my daily brush cleaner but have since stopped. A garbage can full of paper towels soaked with this stuff can emit a strong odor that some people have a difficult time with. I now only use this to restore stiff brushes.
Turpenoid Natural is really meant more for cleaning brushes and not for thinning oil paint as a medium. Obviously, if you are using it to clean your brushes small amounts will make it into your painting, but this shouldn't pose any issues.
Marvelous Marianne's Savvy Soap
I love this stuff, especially for painting trips. This is more for final brush cleaning than it is for cleaning between paint strokes. It's also great for restoring brushes. It's non-toxic, bio-based, and you can even use it to clean your hands.
When I'm painting in the field and need to give my brushes a final cleaning for the day, I'll just squirt some Savvy Soap into my palette, rub the bristles in it, and wipe them with a paper towel. I repeat until they are clean. It's very convenient.
Murphy's Oil Soap
Some purists may cringe at this but I have had no issues giving my brushes a final cleaning with Murphy's Oil Soap. It's economic and works well. I just clean my glass palette, pour some on, and stir the brush bristles around in it, then wipe them clean, repeating as necessary.
Bear in mind Murphy's Oil Soap can cause irritation for some people. I only use it about once or twice a week to clean brushes I'm done using for the time being. It hasn't caused my family or me any issues, but you will probably want to test a small bottle first.
Other Options for Solvent-Free Oil Painting
Starting Your Oil Painting with Acrylic
Since it's usually the initial layers that require thinning with a medium, some artists will lay down their first layers with acrylic paint. Bear in mind this will not work on oil-primed surfaces since you cannot paint acrylic over oil, only the reverse. But if you still want to have the soft, blending capabilities of oil without the issues or ghosting or thinning with solvents, you may want to try this option
Keep in mind that if you want to use the above method, you must buy a separate set of brushes and even a separate palette and palette knives. Once you dip your brushes into oil paint, they cannot be effectively used for water-based paints like acrylic. Oil and water do not mix. Or do they...?
Water-Based Oil Paint
A somewhat newer solution that has been utilized by many is water-based oil paint. Despite what you may think, these are real oil paints and they work both with water and oil. They dry more quickly than traditional oil paint. Since they work with traditional oil paint you could thin them with water and use them for your initial layers. Then you can paint over them with traditional oils or use them exclusively.
I don't have much personal experience with water-based oil paints. I know they can become sticky if you don't use enough water to thin them. They can also freeze, which is only an issue if you plein air paint in cold temperatures. Some brands can be stiff but you will also have this same problem with cheaper traditional oil paint.
My Painting Method and Studio Practice
I don't yet have any issues with solvents, but I have immediate family members who do. My studio is not entirely solvent-free, but I'll share my process.
I use traditional oils for my entire painting process; my brush cleaning process is described above.
When starting an oil painting I will usually thin my paint with Gamsol Odorless Mineral Spirits. I have this in a small jar that I keep covered when I'm not using it since it does emit harmful vapors. I will also turn on the exhaust fan I had installed in my studio. Prior to that, I would open a window and even use a window fan.
Most all of my subsequent painting is done without thinning the paint, but using it straight out of the tube. Bear in mind that good quality paint helps. Buying cheap, stiff paint will force you to have to thin it, which usually results in soupy, unusable paint. See my Resource Page for what brands and colors I use.
At times I will use a medium to rework a dried painting or to glaze it. If I don't mind keeping the paint thin, I'll use Galkyd, which does contain mildly harmful vapors. If my family members are in the studio, I will use walnut oil or safflower oil. If I want the paint to retain some body and thickness, I'll use Gamblin's Solvent-Free Gel, a great alternative!
This is by no means an exhaustive list of everything that is available. There are always new options coming onto the market place, some better than others. Hopefully, this will convince you that you don't need to dump oil painting for health reasons and get you on the path to a viable solution.
Keep painting!
Jason Tako is a nationally known fine artist who specializes in western, wildlife, plein air, and Historical Native American subject matter. He spent his learning years sketching the wetlands and wooded areas of rural Minnesota. He has been featured in Plein Air Magazine and Western Art Collector Magazine and he was the Featured Artist for the 2020 Southeastern Wildlife Expo. See his work at www.JasonTako.com and his demonstrations on his YouTube Channel.
Can you use charcoal and graphite together? This is a question some artists may ask, especially if they want to combine the rich darks of charcoal with the precision of pencil. We will discuss if you can use charcoal and pencil together and how to do it.
You can use pencil and charcoal together but there are things you want to be mindful of. Charcoal applied over pencil works much better than the reverse. Also, charcoal works better over hard H-grade pencils than it does over soft B-grade pencils. White charcoal does not work well over graphite.
Below we will go into detail over combining charcoal and pencil and also show examples from experiments I did with different combinations over two types of paper.
Types of Paper and Pencils Used
Vine charcoal is the purest form of charcoal. Vine charcoal is basically sticks or small branches that have been charred in really hot temperatures. I've bought charcoal from stores that still have remnants of knots on them. If you are interested in the process, check out this YouTube video on making charcoal.
I used two types of paper for all of these experiments, Strathmore 400 Series Medium Drawing Paper, and Strathmore 300 Series Charcoal Paper. From here on out I'll refer to them as 400 and 300 Series paper. The 400 is a fairly smooth paper with a natural tone. The 300 is a little whiter and has some tooth since it's made for charcoal.
I honestly don't know which brand of vine charcoal I used since I have about 4 different brands in my studio that are out of the box. If it's any consolation, the only difference I've noticed between vine charcoal is how hard or soft they are.
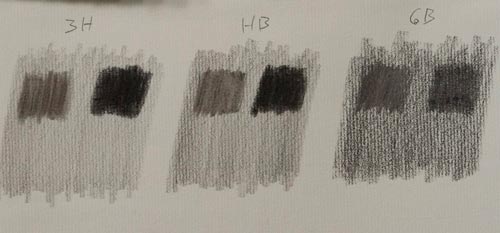
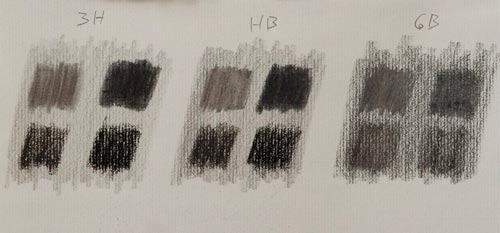
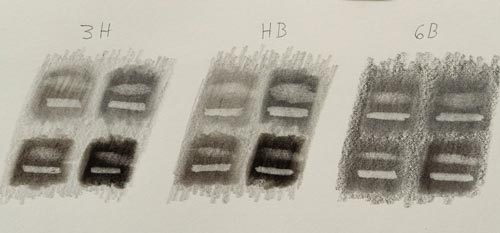
In this first photo below, I have applied three swatches of pencil on each paper. From left to right in each photo (unless otherwise indicated) The first swatch is a Derwent 3H, the second is a Koh-I-Noor HB, and the third is a Derwent 6B. I applied the graphic using the side of the pencil in a fairly light manner so as not to burnish the graphite.
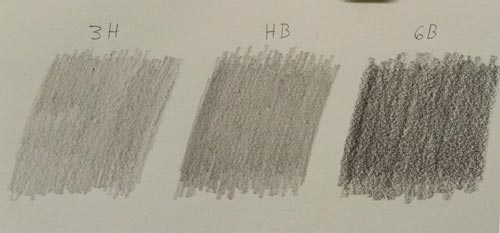
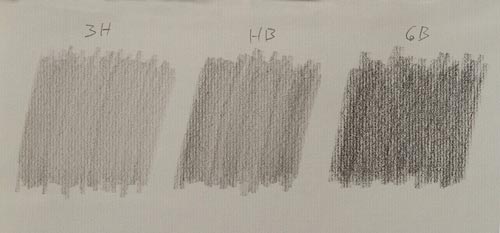
Hard Vine Charcoal Over Graphite
I began by applying hard vine charcoal to each of the swatches in the upper left corner of the swatch. The charcoal had a slightly abrasive feel going on and even caused a few scratchy strokes, but this is to be expected with hard charcoal if you are not careful.
You can see below that overall it applied well to both papers. As to be expected, it appeared darkest over the 3H swatch, partly due to contrast, but also because the 3H seemed to accept it better.
See the types of pencils, charcoal, and paper I use on the Drawing and Sketching Resources Page.
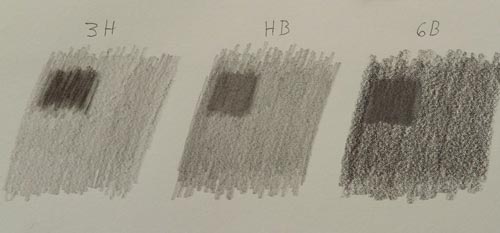
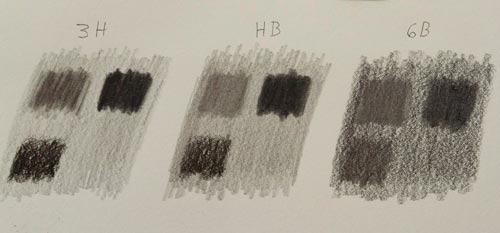
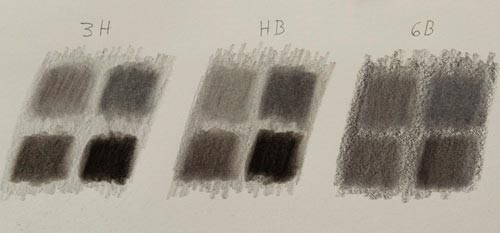
Soft Vine Charcoal Over Graphite
Next, I applied soft vine charcoal over the same graphite swatches in the upper right corner. It applied very nicely over the 3H as well as the HB.
While I was able to apply it over the 6B, it didn't do nearly as well. The soft graphite seemed to actually reject the charcoal. Since I was drawing upright, I saw charcoal falling down from the swatch as I applied it. You'll also note that on the 6B swatch I was unable to achieve that nice dark tone that charcoal is known for.
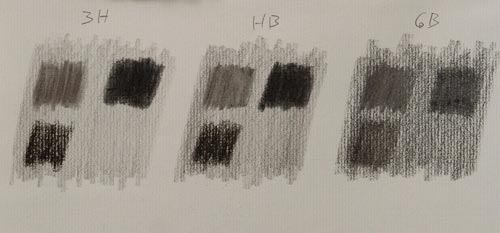
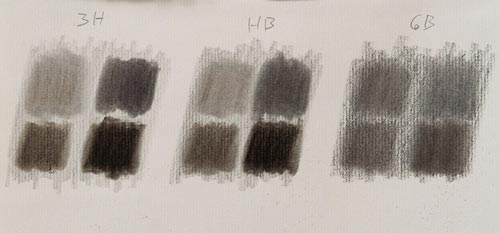
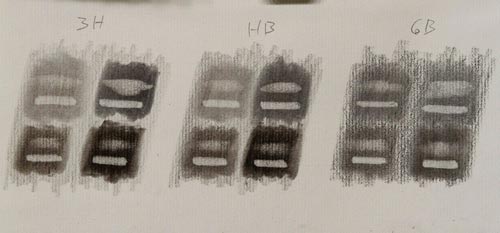
Hard Compressed Charcoal Over Graphite
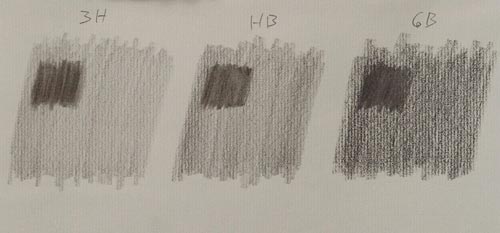
The next step was to try compressed charcoal over the same swatches. I started with a Mont Marte Woodless Charcoal Pencil, Hard Grade. Don't be thrown off by the term woodless, this just means that the charcoal is encased in plastic rather than wood which results in a larger amount of exposed charcoal for drawing.
The compressed hard charcoal went well over the 3H, but it did not do as well over the HB and 6B. It did cover somewhat, but not nearly as much as the over the 3H. Refer to the lower-left corner of each swatch to see how the hard compressed charcoal did over pencil.
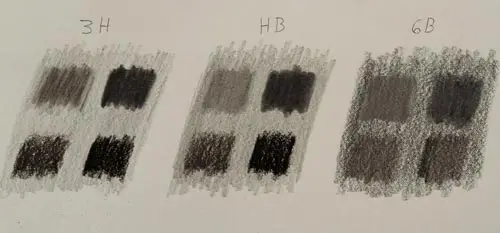
Soft Compressed Charcoal Over Graphite
This time I applied a Mont Marte Woodless Charcoal Pencil Soft Grade, over the lower-right corner of each swatch. It worked beautifully over the 3H and the HB, but once again the 6B resisted acceptance of the charcoal which resulted in a subtle darkening at best.
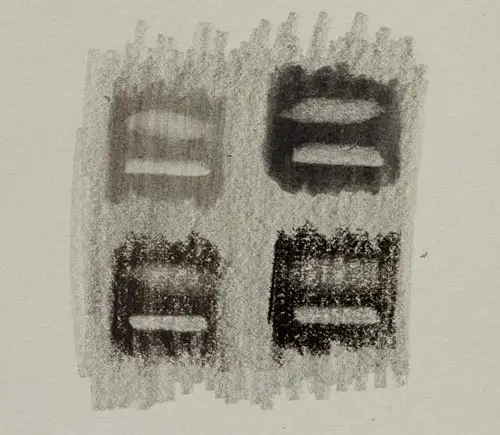
Blending Charcoal Over Pencil
Using a standard blending stump, I wanted to see the effects of blending the charcoal I had just applied over the pencil. You may think that the only result would be a softening of the charcoal and pencil, and while that is basically what happened for most of the combinations, there are a few things that you should be aware of.
The first is that I was not able to blend away the scratchy strokes I had made with the hard vine charcoal over 3H graphite. I'm not too surprised because while hard-grade pencil and charcoal can be easy to erase if applied lightly, it can be almost impossible to erase them if applied with a heavy hand.
When I got down to blending the compressed charcoal (two lower swatches) something very interesting happened: blending the combination of compressed charcoal over graphite had a slight warming effect; it almost took on a slightly brownish tone, especially near the edges of where it was blended. It may not be as noticeable in the photos but believe me, this happened for both the hard and soft compressed charcoal.
This browning effect could be an issue. If you blend a small section of your drawing and this occurs, it could read as a mistake or a stain, given that charcoal on white paper tends to have a cool temperature. Depending on your technique and subject matter, you could also make this work for you in some way. But just be aware that blending compressed charcoal with graphite can have a warming effect.
You will also note that when I blended the soft compressed charcoal (lower right swatch), it darkened very nicely over the 3H and HB, but ended up being much lighter over the 6B.
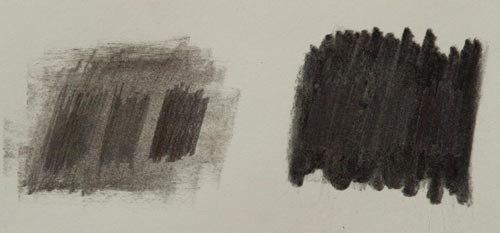
Erasing Charcoal Over Graphite
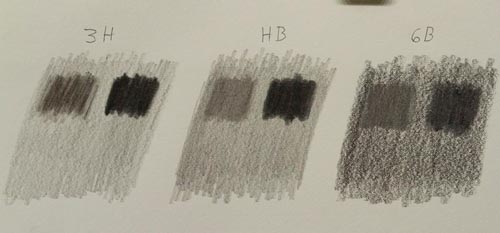
Using a kneaded eraser and an electric eraser I attempted to erase a small part of the swatches I had made. The kneaded did not have that much effect. The electric eraser is one of the most aggressive erasers I have used and it did remove more charcoal and graphite, though not all. In the photos below I used the kneaded eraser on the top part of each swatch and the electric eraser on the bottom.
Since the above swatches had been blended, which can grind the graphite and charcoal into the paper, I made another swatch of charcoal over graphite which I didn't blend. The results were only slightly better as you can see below.
Pencil Over Charcoal
Just for kicks, I decided to try pencil/graphite over vine charcoal. I didn't think this would work too well and for the most part, I was correct. It actually worked OK using pencil over hard charcoal, but when used over soft charcoal, it basically made no impact at all except to burnish the pencil and cause that annoying glare. Once again, you may find a way to use this to your advantage.
White Charcoal Over Graphite
My final experiment was to try compressed white charcoal over graphite. As I suspected, it didn't work very well. You could barely make out the charcoal on 3H and HB graphite. The only effect it had on 6B graphite was to spread the graphite in different directions. The 6B graphite didn't accept the white charcoal at all, but my charcoal stick did pick up plenty of graphite.

Final Thoughts About Using Charcoal over Graphite
So the takeaways are that if you are going to use charcoal over pencil, you will get better results if you use an H-grade pencil. Not only does H-grade graphite accept charcoal better, but it also allows the charcoal to retain a darker value than does soft graphite.
You also want to make sure that you have your pencil drawing exactly how you want it, or at least very close before you apply charcoal. Once the charcoal is applied, erasing will be more difficult.
As for applying white charcoal over pencil, forget about it. You will only mess up your white charcoal stick or pencil. But once again, you may find a use for this that I'm not aware of.
Of course there are many other brands and combinations that were not covered in this article. Don't even be afraid to experiment, just don't do it on that nice masterpiece you have been working on. My hope is that this will give you some information to work with.
Please leave your thoughts or experiences below.
Keep Drawing!
Jason Tako is a nationally known fine artist who specializes in western, wildlife, plein air, and Historical Native American subject matter. He spent his learning years sketching the wetlands and wooded areas of rural Minnesota. He has been featured in Plein Air Magazine and Western Art Collector Magazine and he was the Featured Artist for the 2020 Southeastern Wildlife Expo. See his work at www.JasonTako.com and his demonstrations on his YouTube Channel.
If you are just starting oil painting the numerous options can be quite intimidating, and you may wonder how much it will cost. Let's discuss at some oil painting start-up costs and what you actually need to get started oil painting.
The cost to start oil painting can vary depending on the number of colors you buy, the quality of your supplies, and who the vendor is. An average minimum cost to start can be approximately $170. This cost reflects buying only the 3 primaries and white, along with minimal painting accessories.
Let's now discuss the variables involved and what materials you actually need to start oil painting. You can see a list of most of these materials and links on where to obtain them on the Resources Page.
What Oil Colors You Need to Start Oil Painting
Many beginning artists make the mistake of thinking they need a lot of colors in order to do an oil painting. I even know one artist who went to an art store and bought every single pigment available when he started. The truth is you only need a few colors to do a good painting.
At one point, I restricted myself to just the three primaries and white and painted that way for a couple of years. I was able to get almost any color or value that I needed, including black.
The real advantage of having a greater number of pigments is mostly convenience and obtaining rare intensities that one can usually get by without. While you may not be comfortable painting with just three colors and white, it's a great way to learn how to mix color.
Below are a couple of tables where I show the minimum palette needed and my typical expanded palette. I used current pricing (May of 2020) for Utrecht brand oil colors.
Minimum Primary Palette
| Titanium White 120 ML (you will use a lot of white) | $18.44 |
| Cadmium Yellow Light 40 ML | $17.03 |
| Cadmium Red (Medium) 40 ML | $19.50 |
| Ultramarine Blue 40 ML | $7.42 |
Expanded Palette
| Cadmium Orange 40 ML | $17.03 |
| Yellow Ochre 40 ML | $7.82 |
| Burnt Sienna 40 ML | $7.42 |
| Alizarin Crimson (or Alizarin Permanent) 40 ML | $17.03 |
| Cerulean Blue Hue 40 ML | $8.36 |
| Veridian 40 ML | $17.03 |
| Permanent Green (Light or Yellow) | $8.36 |
There are cheaper brands out there, such as Windsor Newton's Winton, Chroma Archival, and Charvin. But my experience with these colors is they are either too stiff, too soft, or just bad consistency. I use Utrecht colors to this day, as do many professional artists. They don't cost much more than lower-grade paints and their quality is superior. Cheap paints usually result in a bad painting experience.
Also, there are way more colors/pigments than what I have listed. This is the main palette I have settled on after over 15 years of painting. Don't be afraid to experiment once you've gotten more comfortable. Just know this, there is no magic color that will solve all your problems. At the end of the day, it's how well you mix the colors you have, not how many colors you have.
What Brushes You Need to Start Oil Painting
This is another area where going cheap it not worth it. You would be way better off buying just a few good quality brushes than buying a bunch of low-grade brushes. Cheap brushes will lose hair faster than my scalp. You will end up with hair in your paint, on your canvas and if the brush is cheap enough, it may not last even one day of average painting. Bad brushes alone may discourage you from painting.
There are a lot of brushes on the market, some good, some horrible. While you usually get what you pay for there good brushes available at a reasonable cost. A great brand is Silver Brush Grand Prix.
For oil painting, I use mostly flat bristle brushes and I can do almost an entire painting with just three different sizes. Below I have a list of brushes that can get you started (prices may vary). While you can get away with just one of each, I recommend two of each. You can use one for dark paint and another for clean, colorful paint.
| Silver Brush Grand Prix Flat Bristle #2 | $5.72 |
| Silver Brush Grand Prix Flat Bristle #4 | $6.44 |
| Silver Brush Grand Prix Flat Bristle #6 | $8.30 |
| Silver Brush Grand Prix Round Bristle #1 | $5.19 |
Once you have a few paintings under your belt, you will want to experiment as there are other types of brushes such as brights, rounds, and filberts, along with different types of hair like synthetics and sables, and different sizes.
Palette Knives for Starters
Palette knives are a great way to mix paint, transfer it, or remove it from a surface. There are metal palette ones and plastic ones with different shapes and sizes. Of course, the metal ones are usually higher quality and more expensive, but for starting out you can buy a set of plastic ones for just around $10. See Resources Page.
Mediums for Cleaning and Thinning
You will need something to clean your brushes while painting, especially if you are using the same brush and going from a dark color to a light color. You will also need something if you want to thin the consistency of your paint.
Odorless mineral spirits can do both. You can get cheap mineral spirits from the hardware store for probably around $10-$12. I use this type of mineral spirits but only when painting outside. This type is not really odorless, even though it says that. In fact, it can have a very strong odor. If you want to get true odorless mineral spirits then Gamsol by Gamblin for around $15 for a 33.8 oz bottle is the way to go. See Resources Page.
If you have an issue with using solvents such as mineral spirits, you can clean your brushes with linseed oil. This is actually how I clean my brushes while painting (I use Murphy Oil Soap to clean them when I'm done painting). A word of caution: linseed oil can spontaneously combust when it's soaked in rags or paper towels. Use a metal garbage can and lid to dispose of. After 10 years I've never had this happen, but I'm not taking any chances.
Canvas for Beginning Oil Painting
There are a number of different canvases on the market. Some are universal-primed, which means they can accept oil or acrylic, and there is oil-primed which can only accept oil paint. There is also cotton duct and linen, not to mention the different grades of roughness or smoothness. Rougher textures tend to be used for landscapes, while smoother textures for portraits.
For starting out you don't need to concern yourself with all these variables, though you will want to learn them if you get serious. An economical way to start is to buy some canvas sheets that come in a pad. It's an actual canvas that you can tear out of a pad like a sheet of paper. You can tape this sheet of canvas onto a piece of plywood, hardboard, or even thick cardboard. Fredrix canvas pads are around $7 for 10 9x12 inch sheets.
I would recommend starting small, 8x10 going up to 12x16 inches until you get more comfortable. See Resources Page.
Good Starter Easel
An easel is not completely necessary. As long as you can find a place to set up your canvas and keep it fairly steady, you are good. Some people will even lay their canvas flat on a table and paint. But if you want to have an easel, you can pick up a compact table-top easel for under $20. This can get you by until you are ready to purchase a big easel. See Resources Page.
Palettes for Starting Oil Painting
There are palettes that you can hold, and there are palettes you don't hold. My preference is to have a palette I don't hold so that both hands are free. My current palette is an old office desk with a piece of glass cut to fit on top. A glass palette is nice for oil painting as it can be easily cleaned with denatured alcohol.
But for starters, you can pick up some paper palettes for less than $10. These are sheets of paper that you tear off and squeeze your paint right onto. While they may only last for a day or so, they can get you by on the cheap until you are ready to move up.
Other Items You Will Need
I didn't include these items in the total price because you probably already have these laying around the house. These include:
- Paper Towels for cleaning your brushes, palette knives and surfaces.
- A plastic or glass jar with a cover for putting your mineral spirits or linseed into to clean your brushes.
- A place to paint with good lighting. Cool lights work best. You can also paint in front of a north-facing window that doesn't ever get direct sunlight (in the Northern Hemisphere).
- A place to store your wet paintings until they dry.
- For storing leftover oil paint, see my article: A Quick and Easy Way to Store Your Oil Paint.
Artists tend to be very creative, and there are many variables and other possible solutions to the ones I mentioned above. My hope is that this list will get you started and help you eventually find your own way and methods. I would love to hear your ideas below or any questions you may have.
Keep Painting!
Jason Tako is a nationally known fine artist who specializes in western, wildlife, plein air, and Historical Native American subject matter. He spent his learning years sketching the wetlands and wooded areas of rural Minnesota. He has been featured in Plein Air Magazine and Western Art Collector Magazine and he was the Featured Artist for the 2020 Southeastern Wildlife Expo. See his work at www.JasonTako.com and his demonstrations on his YouTube Channel.
After over two decades of sketching and filling piles of sketchbooks, I've dealt with many smudged drawings. So how do you keep drawings in your sketchbook from smudging and smearing?
The most effective way to prevent smudges is to spray your drawings with a fixative spray once they are completed. Other methods include hairspray, using a hardbound sketchbook, drawing with H-grade pencils or ink, placing wax paper between each page, and placing rubber bands around your sketchbook.
Each of these methods has it's pros and cons. So let's discuss each one of these in detail.
Prevent Sketchbook Smudging with Fixative Spray
In my opinion, this is probably the best way to solve the problem. Spraying the drawing will reduce smudges significantly. It's one of the quickest of all the methods listed. You can draw with any medium you like, and keep all your sketches in your sketchbook.
There are many fixative sprays on the market. Some allow you to rework the drawing to a certain degree, but once you apply fixative, erasing is pretty much out of the picture (no pun intended). There are others that are meant to be a final protective coating, and there are fixatives that are specific to certain mediums (such as pastel).
If you do a lot of sketching in the field as I do, then this is not always a viable solution. Hiking into the woods with an 11oz can of spray is not very practical. One solution is to bring along a can of fixative and keep it in your car, then spray your drawing when you return. Just be careful about keeping an aerosol can in your car during hot weather. Read the label for warnings.

Preserving Drawings with Hairspray
First of all I must admit that I have never done this, but from what I've read it actually works. It can also be a very cost-effective method as you can pick up a can of Aqua Net for around $3 bucks. The cheapest fixative spray will could you almost double. And if you grew up in the '80s as I did, the Aqua Net may carry a bit of nostalgia.
However, if you really like your sketches and want to keep them around for many years, then I would avoid using hairspray. Word is that it can yellow your drawings over time. After all, they didn't make that stuff to preserve mullets for decades (though some people have preserved their mullets for decades). And some hairsprays may contain chemicals that would do who knows what to your drawings.
But if you are just starting out, on a budget, and don't care about your drawings over the long haul, hairspray may be the way to go. It may also help you finally get rid of that can of Aqua Net that has been lingering in the back of your bathroom cabinet since 1986.
See the types of pencils, charcoal, and paper I use on the Drawing and Sketching Resources Page.
Using a Hardbound Sketchbook
There are basically two types of sketchbooks or pads on the market, spiral-bound and hardbound. There is more freedom of movement between the pages with a spiral-bound sketchpad and therefore more smudging. You should only use a spiral-bound pad if you intend to remove the sketch or drawing as soon as it's completed.
A hardbound sketchbook allows less freedom of movement between the pages, so there is less chance of smudging. Please note that I said less chance, not no chance. Sketches in hardbound sketchbooks can smudge also, especially if you are hard on your books and you loosen or break the binding.
Hardbound sketchbooks also don't seem to have the variety of paper types that spiral-bound sketchpads offer. But if you want to keep all your sketches in a journal-type form, hardbound is the way to go.
Drawing with H-Grady Pencils
Using H-grade pencils (hard pencils with more clay content) can help reduce smudges. I go into more detail on different pencil grades in my article The Lightest and Darkest Drawing Pencils-And How to Use Them.
While they can still smudge, H-grade pencils smudge a lot less than B-grade pencils and are a night and day difference from charcoal or other very soft mediums. They provide a nice thin line and a long-lasting fine point which doesn't require constant sharpening.
Of course, you will be much more limited in your value range, especially if sketching subjects that have a greater tonal range. But if you want to jot down some basic lines and ideas and not have to worry about making an immediate mess, H-grade may be the way to go.
Using Ink to Prevent Smudges
For preventing smudges while still getting fine lines, ink is a step up from H-grade pencils. Once it dries, especially when using permanent ink, it will not smudge in the least. There is no need for fixative sprays, and you can use pads or hardbound sketchbooks. There is also no sharpening required to maintain a fine point. Markers are another alternative, though they can bleed through some papers.
Of course, the obvious challenge is that you cannot erase ink. But this may not be a drawback, depending on how you look at it. I actually spent a year sketching strictly with a ballpoint pen. I wanted to challenge myself with not being able to erase, which forced me to carefully observe my subject matter before ever putting pen to paper.
On a side note, ballpoint pen is the sketching medium of choice for master wildlife artist Robert Bateman, and many old sketchbooks from the 19th century and prior were done in ink.
Prevent Smudging with Wax Paper
This is another one I admit I have never really tried, but some people swear by it. The idea is to cut sheets of wax paper the same size as your sketchbook pages, attach the paper to one side of the page with tape (you can wrap the tape around the backside of the page) and the paper will prevent smudging.
This may work well for an indoor-only sketchbook, but having a bunch of extra sheets of wax paper flopping around when I'm outside sketching doesn't seem to practical. I also wouldn't want to spend all that time cutting wax paper. However this is my personal preference. This method may work wonderfully for other people who are not as hectic or mobile as I am.
Securing Your Sketchbook with Rubber Bands
To prevent your sketchbook from slightly rubbing back and forth, you can purchase some large rubber bands and place them around your sketchbook to keep the pages more tightly bound together. Rubber bands are very portable and you can carry along some extras just in case you lose one.
Some sketchbooks come with a type of rubber band or binding that goes vertically around the sketchbook to keep it closed and firmly bound together. If your sketchbook sees a lot of action as mine have, this may not completely prevent smudges, especially if you use a soft medium such as charcoal, but it certainly can help.
Other Ideas for Preventing Smudging
Removing Your Drawing and/or Framing It
This one is fairly obvious but it's worth mentioning. If you have a sketch you really like, remove it from your sketchbook and set it aside or frame it. I would still spray it with fixative since it could still get smudged even outside of a sketchbook.
Sketch Only On One Side of Each Sheet
I've tried sketching on both sides of each sheet of paper in an effort to prevent waste. While this works fine for ink, it can be a disaster if using pencil, especially if your sketches have a lot of tone.
Your Technique
If your sketches have a lot of shading and tone, they are a lot more prone to smudges than if you just use lines with a harder pencil. Many of my line-only sketches barely smudge at all, even when using a spiral-bound sketchpad.
Don't Smudge Your Drawings While Drawing
I was actually surprised to see this one in my research since I consider proper drawing technique to be distinct from preserving a completed sketch or drawing. But it bears mentioning that you should pay attention to your hand placement and direction of movement when drawing. Essentially, if you are right-handed, work left to right as much as possible and vice-versa.
Handle Your Sketchbook with Care
Another seemingly obvious one, but worth mentioning. If you have just completed a nice sketch with a soft medium, don't put your sketchbook into a backpack or somewhere else where it can be jostled around, at least until you can either remove that sketch or spray it with a fixative.
Combining Several Methods
In my experience, combing several methods, or altering your methods depending on the situation works best.
For example, if you are sketching strictly in the studio and your sketchbook or pad will go no further than the confines of your house, you are probably safe using most any medium and applying a fixative or inserting wax paper once the sketch is completed. If you are sketching in the field and cannot spray your sketches, you should then consider using a hardbound sketchbook combined with H-grade pencils or a ballpoint pen.
I hope that helps. I would love to hear what your experiences or techniques are for preventing your sketchbook from smudging. Please leave your comments or questions below.
Keep sketching!
Jason Tako is a nationally known fine artist who specializes in western, wildlife, plein air, and Historical Native American subject matter. He spent his learning years sketching the wetlands and wooded areas of rural Minnesota. He has been featured in Plein Air Magazine and Western Art Collector Magazine and he was the Featured Artist for the 2020 Southeastern Wildlife Expo. See his work at www.JasonTako.com and his demonstrations on his YouTube Channel.
Oil paint is expensive. Letting paint dry on your palette is like throwing money away. There are different methods available for how to store used oil paints, but which ones are the best?
The best way for artists to store used oil paints and keep them from drying out is to place them on a glass plate with a cover and place it in the freezer at around zero degrees. Depending on the pigment, some colors will last for days or even weeks using this method.
Below I go into detail on my process for storing both open oil paint and paint still in the tube.
Storing Oil Paint on a Glass Plate
When I first started using this method, I used a glass plate that was placed in the freezer with the paints out in the open. The plate provided a nice flat surface that could store a decent amount of paint. This worked fine for several years, but there was always the risk of someone reaching into the freezer and sticking their hand or some food into the paint.
I eventually replaced the open plate with a glass pie plate that came with a plastic cover. Now I don't have to worry about food or hands in my paint. You can even stick paint on the angled sides of the plate as long as the paint isn't too soft. I do want to emphasize that using a glass plate or some other non-absorbant surface works best.
When I begin my day, I'll just take the pie plate out of the freezer, remove the paint from the plate with a flexible palette knife, and place it on my palette. I then pour a little denatured alcohol into the plate and wipe out the paint remnants with a paper towel.
Concern About Wasting Paint
Sometimes I can't get every bit of paint out of the plate, and you do lose some paint when wiping excess paint off the palette knife between each transfer, but this is minimal. I've seen videos of artists spending a half-hour scraping piles and piles of dried paint off their palette. So the little bit you lose from transferring your paint back and forth every day is very minimal in comparison.
How Long Does Oil Paint Keep in the Freezer?
That depends on the pigment and brand. I would give an average of about a week. Some colors dry faster than others. The first colors that usually dry on me are Cadmium Red, Cadmium Orange, and Cerulean Blue Hue. Some colors like Ultramarine Blue seem to last forever when frozen. But even the faster drying colors seem to stay fresh for up to a week, especially if they are left in the freezer that entire time.
We have our freezer set around zero degrees, which seems to work well. I also have a dedicated place in our freezer to do this. If this is not possible for you, consider investing in a small freezer, which you can buy for under $150. It may seem like a lot to invest, but when you consider how much oil paint can cost, and how much paint you will waste over the years by leaving your paint out, it will easily pay for itself.
Other Methods for Storing Oil Paint
Of course freezing your paint on a glass plate is not the only method for storing used oil paints. I've seen and tried a number of other options which I'll describe below.
Plastic Wrap
Some artists will use a plastic cling wrap and just place it over their palette. While this may be better than just leaving them out in the open air, I always found this method to be a bit messy. The plastic wrap can sag into the piles of paint unless it's stretched really tight over a palette that has a walled side. Either way, it doesn't seem to keep the paint as fresh as freezing, but it is a viable alternative.
Placing Cups Over the Paint
A number of years ago I invested in these little plastic caps that had a soft rubber rim which you could place over your piles of oil paint. I can no longer find them on the internet, so they may no longer be on the market. The idea sounded good, but in practicality, they didn't seem to keep the colors fresh for very long, and I always ended up with paint on the edges of those little cups.
Wrapping Your Oil Paint
Another method I've seen is taking your oil paint and placing it in little sheets of aluminum foil, then folding up the foil with an "airtight seal." The problem with this method is that I doubt it's possible to get an actual airtight seal by merely folding aluminum.
I had no problem getting the paint into the foil, but a big problem getting it off after it had been wrapped up. The foil would get all kinds of bumps and dents which made it difficult to get remove the paint. But the even bigger problem is that the foil tore very easily. I concede I was using a metal palette knife, but I imagine a plastic knife may also cause tearing given the fragile nature of aluminum foil.
Adding Oil to Your Oil Paint
This is another one I've tried and while it does help, it has its drawbacks which lead me to abandon it. First of all, adding more oil to your paint will change its viscosity. This may not be all that bad if you like thinner and more oily paint, but it's an issue for artists who like their paint to have more body. Also, it just didn't seem to work as well as freezing.
Storing Paint in Empty Tubes
This method would be good for storing larger amounts of paint, its just something I've never had a use for. But for those who are interested, you just buy some empty aluminum tubes at someplace like Dick Blick; they come with caps but are open at the back end. Using your palette knife, you place the paint into the open end of the tube then fold and pinch the opening together with pliers.
If I had a certain color that I usually mixed and used on a regular basis, making a big batch and putting it into an empty tube would be a great solution.
See the brands and colors that are on my palette by going to the Oil Paint Resources Page.
Storing Tubes of Oil Paint
Even if you have never opened your new tube of oil paint you can still have issues with storage. The oil and pigment can separate, and the oil will usually go against gravity. This means that if you store your tubes of paint with the cap-end up you will get mostly oil and no pigment when you squeeze out the contents. When you finally do get to the pigment, it will be cakey and even dry because there is no oil left in the tube.
The best way to store tubes of oil paint opened or unopened, is to store them upside down, with the cap facing downward. I do this by attaching a binder clip to the bottom side of the tube (opposite of the cap-end), and hang the clip onto a screw that I have drilled into a large piece of plywood which hangs on the side of my palette desk.

While there are a number of ways to do it, just make sure you store your oil tubes upside down. Even when you store them on their side you can still get the same issue since the flatter bottom of the tube still causes the bottom end to be lower than the top.
While the oil and pigment still separate no matter how you store your tubes, having the oil at the back end of the tube ensures that there is still oil in the tube and will prevent the pigment from completely drying out.
I know there are other methods for storing oil paint, but freezing and upside-down storage has always worked best for me. You may even want to combine some of the methods described above with freezing. Please see free to share your ideas and what has worked for you below.
Keep Sketching!
Jason Tako is a nationally known fine artist who specializes in western, wildlife, plein air, and Historical Native American subject matter. He spent his learning years sketching the wetlands and wooded areas of rural Minnesota. He has been featured in Plein Air Magazine and Western Art Collector Magazine and he was the Featured Artist for the 2020 Southeastern Wildlife Expo. See his work at www.JasonTako.com and his demonstrations on his YouTube Channel.
Many artists and painters like to sketch their ideas onto canvas prior to painting. But what medium should you use for sketching on canvas? We will talk about some different options below.
To retain a detailed sketch throughout the painting process use an H-grade pencil and seal it with a fixative spray. Use charcoal if retaining the drawing is not necessary. Other mediums can be utilized such as markers, pastel, ink, colored pencils, transfer paper, and even paint.
This only scratches the surface of what can be used for sketching on canvas. Below we go into more detail on some of the different methods available.
Sketching on Canvas with Pencils
Pencils are a very common way to sketch on canvas prior to painting. They can be used for oils, acrylics, or most any other medium. The great thing about pencils is you can do a fairly detailed drawing right on the canvas. This works great for paintings that contain any kind of precise anatomy, perspective, or if it's a complex composition. The thin lines and detail achieved will make sure you don't miss anything important, such as a button on a shirt.
The potential drawbacks (no pun intended) is that having a lot of tight, thin outlines can cause you to be more restrictive with your paint application. This can sometimes result in a paint-by-number look since your main objective is to fill in all those little shapes with color. This can be overcome by loosely sketching your idea on the canvas rather than creating perfect outlines.
When using a pencil to sketch on canvas, it's generally best to use an H-grade pencil, preferably a 3H or 4H since these have less of a tendency to smudge. To keep the drawing from smudging, you can apply a fixative spray or acrylic matte medium with a soft brush over the canvas and let it dry before you begin to paint. Be aware of the fact that if you use a more transparent painting method, pencil lines may show through the paint.
See the types of painting and drawing materials I use on the Resources Page.
Erasing Pencil on Canvas
If you are using an H-grade pencil, a kneaded eraser will erase most of the graphite, depending on how heavy the texture of your canvas is. If you are erasing graphite or charcoal on an oil-primed canvas, I recommend you dedicate an eraser for that task alone. There are other erasers that can work, but you must be careful since using them with a heavy hand could remove some of the primer on the canvas.
Sketching on Canvas with Charcoal
Another time-honored method us using charcoal to draw out your ideas on canvas prior to painting. If your objective is to only give rough indications of placement, proportions, and anatomy, and then let the paint do the talking, then this is the way to go.
The broad lines and temporary character of charcoal will not only help free you from a paint-by-number mentality, but it will also force you to rely more on your ability to draw with paint rather than just fill in shapes. This is a great approach for those who want to loosen up in their work.
Of course, the obvious drawback (pun intended this time) with charcoal is that it's messy. If you have a tendency to rest your hand on the canvas when you paint, you may end up with more charcoal on your hand than on the canvas. The charcoal can also blend into your paint, depending on your technique. I have not had many problems with this as I tend to paint somewhat thick, but if you use thin layers it may be an issue.
Different Types of Charcoal and Their Effect on Paint
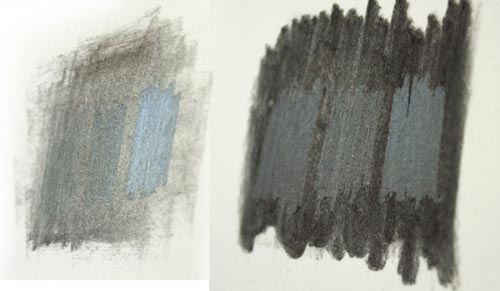
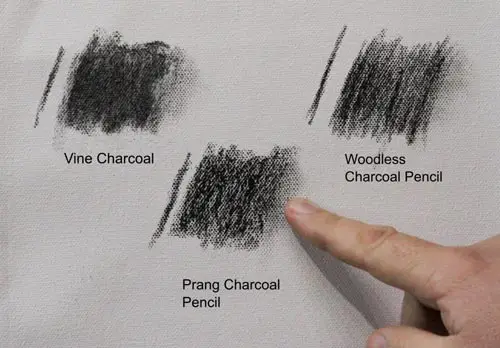
There are different types of charcoal available on the market, but they mainly fall into two categories, vine charcoal, and compressed charcoal. Below is an example of using oil paint over vine charcoal and two different types of compressed charcoal pencil: a Prang charcoal pencil and a Mont Marte wordless charcoal pencil.
The lower right of each swatch was the thinned with mineral spirits, you can see how the effect is essentially the same on all three. I used Cadmium Lemon on the top of the swatch, Burnt Sienna on the right, and Ultramarine Blue on the bottom. I used the paint straight from the tube without thinning it.
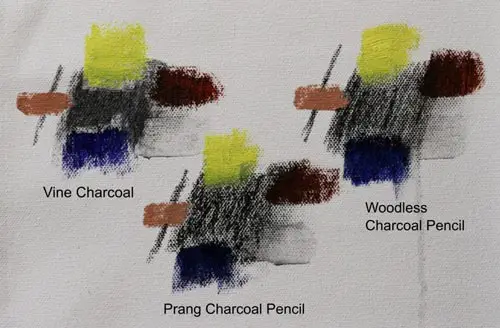
The first thing to note is how the vine charcoal, while not as dark, did a better job of covering the heavy texture of the canvas. You can see that all three did cause some pollution of the color, but as I brought the color away from the charcoal and into pure canvas, it dissipated fairly quickly. The Prang pencil seems to have more effect on the color.

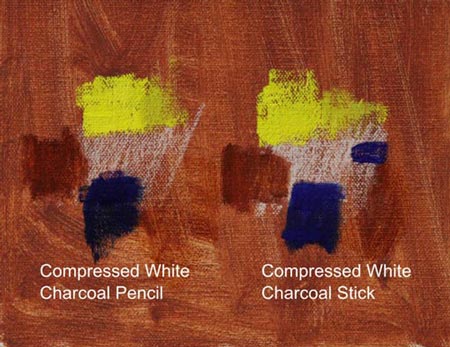
Another option is using compressed white charcoal on a toned canvas. This charcoal tends to hug the canvas more, and since it's white, it doesn't seem to impact the paint as much, even when scrubbing in dark paint. You will need to tone your canvas fairly dark to be able to see the charcoal well. And it's essential to make sure the paint you used to tone your canvas is bone dry before you apply charcoal.
Other Alternatives for Sketching or Drawing on Canvas
Markers on Canvas
Some artists will use markers for their preliminary drawings. There are many different kinds from acrylic to Sharpies and these come in all array of colors. While I admit I've never used this method, the word is acrylic may be a better way to go since oil-based markers such as Sharpies can eventually bleed through the paint.
Pastels on Canvas
Pastels, while not optimal for doing a highly-detailed drawing, can work great if you want a loose approach similar to charcoal, yet with color. You will want to make sure that the pastel you are using is compatible with your medium. For example, you could use oil pastel with oil paint, but never with acrylic paint.

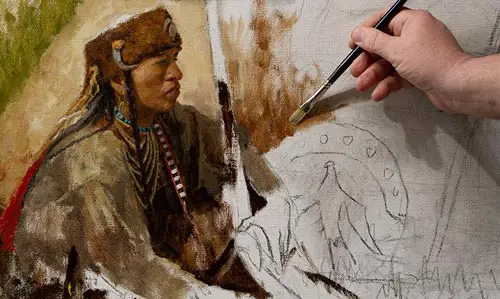
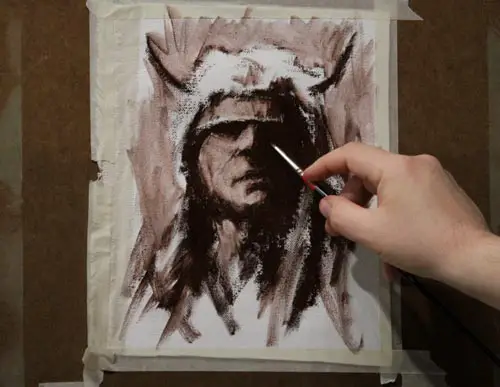
Oil pastels and oil sticks have a tendency to bleed into the subsequent layers of paint, especially if the paint is thinned (see above). This can be used to your advantage. Below I demonstrate blocking in the light and shadows in a portrait and using mineral spirits to spread the oil stick for a nice tonal foundation that can be painted over either wet on wet, or once it's dry.
Ink on Canvas
Ink, such as India Ink is best used on a prepared canvas, with gesso or some other base. But ink has a nasty tendency to slowly bleed through the layers of paint and create a faint reminder of itself years later. To prevent this, seal it in with a couple of coats of clear matte acrylic spray prior to painting. Also, be mindful that ink is not at all forgiving when it comes to making corrections.
Colored Pencils on Canvas
Regular colored pencils have a wax base that can resist some paints. Watercolor pencils can blend nicely into the subsequent layers of paint, though you may want to limit using them with water-based paints only. Lighter colors will have less effect on your subsequent layers. Another nice thing about watercolor pencils is you can completely erase any lines by wiping them away with clean water and a paper towel.
Transfer Paper on Canvas
Whether you make your own or you purchase it, transfer paper such as graphite or carbon transfer paper is a great way to transfer a sketch or drawing onto the canvas. The lines it creates tend to hold out a little better on canvas than pencil or charcoal. And a sheet can be used multiple times.
My preferred method is to make my own type of transfer paper by applying charcoal (white or black) onto the reverse side of the paper that has my drawing. I then lay the charcoal-side of the paper onto the canvas and trace over the drawing. This method of applying charcoal tends to keep it on the canvas a little better than drawing with charcoal straight onto the canvas.
Paint on Canvas
This may seem a bit obvious, but if you are an oil painter using acrylic-primed canvas, you can do your sketch or preliminary drawing in acrylic paint. The advantage of this is acrylic's fast drying time, and the fact that it will not bleed into the oil paint once it's dry. Some artists will draw in pencil, seal the pencil lines by repainting over them with acrylic, then proceed to oil paint.

Should You Sketch Just Lines or Masses of Light and Dark?
You can do either one but bear in mind that if you are using a messier dry medium like charcoal or even pencil, having a bunch of excess graphite will cause more pollution of the paint. If you need to have those value masses, it is usually best to draw in your outlines, then mass in indications of value with thin paint before you get into the serious stuff.
Canvas Texture
Rougher canvas will be more challenging to draw on, especially if you are using a fine-tipped pencil. Erasing can also be difficult. For heavily textured canvas I would recommend a softer medium such as charcoal or a larger pencil, similar to a carpenter's pencil with a wide, blunt tip. Pastels, markers, or thinned paint can also work well with rough canvas. Avoid using sharp, fine tips like technical pencils.
Experiment with Different Techniques
Of course, there are many other techniques and options for sketching on your canvas that cannot be covered in this article. Hopefully, this will be enough to get you started and experimenting with your own techniques. Just remember the one unbreakable rule, oil over water, never the reverse. In other words, don't paint acrylics over oil pastels.
Please leave your comments or questions below and keep sketching!
Jason Tako is a nationally known fine artist who specializes in western, wildlife, plein air, and Historical Native American subject matter. He spent his learning years sketching the wetlands and wooded areas of rural Minnesota. He has been featured in Plein Air Magazine and Western Art Collector Magazine and he was the Featured Artist for the 2020 Southeastern Wildlife Expo. See his work at www.JasonTako.com and his demonstrations on his YouTube Channel.
Using the right drawing pencil can make a big difference in how your sketches or drawings turn out. We will talk about the different grades of drawing pencils and how to best use them.
For graphite drawing pencils on the market, the lightest is 6H, while the darkest available is 8B. The higher the number in each grade, the lighter or darker it is. So a 6H will be lighter and harder than a 2H, and a 8B will be much darker and softer than a 2B. F and HB are middle-grade pencils.
Below we go into further detail on each group and how to best use them.
The Range of Drawing Pencils and What They Look Like
| 6H | 5H | 4H | 3H | 2H | H | F | HB |
| B | 2B | 3B | 4B | 5B | 6B | 7B | 8B |
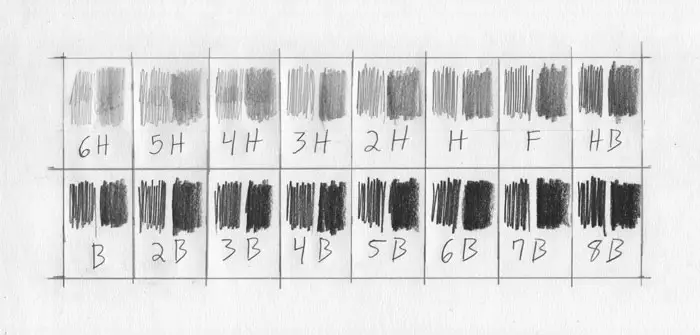
As you can see above, a 6H is a very light pencil and 8B is very dark.
H-Grade Pencils and How To Use Them
H-grade pencils generally have two uses. The first is for lightly sketching in outlines and working out your proportions or composition before getting into the serious part of the drawing. The second is if you want to limit the value range of your drawing to a higher (lighter) key.
H-grade pencils sharpen very nicely to an extremely fine point and retain that point for longer periods of time. They require less sharpening, which makes them great for detailed work that doesn't require dark values, but they have a slightly abrasive feel due to their higher clay content and work best on smooth paper with little texture. You can use the side of the graphite tip for subtle and high-value (light) shading techniques.
If used with a light hand, H-grade pencil strokes will erase very easily. However, their hardness can easily cause indentations in your paper. This can not only make them difficult to erase but also leaves behind an indentation in your paper even if you are able to remove all the graphite. This may not be all bad if you want to have a more permanent outline that you can shade over, but be certain about those outlines before you press down. And remember, pressing down will dent and possibly even tear the paper.
Another nice thing about H-grade pencils, especially the higher numbers like 3H and above is that they smear or smudge very little. This can be very handy for traveling sketchbooks and keeping your hands clean while drawing. However, the light lines they create may be difficult to see when sketching in bright sunlight or dark areas, and blending is more difficult.
See the types of pencils, charcoal, and paper I use on the Drawing and Sketching Resources Page.
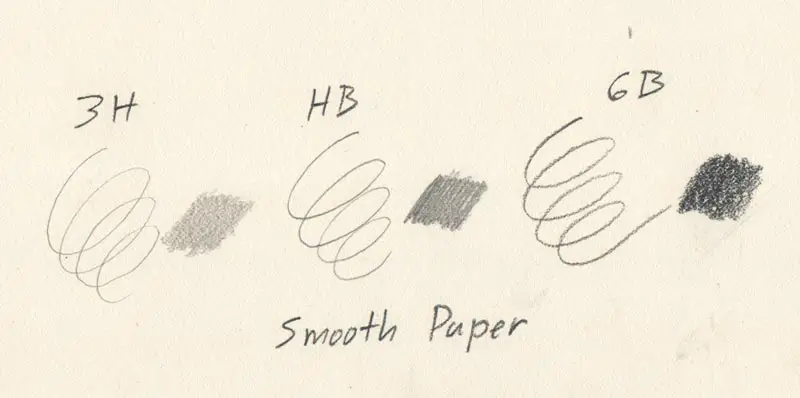
F and HB-Grade Pencils
F and HB pencils are middle of the road and more general use pencils. F tends to still be a tad hard, while HB and B tend to be a nice blend of both worlds. Though they cannot get very dark.
B-Grade Pencils and How to Use Them
While they can also be used for outlines, B-grade pencils are generally used for shading and tonal work. The high-numbered grades have a smooth, velvety feel on the paper and they can make darker gray tones which can border on black. For those who like to work less with outlines and more with tones, B pencils are the optimal choice as their softness will cover the paper more quickly with darker solid tones than will an H-grade pencil.
B-grade pencils work well on both smooth paper and paper with a slight bit of texture Their soft consistency will not cause the same paper indentations that you get with an H-grade. Strokes applied with little pressure tend to erase easily, but strokes applied with a lot of pressure are very difficult if not impossible to erase.
While B-grade pencils are easy to sharpen, they cannot achieve the same razor-sharp point that you get with an H-grade. Even if you sharpen it to a fine point, that point will almost immediately disappear when you start to use it as the soft graphite wears down quickly. As a result, B-grade pencils require more frequent sharpening.
B-grade pencils are very easy to blend. While this makes them more attractive for tonal work it also makes them messier. If you are going to use them in a carry-along sketchbook, I recommend a hardbound sketchbook as the pages will not rub together as much as a spiral-bound book. But even with a hardbound sketchbook, you will still end up with some smudged sketches. Use a fixative if you really want to preserve your sketches.
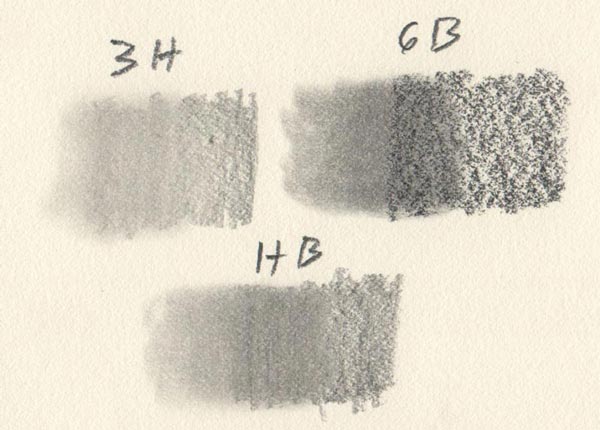
Eliminating the Glare in Your Pencil Drawings
One drawback (no pun intended) that can be more apparent with darker B-grade pencils (though it can happen with any grade) is that they can leave a glare or shine which reflects light in a very annoying manner. When you apply the pencil with a very heavy hand or overwork the area, you are actually burnishing the graphite, a similar effect to polishing metal, which gives it a very smooth and shiny effect.
Once this happens, it's very difficult to undo. A matte fixative spray can help eliminate some of the glare, but to avoid this in the first place, make sure you don't overwork the area or apply too much pressure. Using a dark enough pencil in the first place is the best solution. Also, keep in mind that a heavily-textured paper will result in little white areas that are difficult to darken without applying a lot of pressure. The smoother the paper, the easier it is to darken.
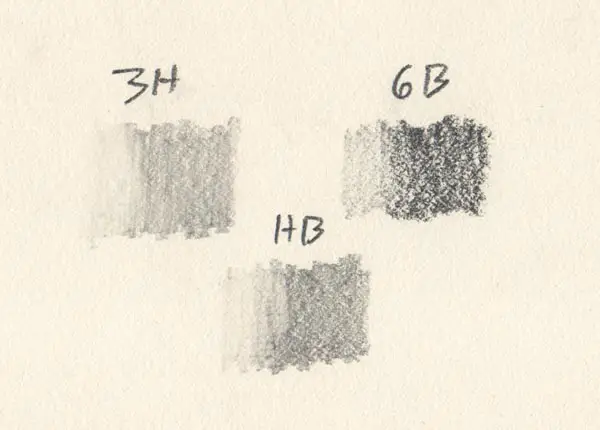
Getting Even Darker Drawings
A more recent development has been that of carbon pencils. Instead of using the allotrope of carbon, which is graphite, carbon itself is used which can achieve even darker results than graphite. It also doesn't have that annoying glare that you can get with graphite when heavily applied. Some manufacturers are combining graphite with carbon to achieve even darker-grade pencils all the way up to 14B.
Another way to go is charcoal. This medium, especially compressed charcoal, can get very black and it can be re-worked and layered without any glare. However, charcoal is very messy and is only convenient for a traveling sketchbook if you are able to spray your sketches with fixative as soon as they are completed.
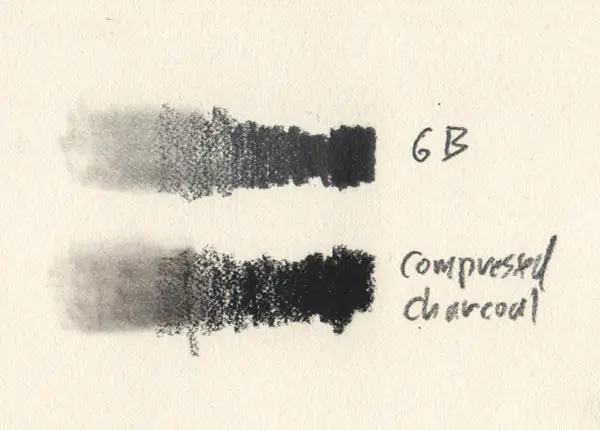
Which Sketching Pencil Should You Use?
It depends on your style and objectives. If you are doing gesture-type sketches or contour-type drawings where outlines are most important, then an HB or lighter is the way you want to go. You will be able to maintain a nice sharp point for a longer period of time, and the outlines won't be easily smudged away.
If your objective is to capture the effect of light and form, then B or darker would work best. You can use the side of the exposed graphite to quickly cover large areas with wide dark strokes and easily blend those strokes for a smooth transition.
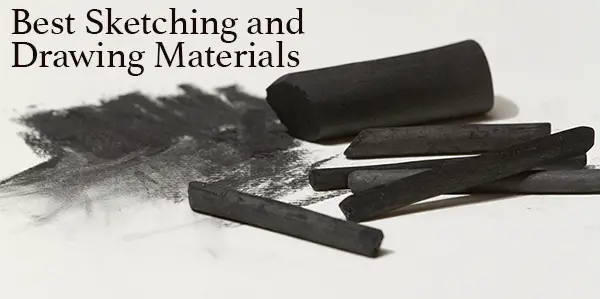
Do I Need to Buy Every Pencil Grade?
No, buying every pencil grade from 9H-9B is not at all necessary. If you are starting out and unsure, you may want to buy an entire set and see what works best for you. Most likely you will find that a few grades will constantly need to be replaced, while others will hardly ever get used. If you are on a budget, I recommend starting with an HB, 4H, and 4B and go from there.
When traveling and quickly sketching on the spot, I tend to default to an HB or B since they can handle almost any scenario in a sufficient manner and they don't get too messy. My primary tool of choice when sketching is a technical pencil with HB graphite. This is very convenient as it doesn't require a pencil sharpener. I'll also bring along a regular B or 2B pencil if I want to do some quick shading.
As with anything, you should really experiment and see what works best for you.
I hope that helps. Please be sure to subscribe and leave your comments below.
Keep Sketching!
Jason Tako is a nationally known fine artist who specializes in western, wildlife, plein air, and Historical Native American subject matter. He spent his learning years sketching the wetlands and wooded areas of rural Minnesota. He has been featured in Plein Air Magazine and Western Art Collector Magazine and he was the Featured Artist for the 2020 Southeastern Wildlife Expo. See his work at www.JasonTako.com and his demonstrations on his YouTube Channel.
In March of 2019, I received a phone call that I will never forget. After exhibiting at the Southeastern Wildlife Expo for over 10 years, they called me and asked if I would like to be the featured artist for their 2020 show. Since SEWE is probably the most prestigious wildlife art show in the world, I was stunned and very excited. But soon, the excitement became mixed anxiety about preparing for the show and making the best of the opportunity I had been given. This is an article about preparing for a fine art exhibition.
This is the first of a series of posts discussing preparing for a fine art exhibition. My hope is you will find this information beneficial for your exhibitions. Please bear in mind I will be using painting as an example, but these ideas apply to most any form of artwork.
Is the Show Right for You?
Make sure it’s the right type of show for the style, subject, and price range of your work. An offering of low-priced craft items will establish a low-price mentality in the minds of the attendees. It’s very difficult for anyone to seriously consider buying your $5,000 oil painting when the person in the next booth is selling Santa Clause gourds for $5.
Preparing for a Fine Art Exhibition by Planning Your Work
Your next consideration should be to figure out how much work do you need to bring? Size will affect quantity. Larger paintings consume more wall space; therefore, you don’t need to come up with as many ideas. However, you must consider your market. Will the clientele be willing or able to buy large works, or is it the type of crowd that is more willing to purchase smaller/lower-priced work? If this is your first time at the show, try contacting some artists who have previously exhibited there, or you may even ask the show’s organizers for advice. Bear in mind that you may get varied responses depending on the artists’ experience and attitude, and some show organizers, in order to get a booth fee and nice photos, will brag up the event no matter how poor attendance has been historically. Look for consistency in the responses you receive, or better yet, if possible, attend the show as a visitor and take note of attendance and sales.
Check Your Inventory
Do you have enough paint, canvas, and stretcher bars? What about frames? Some wholesale framers will run out of inventory, and custom framers need more time, so order early if possible. Painting in standard sizes will make this easier. One strategy I implement is to paint my larger and/or custom-sized pieces first so there is more time to get the frames made. The smaller/standard size works (with the exception of studies for larger paintings) I save for last since it’s easier to obtain frames for those pieces. Do you have enough framing hardware and frame wire or any other framing materials you will need? Order these items in advance so you are not having a panic attack the day before you leave for the show (I’ve been there).
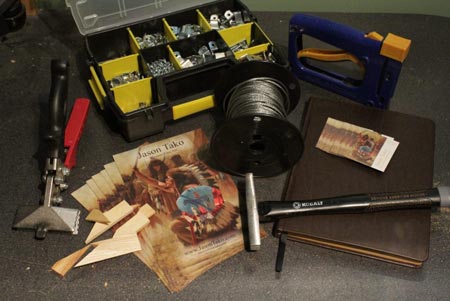
Preparing for a Fine Art Exhibition by planning a Showstopper
A good strategy, especially if this is your first time at the show, is to paint at least one large show-stopper. This will be your best idea and hopefully your best painting. This large work will be your highest priced item which will set the stage for your more reasonably priced smaller works. But most importantly, it will draw people into your booth. Another strategy that I often implement is to do smaller studies for my larger works and bring those studies to the show. This does several things: doing studies will ensure that your large piece turns out well, people who like the large painting but cannot buy it will have the option to buy the smaller study, and it gives your booth a look of consistency. You may be thinking that some people will look negatively on having multiple works of the same idea in your booth, but in my experience, people rarely notice the similarities until I point it out to them. Just make sure that your smaller studies are worthy of being displayed.
Marketing Materials
Final considerations for preparing for a fine art exhibition. Do you need to update your business cards and/or brochures? Will you have enough for the show? Places like Vistaprint make it very easy to design and print nice cards and brochures at a reasonable price. Just make sure you place your order at least several weeks prior to the show. Do you have a sign-up book? Did you update your website with new images and updated pricing? If anyone is interested in your work it is almost guaranteed that they will visit your website, perhaps even while standing in your booth. Make sure everything is consistent. Also, have images of your work (unframed preferably) on your phone or mobile device. If someone expresses interest in your work but give the classic Terminator line, “I’ll be back,” try to get them to sign up in your book, then send them a text and/or email of the painting they were looking at with the title, size, price, and a friendly message.
Go to Part Two which will deal with transporting and hanging your work. To see my artwork, visit www.JasonTako.com and visit my YouTube channel.
Jason Tako is a nationally known fine artist who specializes in western, wildlife, plein air, and Historical Native American subject matter. He spent his learning years sketching the wetlands and wooded areas of rural Minnesota. He has been featured in Plein Air Magazine and Western Art Collector Magazine and he was the Featured Artist for the 2020 Southeastern Wildlife Expo. See his work at www.JasonTako.com and his demonstrations on his YouTube Channel.