How To Draw Linear Perspective Without Vanishing Points
Knowing the principles of linear perspective is a must when sketching architecture or most any other subject. However, using some of the methods of linear perspective when drawing or sketching is often be unpractical because you either have vanishing points that are beyond the drawing surface, or you end up with exaggerated and unnatural angles in your subject. So how can you draw correct linear perspective without using vanishing points?
Correct linear perspective can be achieved without vanishing points by carefully measuring the angles of your subject and comparing these angles with vertical or horizontal lines, then replicating these angles on your paper. Utilizing certain tools like a drawing compass can aid with this process.
So in essence, one needs merely to get all the angles correct in their drawing and linear perspective will take care of itself. My favorite way of doing this is with a drawing compass, or even just holding my pencil up to the angle of my subject (say a house roof) then carefully move my compass or pencil back to the paper while maintaining that angle. I then draw the line, then repeat the process to double-check that my angle is correct.
This method is very practical since, in many scenes that contain two-point perspective, the vanishing points will be outside of the edges of your drawing paper. And if you are working from life, there may not be enough time to draw a bunch of perspective lines on your paper prior to drawing the actual subject.

However, if you are new to drawing linear perspective, you should still understand the principles of linear perspective before you wing it. So let's break down linear perspective in a way that is easy to understand.
Boxes and How They Apply to Linear Perspective
We will be using a three-dimensional box as our example when talking about linear perspective. In a certain sense, any three-dimensional object can be thought of to be in a box. This is very obvious when talking about houses or cabinets, but it even applies to organic subjects such as trees or even people.
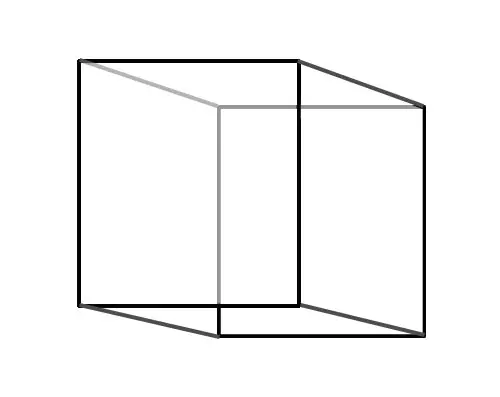
Placing your subject in a box can help you keep it in proper perspective. You can use the box to determine the parallel lines in your subject and which direction they travel to their respective vanishing point(s).
Keeping this in mind when drawing can help you retain a three-dimensional perspective (no pun intended) of your subject matter.
Easy To Understand One-Point Perspective
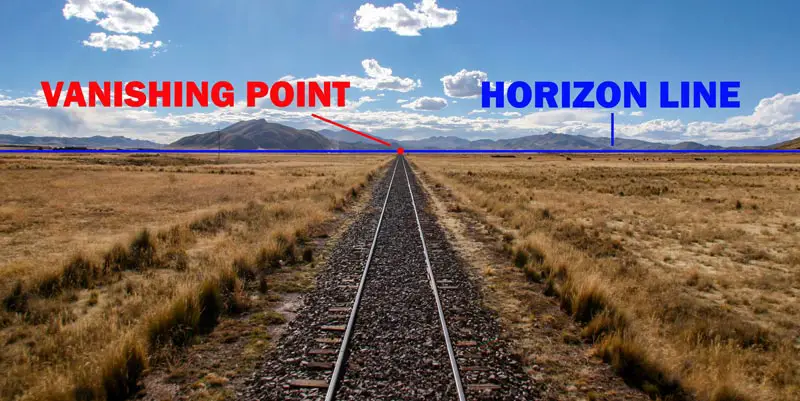
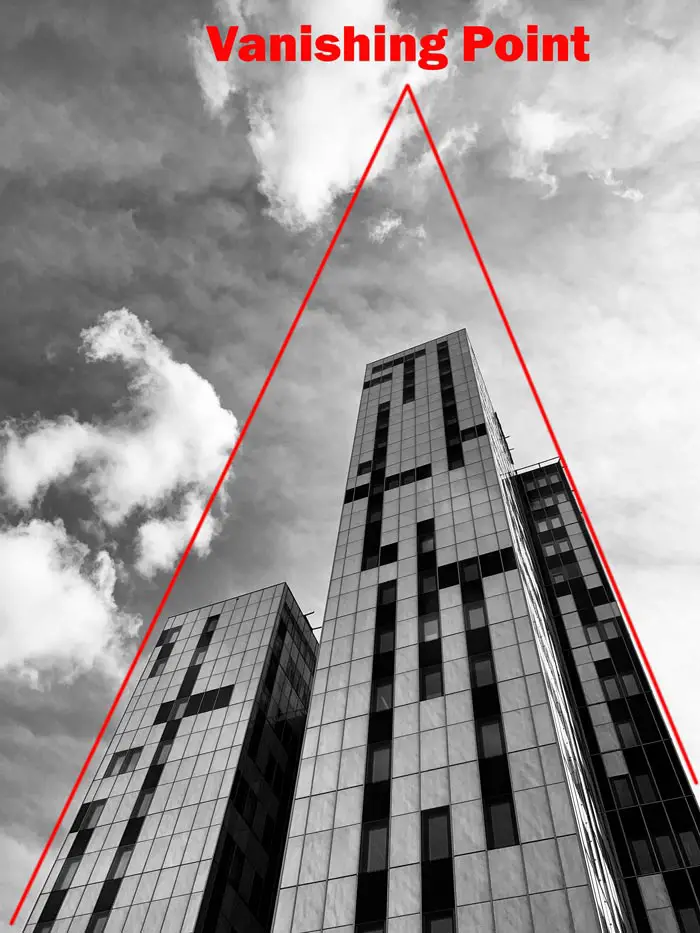
When we look at the world, the further away things are, the smaller they appear. Also, as parallel lines recede, they will appear to come together at a single point. This point is called the vanishing point.
A classic example of this is railroad tracks. If you stand on some railroad tracks in a flat, open plain and then look into the distance, the two tracks will appear to come together at a single point. If the subject or scene has lines that all recede to just one vanishing point, we call it one-point perspective. Of course, you know that the tracks don't really ever come together (if they do then the next train will have some real issues), but they appear to come together from your perspective.
Also, the wooden ties on the track will get smaller and the space between them will diminish the further back they recede. At some point, they will appear to have no space between them. You will have the same illusion with a fence that is receding away. The fence will look similar to a railroad track tipped on its side.
So to sum up, one-point perspective is when all receding parallel lines in a scene appear to meet at a single point.
I should point out that there are scenes that have more than one vanishing point, many contain two or more vanishing points. We will discuss these types of scenes further below.
The Importance of Horizon Lines
Understanding horizon lines is important because these lines are where many of your vanishing points will be located. The horizon line is an imaginary line where the ground plane meets the sky. The best place to see this in nature is on the ocean on a calm day. You can also see this on a very flat landscape in such places as the plains areas of the United States. Using our example of a train track, the vanishing point for the train tracks (and most everything else) would be somewhere on the horizon line.
But what happens if you are somewhere where you cannot find the horizon line, such as a mountainous landscape? In this case, we will ditch the concept of a horizon line and use our eye level instead. Actually, both the horizon line and your eye level are synonymous. If you look straight ahead, your eye level will be in the same location as the horizon line. Of course, if you squat down or climb a step ladder your eye level or horizon line will move down or up with you. Remember, it's all about your perspective.
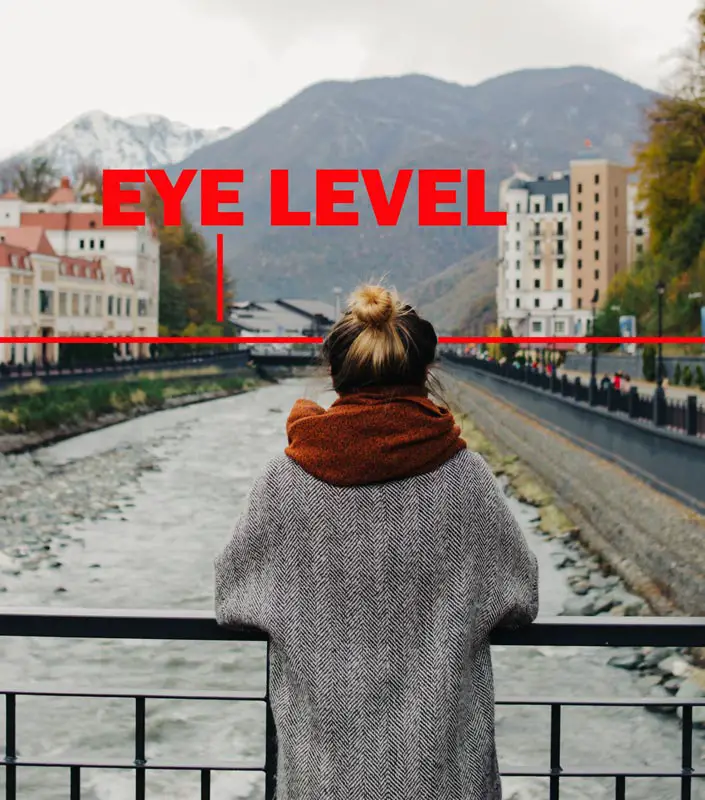
Be aware that tilting your head doesn't have any effect on your eye level since the horizon line remains constant despite the angle of your head. Only changing the vertical placement of your eye level (such as climbing a ladder or squatting down) will change your perspective and as a result the horizon line.
Once you have determined the horizon line's location it's critical that you maintain that location throughout your entire drawing. Having objects recede to multiple horizon lines in the same composition will kill any realistic illusions of depth.
It's important to point out that the same scene can contain both one-point and two-point perspective. Which brings us to our next section.
Easy to Understand Two-Point Perspective
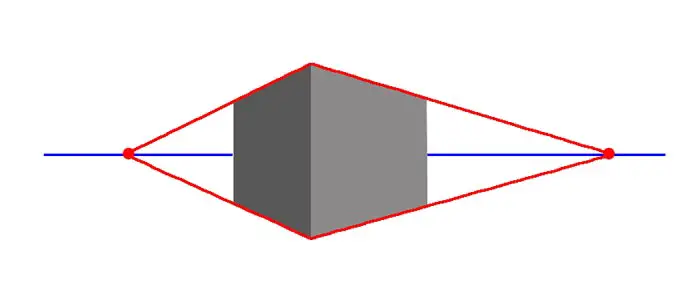
If you are looking at a box and only one side of the box is facing you, you are looking at the box in one-point perspective. But if you have two sides of the box facing you, then you are looking at the box in two-point perspective.
With two-point perspective, since you can see two sides or faces of the box, the box is turned at somewhat of an angle and therefore those two visible sides will recede away from you to two different vanishing points. It's important to note that those two vanishing points will both be on the horizon line.
There are times when looking at a box, you will only see just a sliver of the second face. In these scenarios you can probably just fudge the box into one-point perspective since the angle of the side facing you would be barely, if at all noticeable. Plus the vanishing point would be extended extremely far out on the horizon line.
In all actuality, since reality is three-dimensional, whenever you can see two sides of any box you are actually seeing it in two-point perspective, regardless of whether the second side you are seeing is on the top, bottom of sides of the box. But as mentioned above there are times when we need not concern ourselves about this.
The thing that can be confusing about two-point perspective is knowing which lines will point to which vanishing point? The basic principle is that receding parallel lines will of a particular object will converge at the same vanishing point. This is much easier understood with a visual.
In one and two-point perspective, vertical lines do not recede, therefore they do not meet at a vanishing point and will remain straight up and down.
Horizon Lines Determine Slants
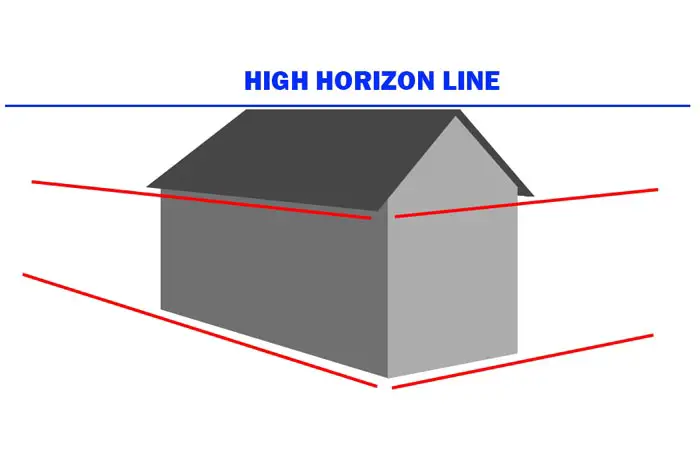
Depending on what you are drawing, the horizon line may be above, below, or directly behind your subject. The location of the horizon line will determine most of the slants in your drawing. If you are standing on the bottom of a hill looking up at a house on the top of a hill, the horizon line will be well below the house. As indicated above, it makes no difference that you are tilting your head up to look at the house because your horizon line will always be at your eye level.
The illustration below shows a basic house shape with a high horizon line or eye level (shown in blue). This would be as if you were standing on a hill looking down on a house that was lower than you. The perspective lines (shown in red) will all slant upwards toward the high horizon line.
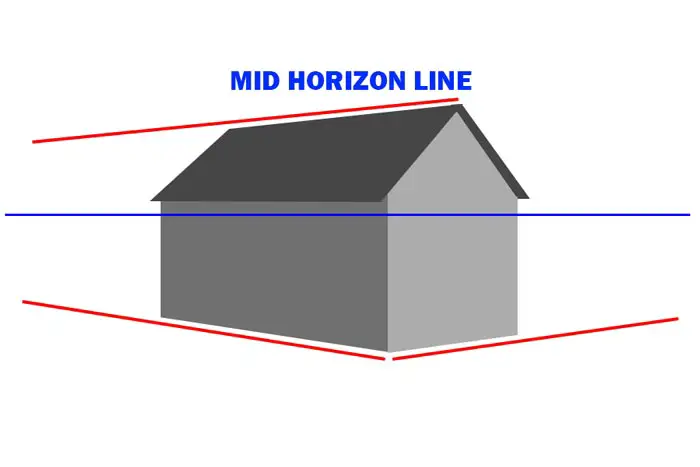
The next illustration shows a house with the horizon line near the center. Notice how the perspective lines slightly slant both downward and upward toward the horizon line. This would be similar to if you were standing on the same level as the house.
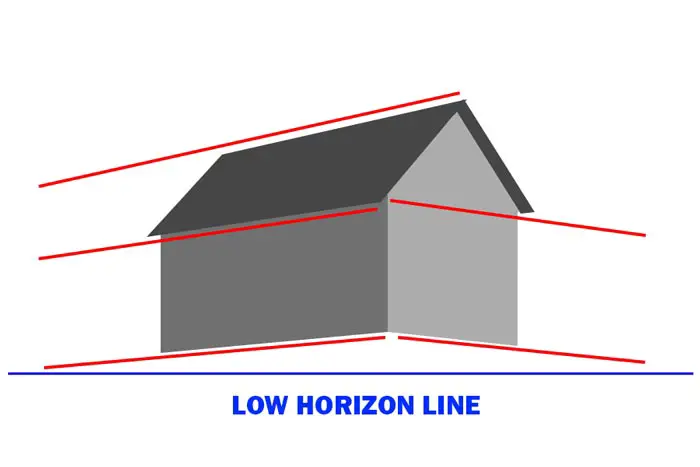
Finally we have a low horizon line, which shows how things would look if you were standing on the bottom of a hill looking at a house on the top of the hill. In this scenario the perspective lines slant downwards toward the horizon line.
Easy Linear Perspective without Vanishing Points
As indicated at the beginning, you really don't have to concern yourself with vanishing points and converging parallel lines when actually drawing. You can just start drawing what you see while using things like a drawing compass to measure the angles of your subject. You can also just feel out the angles and lines and make adjustments until they are correct, but this method takes quite a bit of drawing experience.
If you get the angles of your subject reasonably correct, all is good and you can forget all about vanishing points and drawing needless lines, (though it's always recommended you at least locate your horizon line prior to drawing so you have an approximate idea where all lines will recede to). However, if you get in a bind, it may be wise to resort to locating and using vanishing points, at least for the angles that are more difficult to draw.
For example, let's say you are drawing a house and you just cannot seem to get the parallel lines on the roof to look correct. You can use your drawing compass to determine the angle of the top of the roof. When you draw this line, extend it all the way to the horizon line, this will be your vanishing point. With the vanishing point established, you can determine the correct angle of all other parallel lines by having them recede to the same vanishing point.
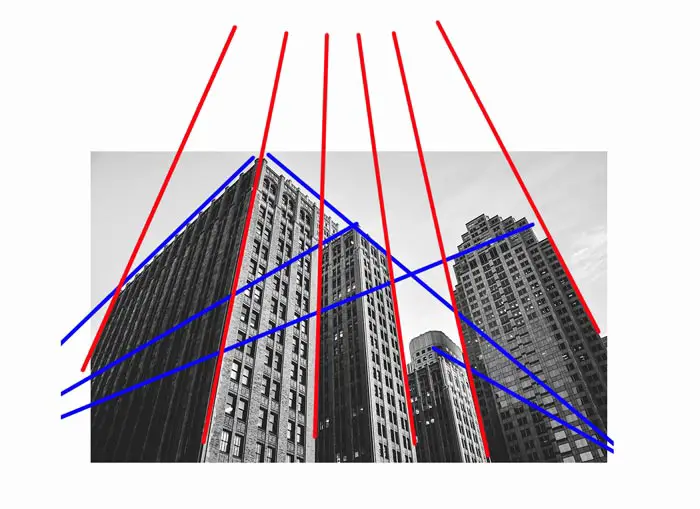
When I draw, even when drawing complex architecture, I rarely locate vanishing points. I will locate and measure the major angles in the scene either with a compass or by just eyeballing it and lightly sketching in the lines. I will then feel out the rest of the lines using my understanding of how slanted lines become less slanted the closer they get to the horizon line.
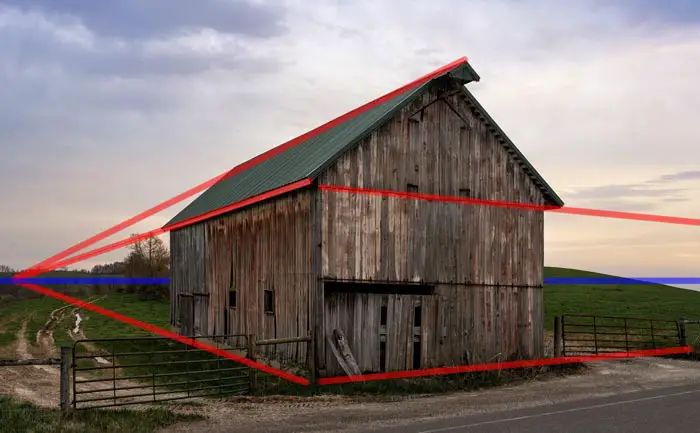
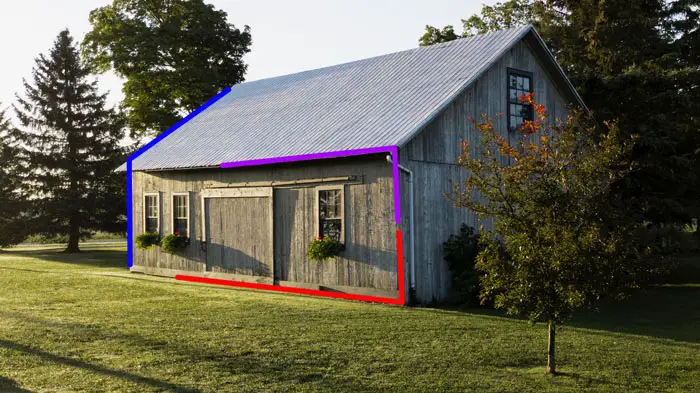
The red, blue and violet lines in the photo below show some of the angles I may measure with my drawing compass or any other similar device. I then replicate these angles in my drawing, even tracing the angle I got on my drawing compass. If these angles and slants correct, I don't need to worry about vanishing points.
If I get into a bind, I'll locate the vanishing point(s), but since many times the vanishing point is outside the boundaries of my paper, I'm usually forced to use one of the two methods described above, measuring with a compass or just feeling it out and lightly sketching it, marking slight adjustments until it looks correct.
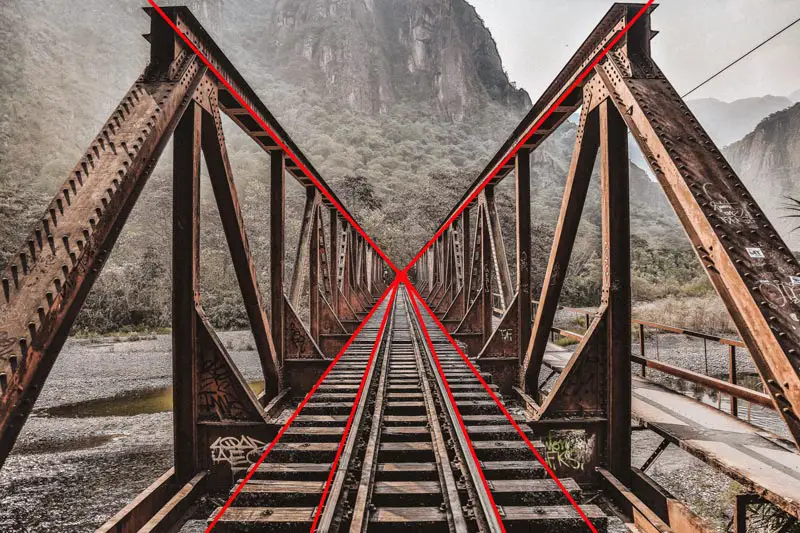
Understanding Three-Point Perspective
Up until now all of our vanishing points have been on the horizon line. While this makes things simple and neat, it’s time to depart from this orderly way of seeing the world and step into the messiness of reality.
Vanishing points for parallel horizontal lines do occur on the horizon line. But the fact is vanishing points can occur anywhere in space, and this is where things can get a bit messy. But don’t let that intimidate you. Once you figure out the principle behind the messiness it becomes much easier.
So far we have treated vertical lines as if they are always perfectly straight up and down; as if pairs of vertical lines will maintain a perfect parallel distance from each other as they recede.
For example, we would tend to draw a tall building with two or three vertical lines that maintain the same spacing from each other for their entire length. But in actuality, these parallel lines also recede from our point of view just like horizontal lines do. Therefore they also will appear to meet up at a vanishing point somewhere far up in space. As a result, they also will slightly slant toward that vanishing point. This takes us into the world of three-point perspective.
So if you are looking at a tall sky scrapper from a slight angle that allows you to see two sides of the building, both of these sides would recede to their respective vanishing points on the horizon line. But as we stare up to the top of the skyscraper we would notice a slight slanting of the vertical lines which recede to a single vanishing point somewhere up in space, giving us our third vanishing point.
In the illustration below, the blue lines represent horizontal lines which eventually converge on vanishing points on the horizon line. The red lines represent parallel vertical lines that converge at a vanishing point high up.
This phenomenon actually occurs with any parallel vertical lines we encounter. It’s just that most vertical lines are not tall enough for us to notice this slight slanting. Sky scrappers, and perhaps large trees in a forest make it more obvious. As a result, three-point perspective can usually be disregarded if you are drawing subjects that are not tall.
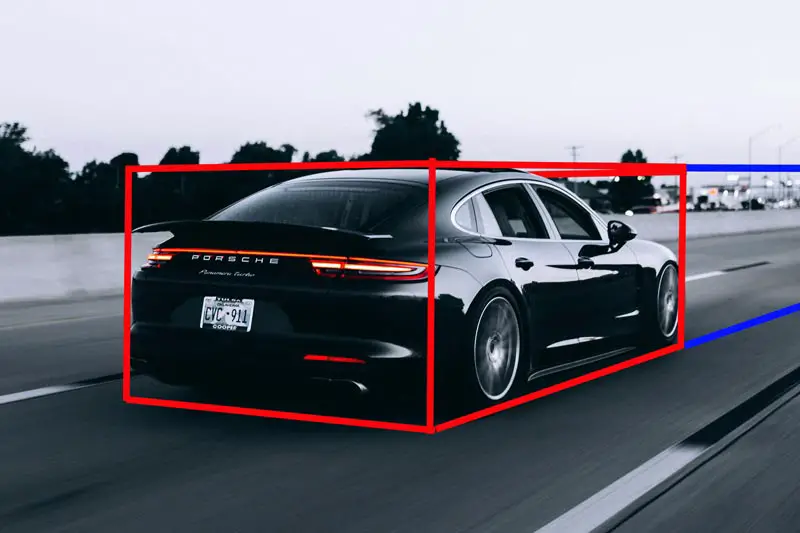
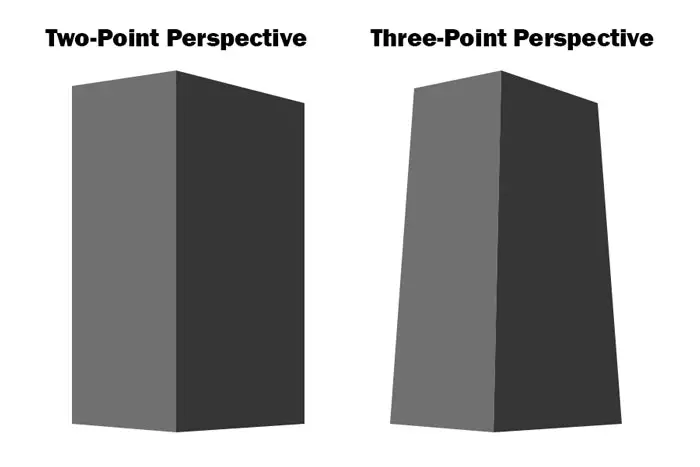
Drawing a one or two-story house in three-point perspective would result in an exaggerated and unnatural appearance as in the photograph below. However, if you want to emphasize the height of your subject matter, three-point perspective is the perfect tool.

The fundamental thing to remember about three-point perspective is that horizontal lines will recede to vanishing points on the horizon line (aka eye level), and vertical lines will recede to some place either above or below the horizon line, and usually far above or below the horizon line.
In my experience of drawing, I have rarely run into scenarios where three-point perspective is required or even appropriate. But I also concede that my typical subject matter consists of more horizontal lines. Even when I’m drawing or painting tall mountains, their abstract shape and lack of straight vertical lines render three-point perspective unnecessary.
I would suspect that artists who draw or paint urban subject matter would find more use for it. Three-point perspective is also utilized by artists and photographers who engage in more whimsical artwork.
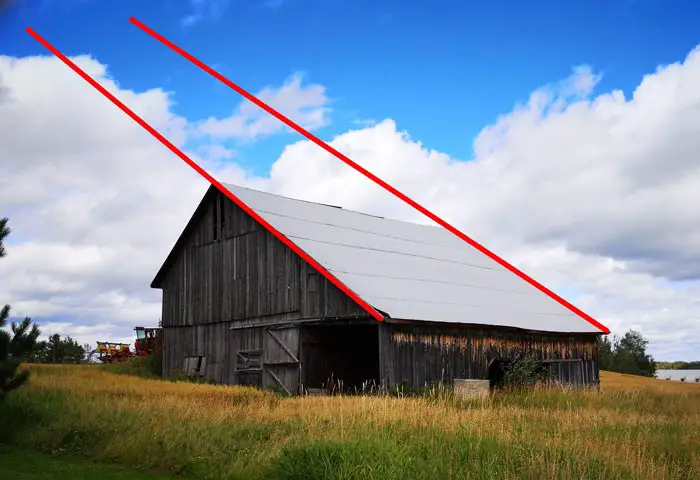
Where I have found three-point perspective, or at least an awareness of it to be necessary is when drawing things like slanted roofs, ramps, and roads on hills. The slanted, parallel lines of roofs will converge at a third vanishing point somewhere up in space.
From a practical point of view, you usually need to just be aware of the principle and feel out the slant since the vanishing point would be way off your paper. The basic principle for roofs is to remember that the slant that is farther away from you will slant down toward the horizon line while the slant that is closer to you will slant more upwards.
When dealing with ramps and roads on hills that recede away from you, there is a good chance that the vanishing point would be somewhere on your working surface. Regardless I rarely ever attempt to find their precise location. I will either measure the angle of the slants or just feel out the slant of the lines and make adjustments until they appear correct. But in a bind, it’s always nice to know the principle and technique you can fall back on.
Locating the Perspective Center on Slanted Boxes and Objects
Now that we have covered the basics, let's look at some other linear perspective techniques.
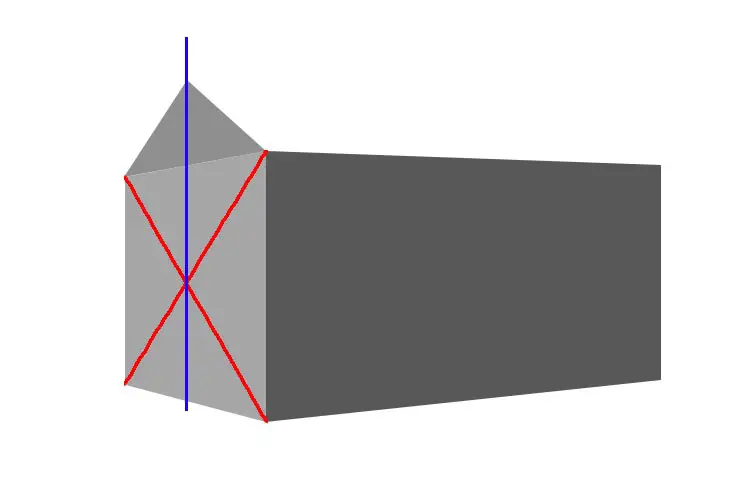
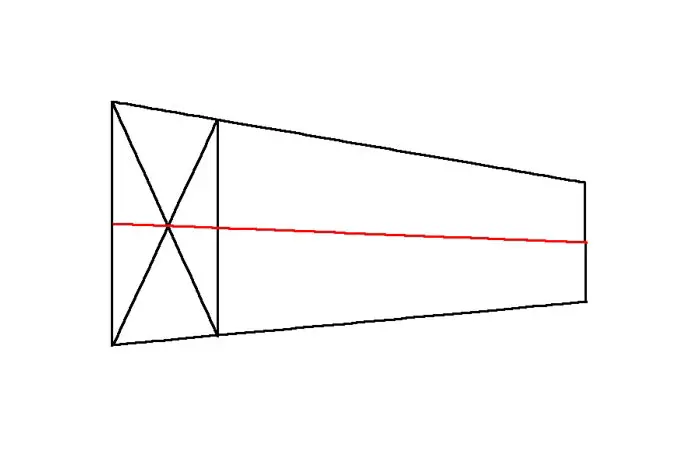
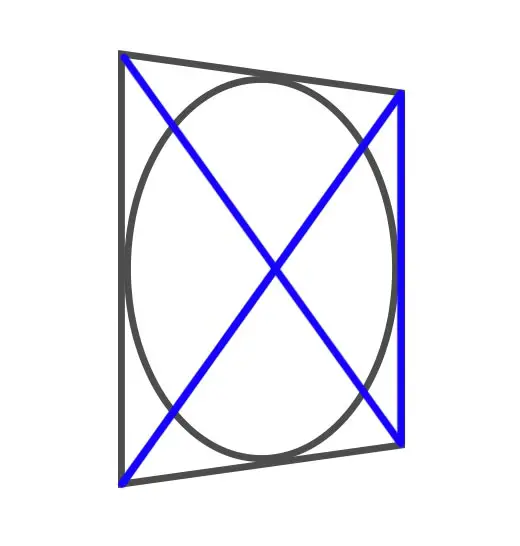
Let's say you are drawing the side of a barn and you need to draw the triangular part of the house also known as the gable, but the side of the barn where the gable is located is slanted away from you. To determine the top of the triangle or gable, you need to figure out the precise vertical center of that side of the house. Since that side is slightly slanted away from you, you cannot just measure the horizontal center of the slanted lines as this will result in the top of the triangle looking offset.
Thankfully there is a really handy trick for locating the center of a slanted rectangle. Simply draw a diagonal line from the upper left corner of the box to the lower right corner. Now draw another line from the upper right corner to the lower-left corner. You should now have an X within your box. The center of the X is the perspective center of the rectangle (see below).
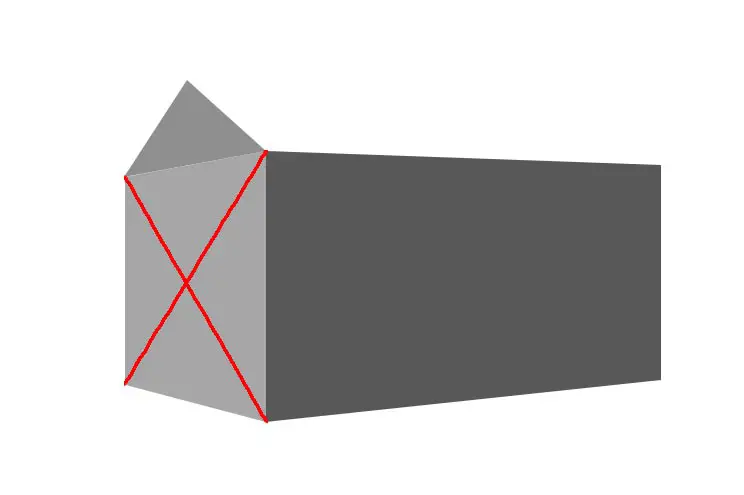
Now you just need to draw a vertical line through the center of the X and this line will mark the top of your triangle.
How to Create Evenly Spaced Sections in Perspective
There are times when you may need to create evenly-spaced sections that recede away from you. This could be vertical posts or columns on a particular structure, such as the columns on the Greek Parthenon. It could also be a row of windows on the side of a building that is receding away from you. In these and similar cases you will want to be sure that the elements you are drawing look evenly spaced.
Thankfully, there is a pretty easy way to do this and it can be done with or without using vanishing points. While this technique may not be required in every similar scenario, this can help get you out of a bind.
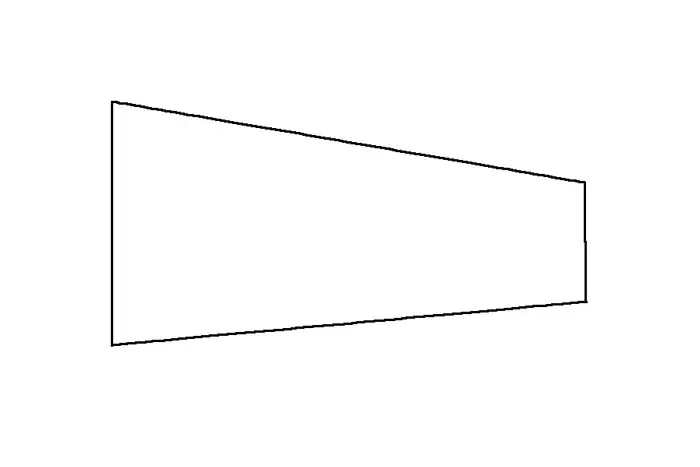
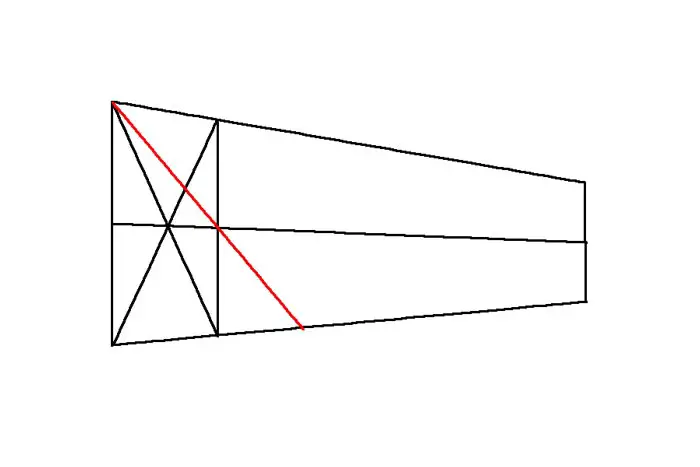
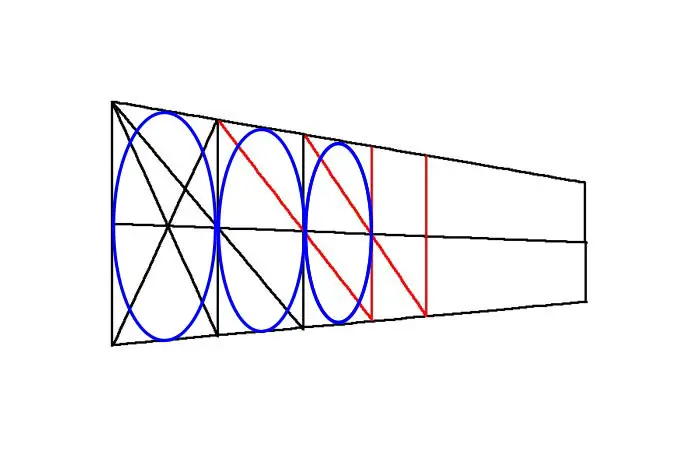
Step 1: The first thing you will want to do is draw a box around the overall part of the structure that contains the area that needs to be evenly spaced. While you could continue these parallel lines until they meet at the vanishing point, you could also use a drawing compass or similar device to measure the angle of these lines and disregard the vanishing point.
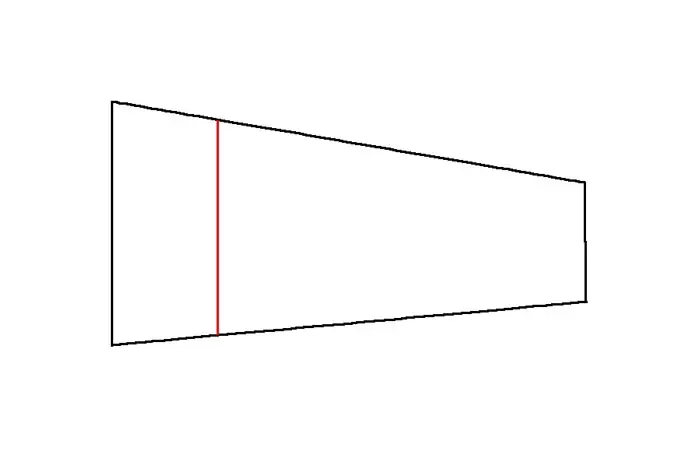
Step 2: Draw a vertical line inside the box to represent the approximate size of the first divided area. You should now have a small, skewed box within a larger skewed box (see below).
Step 3: Within this smaller box draw an X from corner to corner as shown with the red lines.
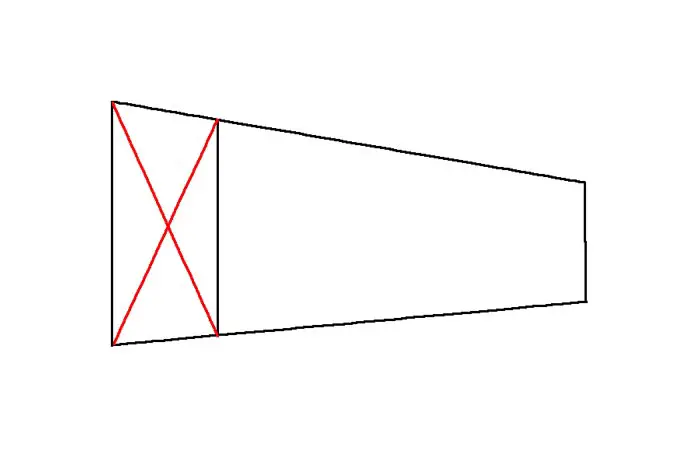
Step 4: Draw a third horizontal line (see the red line below) in the center of the overall rectangle. The center of the X will tell you where the center of the rectangle is.
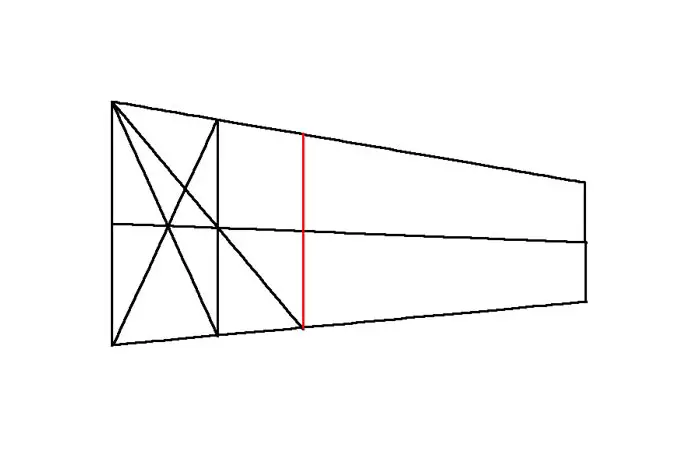
Step 5: Now draw a straight, diagonal line from the top left corner of the rectangle through the intersection of the second vertical line and the center horizontal line. This new diagonal will terminate at the bottom horizontal line as shown below in red.
Step 6: The point where the diagonal line intersects the bottom horizontal line marks the placement of the next vertical division as seen below in red.
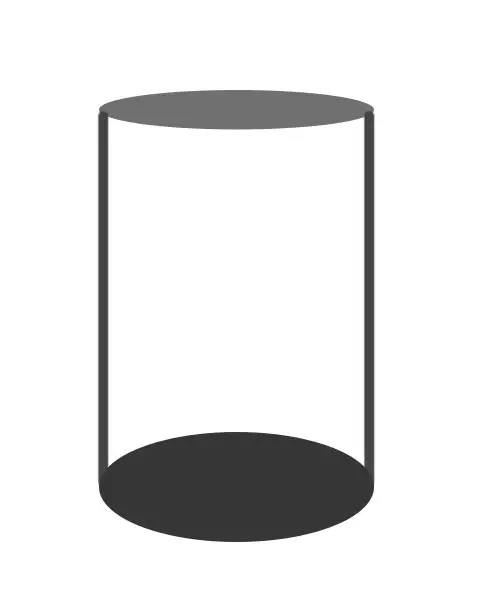
Repeat steps 5 and 6 to determine the rest of the sections. Following this procedure will give you evenly spaced sections in which can be placed most any subject or shape, such as windows, fence posts, or even cylinders (as detailed below).
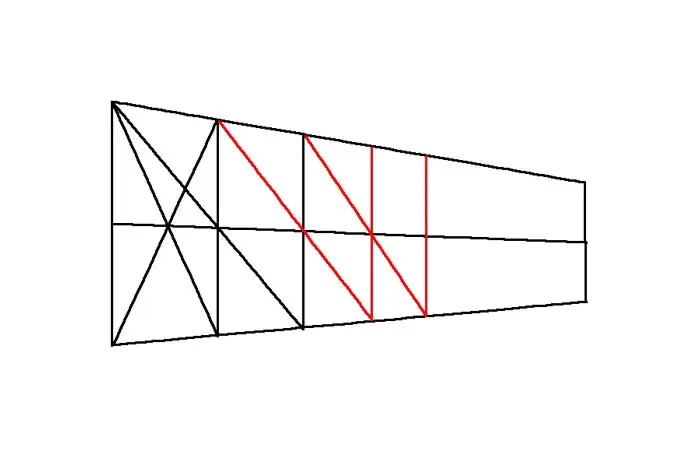
Keep in mind that the above technique will also work for tiled floors. All you need to do is flip the whole thing on its side.
How to Draw Ellipses - Circles in Perspective
Ellipses are just circles in perspective, or circles that recede away from you to a certain degree. We find them all over the place: wheels, cups, cans, bottles, and even suggested in lakes, ponds, etc. Many beginning artists draw ellipses incorrectly, destroying what could otherwise be a good drawing.
Thankfully a process exists for figuring out ellipses and how to keep them in proper perspective. And as with the other things we discussed, once you understand the underlying principle, in many cases you can dispense of the technical process and feel your way through your drawing.
The general rule with ellipses is that the closer they are to the horizon line (shown below in blue), the flatter they appear. This rules apply not just to ellipses, but to any two-dimensional shape.
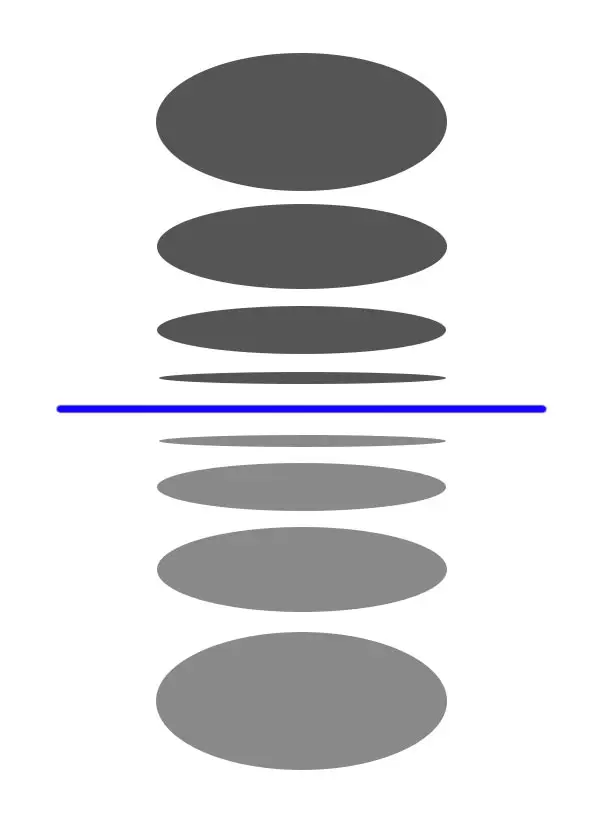
This rule is very important to keep in mind when drawing cylindrical objects such as cups, cans, vases, etc. If you are drawing or painting a still life that has upright cylindrical objects, the cylinders on the taller objects will appear flatter, while the bottom of the cylinder will appear more rounded.
Let's now discuss the process of drawing receding ellipses. This is somewhat similar to drawing receding sections as described above. Draw a square that recedes toward its vanishing point. In that square draw a circle. If you need to figure out the center of the circle, just draw an X within the square, with the lines of the X intersecting the corners of the square. The center of the X is the center of the square as well as the circle within the square.
This method is handy if you need to draw wheels or an ellipse that needs to show the center. Also, let's say you need to draw the ends of a row of pipes receding away from you. You can use the exact same method for creating evenly spaced sections in perspective, and just add circles in each square.
Knowing these principles is important for things like still lifes, architecture and even natural landscapes. As with most other things, I rarely use the above method for determining ellipses, I usually just feel them out by keeping in mind the principle of flattening the farther they are or the closer the shape is to the horizon line.
Keep in mind that my art is not technical or schematic by nature. If I were doing technical drawings or any drawing that required mechanical precision, I would probably need to resort to the technical methods described above.
Circling Back to Square One
There are other aspects of perspective drawing that we didn’t cover. But this should be enough to get you started. As stated above, to achieve proper perspective, all you need to do is replicate the angles of your subject matter. This can be easily achieved by using a drawing compass to measure your angles. Get this right and you can dispense of vanishing points.
However, I do not recommend that you dispense of vanishing points or horizon lines in your mind when drawing. Strong cognitive awareness of these principles can be a good fail-safe when you are winging it. And it always helps to have these things as a backup in the event you get stuck. As I was taught in music school, learn the scales so well that you can totally forget about them when playing. This goes the same for good drawing.
Keep drawing.
Jason Tako is a nationally known fine artist who specializes in western, wildlife, plein air, and Historical Native American subject matter. He spent his learning years sketching the wetlands and wooded areas of rural Minnesota. He has been featured in Plein Air Magazine and Western Art Collector Magazine and he was the Featured Artist for the 2020 Southeastern Wildlife Expo. See his work at www.JasonTako.com and his demonstrations on his YouTube Channel.
Warning: Undefined array key "preview" in /home3/mysketc2/public_html/wp-content/plugins/oxygen/component-framework/components/classes/comment-form.class.php on line 75
Warning: Undefined array key "preview" in /home3/mysketc2/public_html/wp-content/plugins/oxygen/component-framework/components/classes/comment-form.class.php on line 79