How to Draw the Human Eye-Everything You Need to Know
When we were children, most of us would draw the human eye with two arched lines containing a circle in the middle. But for the serious artist, sketching or drawing a realistic human eye requires more knowledge and refinement, especially if you want to draw the eye from different angles. So what is the best way to draw a realistic human eye?
To draw a realistic human eye you must move beyond the symbolic approach of two curves and a circle and understand the skeletal structure that surrounds the eyeball as well as the shapes that eyelids create and how human emotions, gender, and ethnicity affect the eye’s appearance.
We will go into and beyond the step-by-step approach to drawing the human eye. Below is a step by step demo and under that a wealth of information that every artist who wants to draw realistic eyes should know.
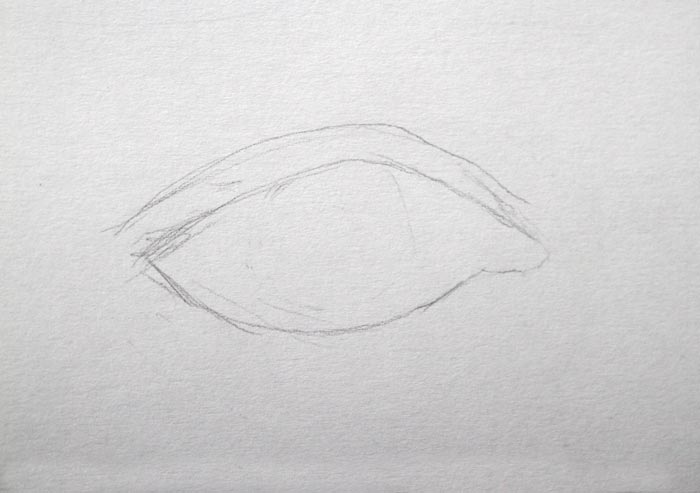
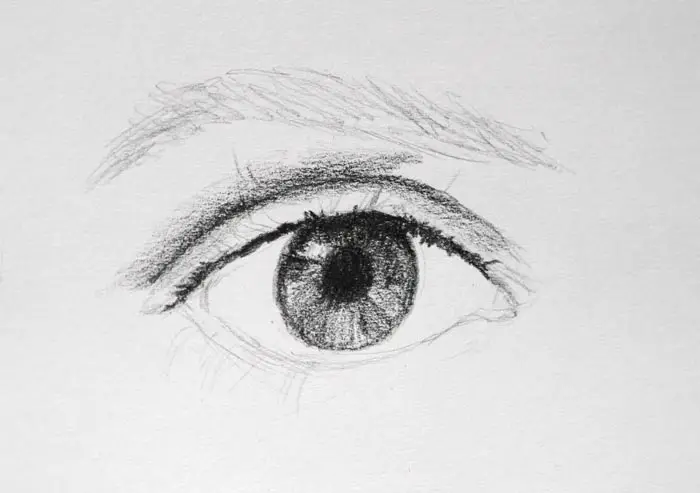
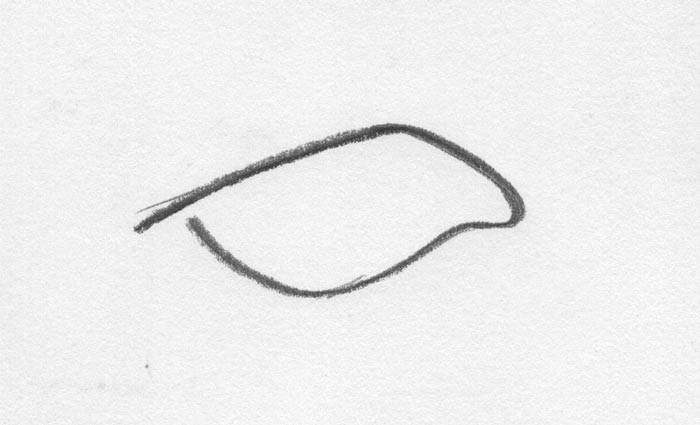
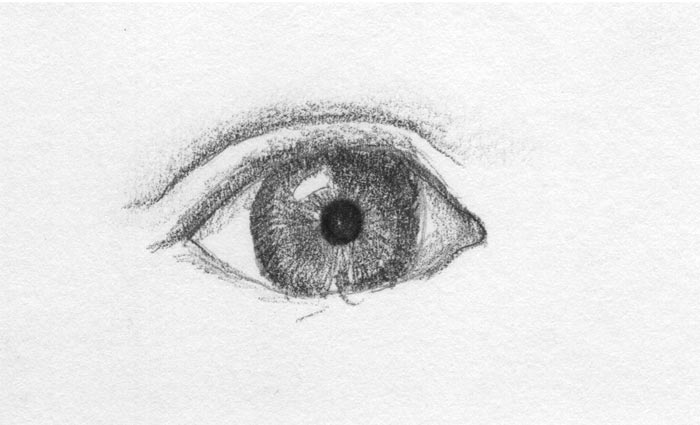
Lightly Sketch the Outlines of the Eyelids
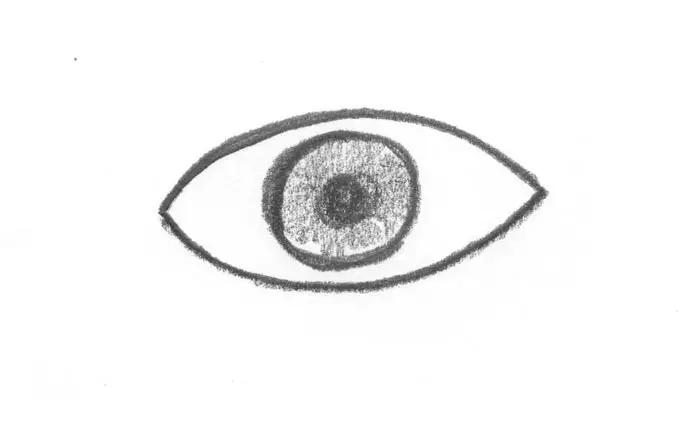
Using an H-grade pencil, lightly sketch the outlines of the upper and lower eyelids. Note that in most cases these lines are not a perfect arch, and in many cases, there may be an apex on the upper curve. See more about this below in the section Additional Knowledge About Drawing the Eye.
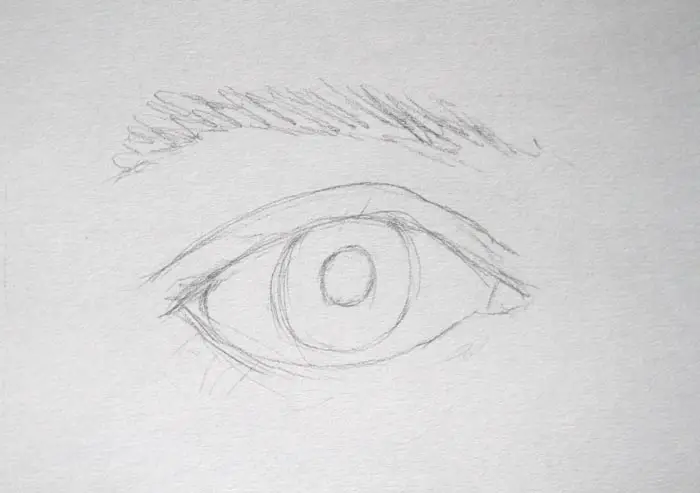
Lightly Sketch the Iris, Pupil and Eye Brow
Once you have determined that the outlines of the eyelids are correct, lightly sketch the iris, then the pupil. Also, block in the general shape of the eyebrow with some light scribbles. You can also lightly indicate some eyelashes. Don't move onto shading or tone until you are certain that everything is the correct shape and size. Light, sketchy lines are much easier to erase and correct than dark ones.
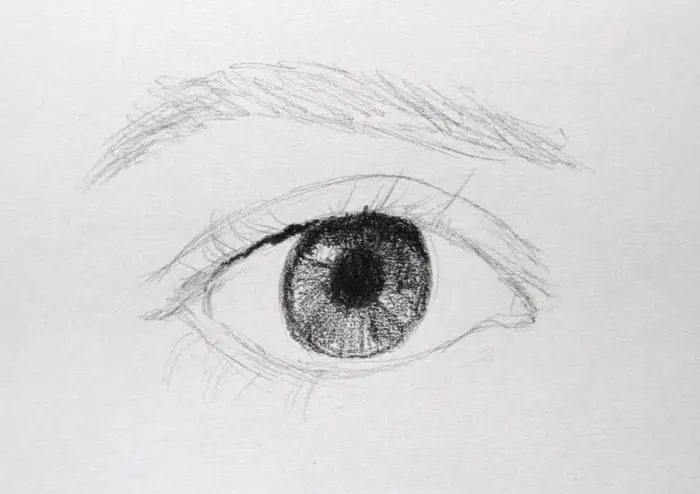
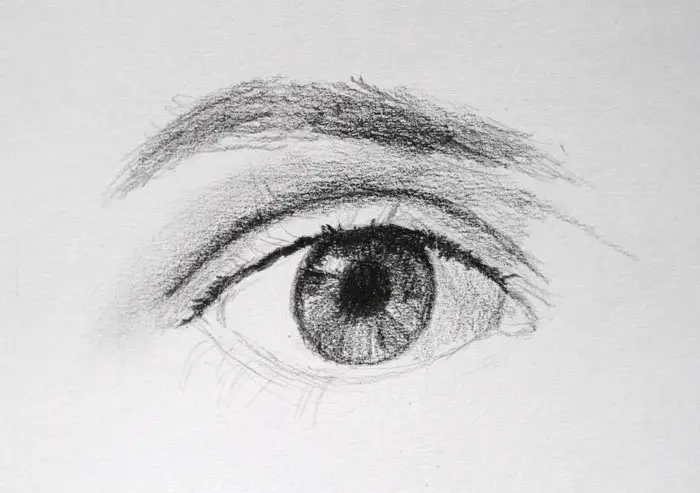
Add Realistic Shading to the Pupil and the Iris
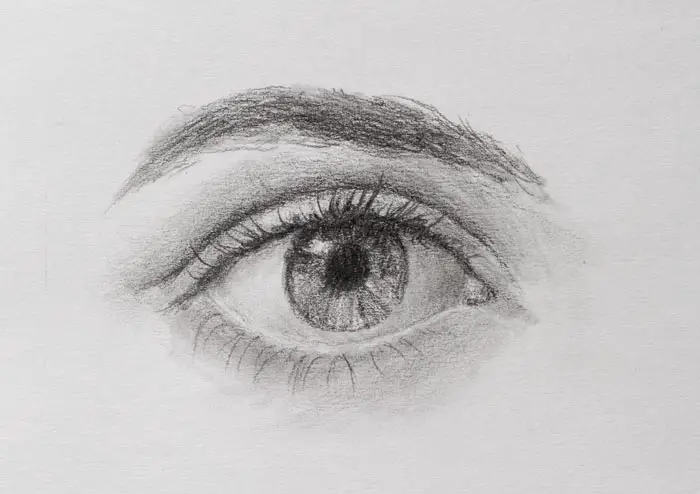
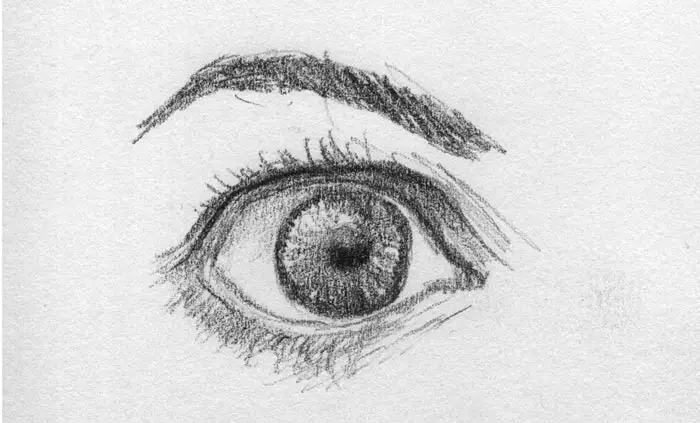
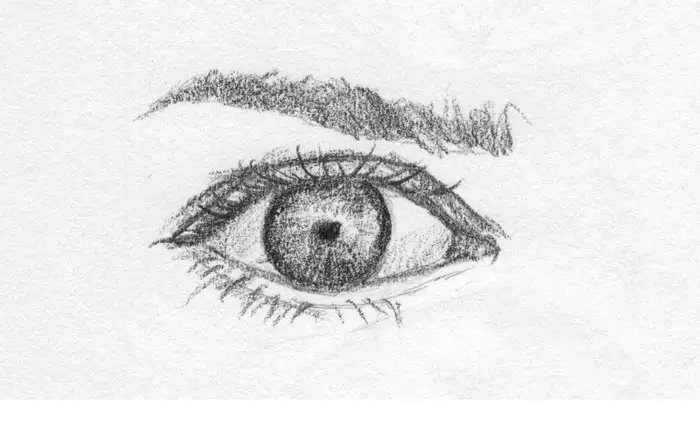
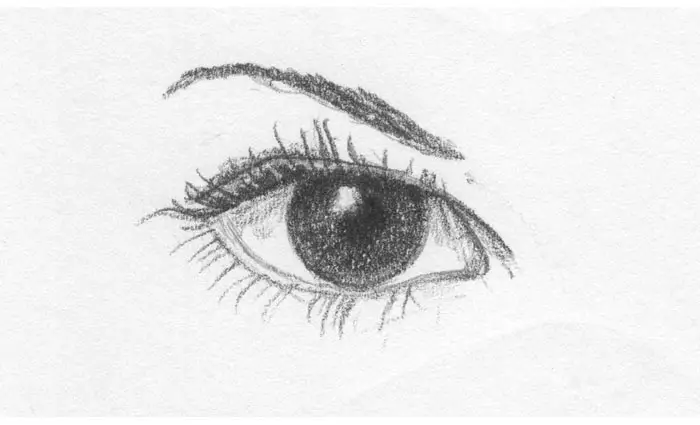
Now that you have all the major features correctly placed you can begin to add realistic tones and shading. Using a 5B pencil, begin with the pupil since this is nearly pure black and is usually the darkest value in the eye. Having this dark value in place will help you to gauge the other values in your drawing. Draw quick lines from the pupil to the outer rim of the iris to suggest the patterns seen in most eyes. Don't forget to leave a white area for the highlight(s).
Add Shading to the Upper Eyelid
Continue shading the upper eyelid and the eyelashes. Be sure not to make the upper line created by the eyelid too dark or defined, blend it out into the surrounding area for a more natural look.
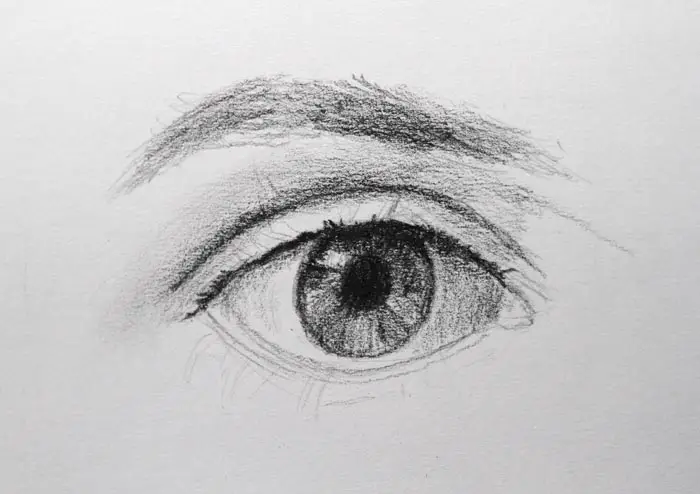
Define the Eyebrow
Using the side of your 5B pencil, add darker tones to the eyebrow. Apply somewhat light pressure so as to maintain the texture of the paper. This will help give the impression of hair without having to draw each individual hair. Also, add some light shading to the area between the eyebrow and the upper eyelid to define the form.
Shade the White Part of the Eye
The white part of the eye is not entirely white. The upper eyelid, as well as the direction of the light source, can cause some shadow to appear in the white area. Add some subtle shading to the white part of the eye. See more about shading in the white part of the eyes in the article below.
Define the Form of the Lower Eyelid
Using the side of your 5B pencil, define the form of the lower eyelid area. Depending on the lighting and the age of your subject will determine how much definition is needed. See the section below titled Drawing the Human Eye for Different Age Groups.
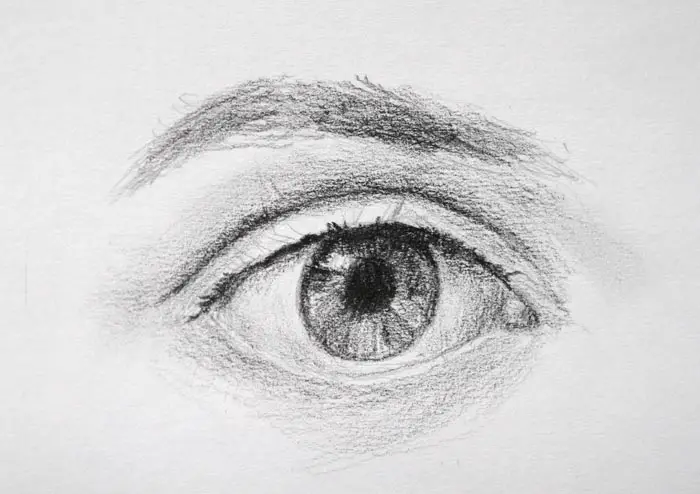
Soften the Surrounding Flesh Tones
Using a blending stump, soften the pencil texture of the surrounding flesh tones as well as the white area of the eye. Leave the iris and the eyebrow textured.

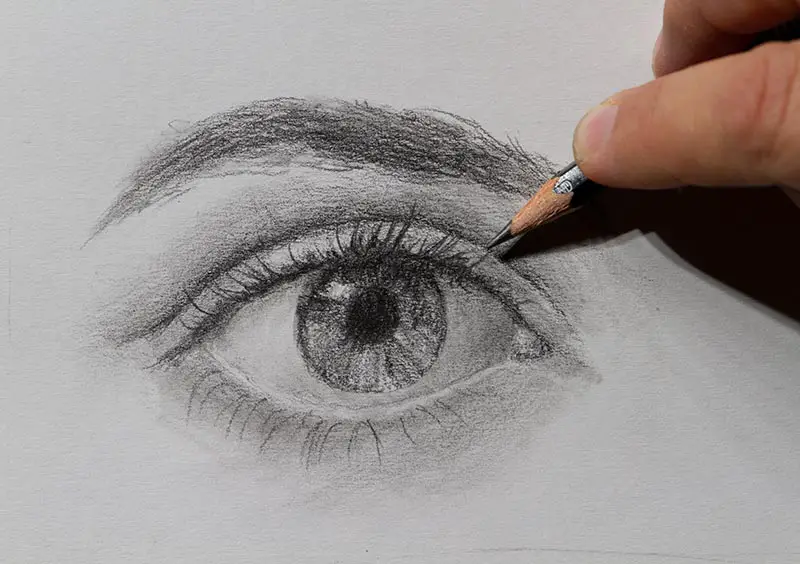
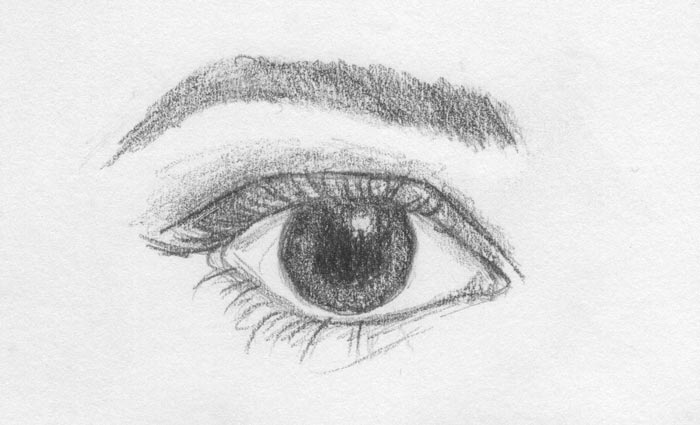
Add the Eyelashes and Other Small Details
You want to save the eyelashes for last so that you are free to adjust the values of the eyelid areas and blend any textured areas on the skin. Use a sharpened 5B pencil, but make sure you don't apply the strokes with full pressure since eyelashes are usually thin and therefore lighter in value.
This is just the tip of the iceberg. There is much more to drawing the human eye which we cover below. Read on...
Additional Knowledge About Drawing the Eye
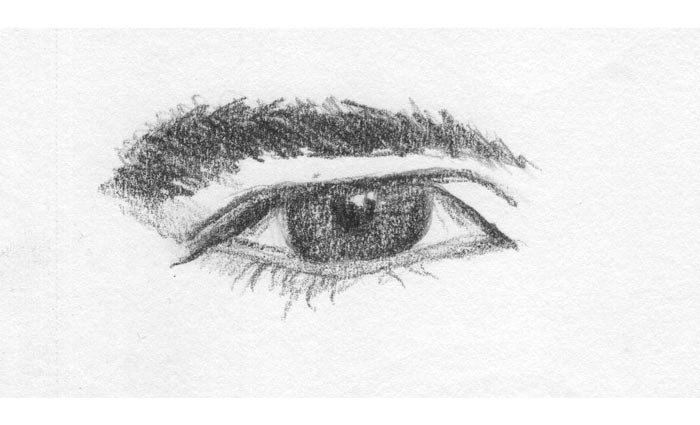
The front view is the most common angle from which to draw the human eye. It gives us the classic two arched lines with a circle in the middle.
We find this symbolic representation of the eye everywhere, from the Eye of Providence on the American dollar bill to the Eye of Horus in ancient Egyptian hieroglyphics. And frankly, it’s not too far off course when it comes to a realistic representation of the human eye. Yet to draw a realistic human eye you have to go a bit further.
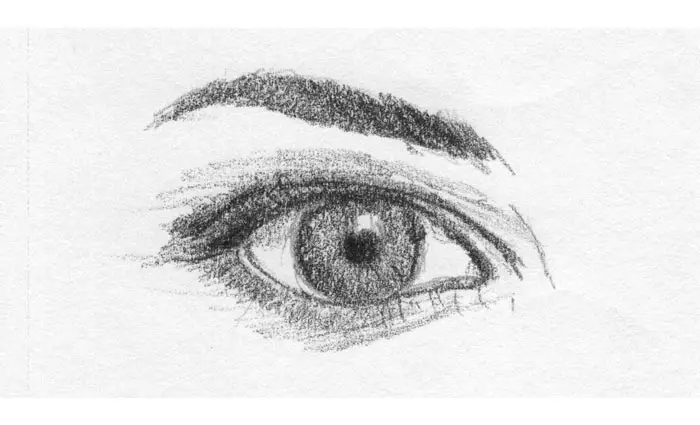
While the basic outline of the human eye is comprised of two concave curves, they are rarely ever perfect curves. In most cases, the top curve, which in geometrical terms would be called concave downward, usually has the apex, or highest part of the curve not in the middle, but about two-thirds toward the center of the face.
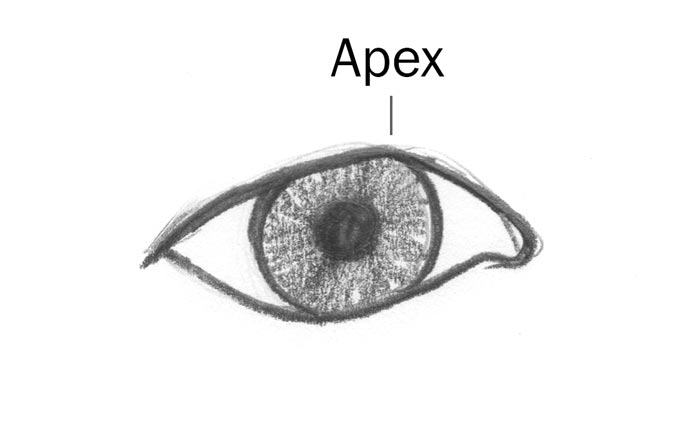
This apex is fairly subtle and the part of the curve from the apex to the tear duct in some cases can almost be a straight line rather than a curve. You can even see this in the Eye of Horus hieroglyphic. In some eyes, this apex may be barely visible and in some eyes you may not see it at all. But knowing it exists can help you avoid an unnatural, perfect curve.
The bottom curve, or concave upward, is usually comprised of a more typical curve. Yet upon close examination, in many cases this curve, moving from the tear duct to the opposite end, starts out somewhat straight and has a more abrupt curve upwards as it reaches the outer edge.
The one thing that most overly-simplified eye drawings miss is the small notch-shape of the tear duct area. Every human eye has them, some more pronounced than others. Don’t miss it in your drawing.
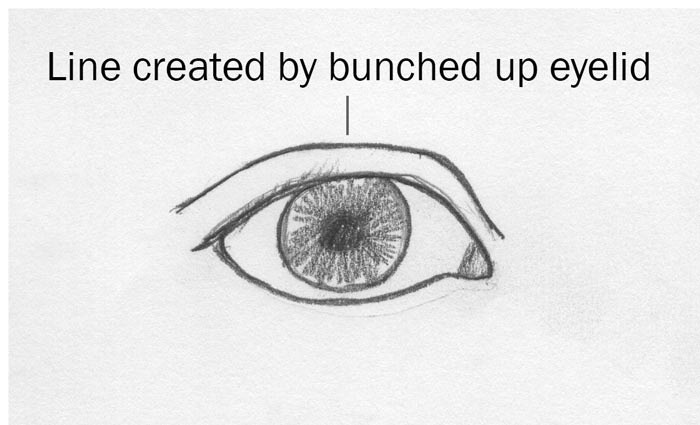
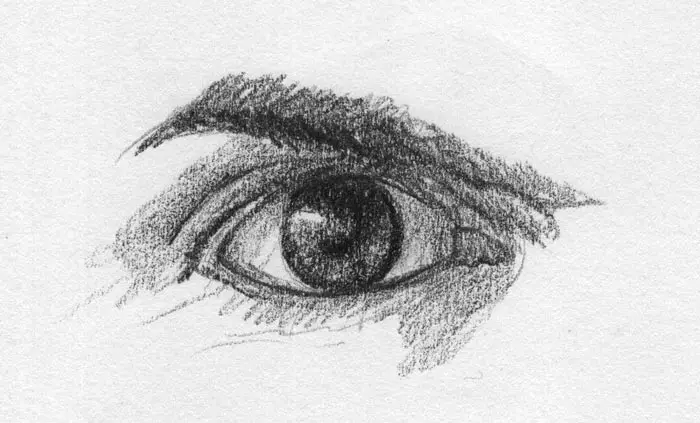
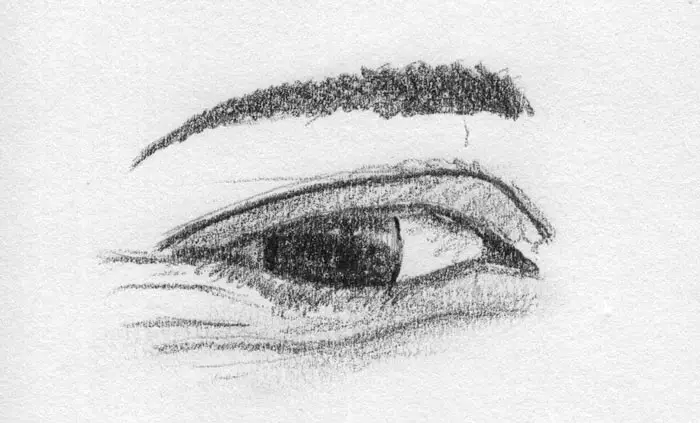
The next consideration for drawing the human eye from the front are the eyelids. We humans have two eyelids per eye, and they make up a big part of the eye’s characteristics. The eyelid curves over our eye, similar to visors. When looking at an open eye, the bunched up tissue of the upper eyelid goes across the entire visible eyeball and over the tear duct. The lower eyelid appears to start just after the tear duct and terminates under the upper lid.
The bunched-up tissue of the eyelids usually creates a line that arches across the top of the eye. Some eyes also have a line below the eye. Depending on the shape of the eye, angle, and emotion expressed, you may see all of this line or barely any of it. Ethnicity and age also play a factor. For example, in many young Asian people, this upper line can appear almost non-existent.
Eyebrows are another big characteristic of the overall look of the human eye. Besides differences in shape, thickness, and location, they are arguably the biggest factor in how the eye can express emotion. Women tend to have thin eyebrows while men thick ones. Men’s eyebrows also tend to be closer to the eye than women’s eyebrows are.
The pupil is always very dark, near black. But it varies in size depending on the amount of light it’s exposed to. A person in a dark setting will have large pupils and in bright light small pupils. These details are very important if you want to indicate a certain type of lighting or background.
All these things mentioned above are generalities. Every human eye is a variation of these concepts. Some eyes don’t appear to have any pronounced apex on the top curve, but look like a perfectly smooth curve. Others may have an apex more in the center of the curve rather than slightly off to the side. Some have a straighter look, others a more rounded look.
If your intent is to capture the likeness of a person, then your job to capture these subtle characteristics in your drawing. Knowing what to look for can be of tremendous help, along with sketch a lot of eyes.
The Difference Between Men and Women’s Eyes
Despite there being only two biological genders, the human eye has great variation within those genders. Yet there are still a couple typical characteristics that generally suggest that a pair of eyes belong either to a man or a woman.
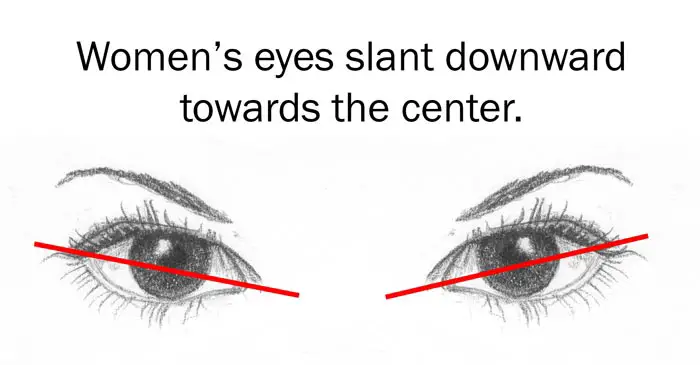
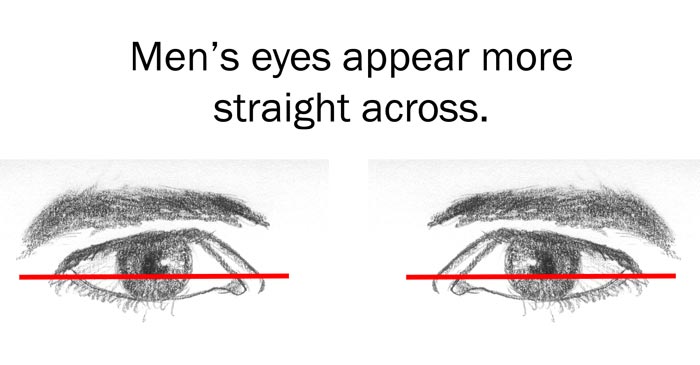
The eyes of a stereotypical man tend to be composed of slightly straighter and more angled lines. While the eyes of women are more elegant with smoother curves. Also, as indicated above, men’s eyebrows tend to be closer to the eyes and thicker, whereas women’s eyebrows tend to be raised further above the eye and are thinner and more elegant. Of course, some of this may be due to eyebrow trimming or other cosmetics.
Another distinction to look out for is that women's eyes tend to have a slight angle from the outside of the eyes downward toward the nose, while men's eyes tend to be more level. While makeup and trimmed eyebrows can exaggerate this appearance, it's something to bear in mind if you want to feminize a person's eyes.
One of the most typical characteristics that artists will use to indicate a woman’s eyes are long eyelashes, especially in cartoons and animation. This can also be a helpful distinction, however, baring the use of makeup or fake lashes, when I look at the distinctions between men’s and women’s eyes, in reality, I usually don’t see much difference in eyelashes.
These are only stereotypes that can be useful when drawing a generic man or woman. But in reality, stereotypes can fall flat. I’ve seen women with thick eyebrows closer to their eyes, and men with very rounded eye shapes. Starting with knowledge of these stereotypical characteristics and branching out from there into uniqueness can be very useful, especially for the beginning artist.
Drawing the Human Eye for Different Age Groups
A child’s eye is typically going to display more of the iris and pupil with very little of the white or sclera. This results in the eyes appearing more rounded, bright, and lively. In most infants, the eyebrow hair will be very thin or even non-existent and the eyes will be very rounded as compared with older children or adults.
Also, the eyelids on the open eye will be a very smooth curve, with all the surrounding flesh being very smooth in appearance. The younger the person, the less lines or winkles.
The eyes of elderly subjects will appear to be more deep-set, with the eyelids covering more of the eye. The line created by the upper eyelid can extend significantly beyond the outer edge of the actual eye with a pronounced overlap and shadow.
Elderly people will usually have excess fat cells under the eyes causing “bags” which add more lines and shadows for the artist to render. There can also be lines reaching out beyond the outer edge of the eye, commonly referred to as crow's feet. These characteristics can actually make it easier to draw a likeness since the artist will have more lines to measure and compare with.
Drawing Expression in the Human Eye
One of the most important and yet overlooked considerations in drawing the human eye is the mood or emotion of the person whose eyes you are drawing. A person’s emotions will have just as much, if not more impact on the shape of the eye than the eye’s basic characteristics. The part that is most responsible for expression in the human eye is the brow.
An angry person will usually lower their brow, causing their eyes to become more narrow and covering the top half of the iris and pupil. A person in a state of rage may furrow their brow and have tbheir eyes wide open at the same time.
When a person smiles they raise their zygomaticus muscles which causes the skin below the eye to bunch up and they may even slightly narrow their eyes. This is why you can tell a person is smiling even if you can only see their eyes. If the person is delighted or happily excited they will also raise their eyebrows.
A surprised person will raise their brow and open their eyes very wide, causing their iris to be more visible, revealing almost the full circle of the iris in many cases. A drowsy person will slightly lower their brow and have their eyes only slightly open.
This brings up an important point. Going back to how we drew eyes when we were children, we would usually show the entire circle of the iris. But in most cases, unless the eye is expressing a strong emotion like surprise or fear, at least a small part of the top of the iris will be covered by the upper eyelid. In some cases, both the upper and lower parts of the iris will be covered, especially in persons expressing a state of sedation or tiredness.
If your subject’s face is in bright light, such as on a clear sunny day, be aware that they will be squinting significantly. Drawing this accurately is a very powerful way to indicate strong light on a person’s face.
When drawing the eyes, be as cognitive of the mood that the eye is expressing as you are about the anatomy of the eye itself. This will bring life to your drawing or painting and is the mark of a master artist.
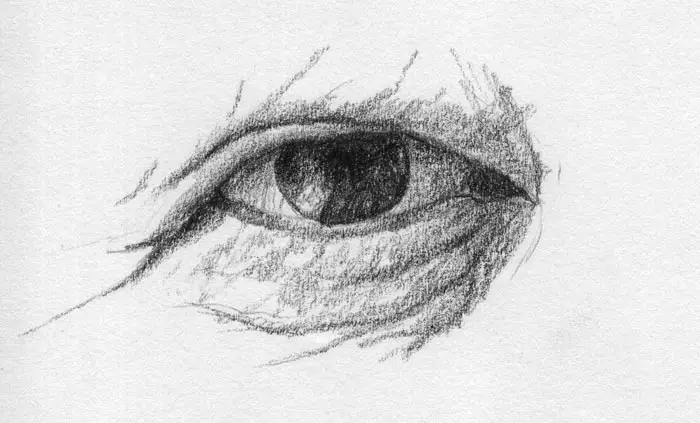
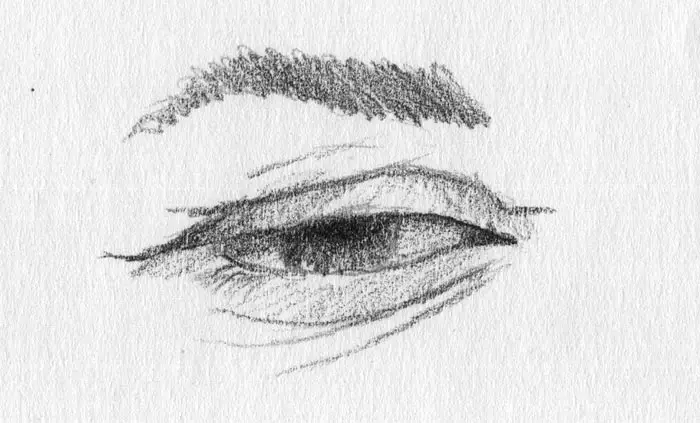
Drawing the Human Eye from the Side
Drawing the human eye from the side is relatively simple. The eye itself can be represented by a somewhat isosceles triangle with one side having a convex curve. In actuality, the eyeball is a sphere, and this sphere is what gives you the convex curve that you see when looking at the eye from the side. The thing you as the artist need to be aware of is the characteristics that are unique to each individual person's eyes. These characteristics will be created by the bunched-up eyelids, the eyebrow, eyelashes, eye color, and most importantly the expression of the person at that time.

Drawing the Human Eye from Other Angles
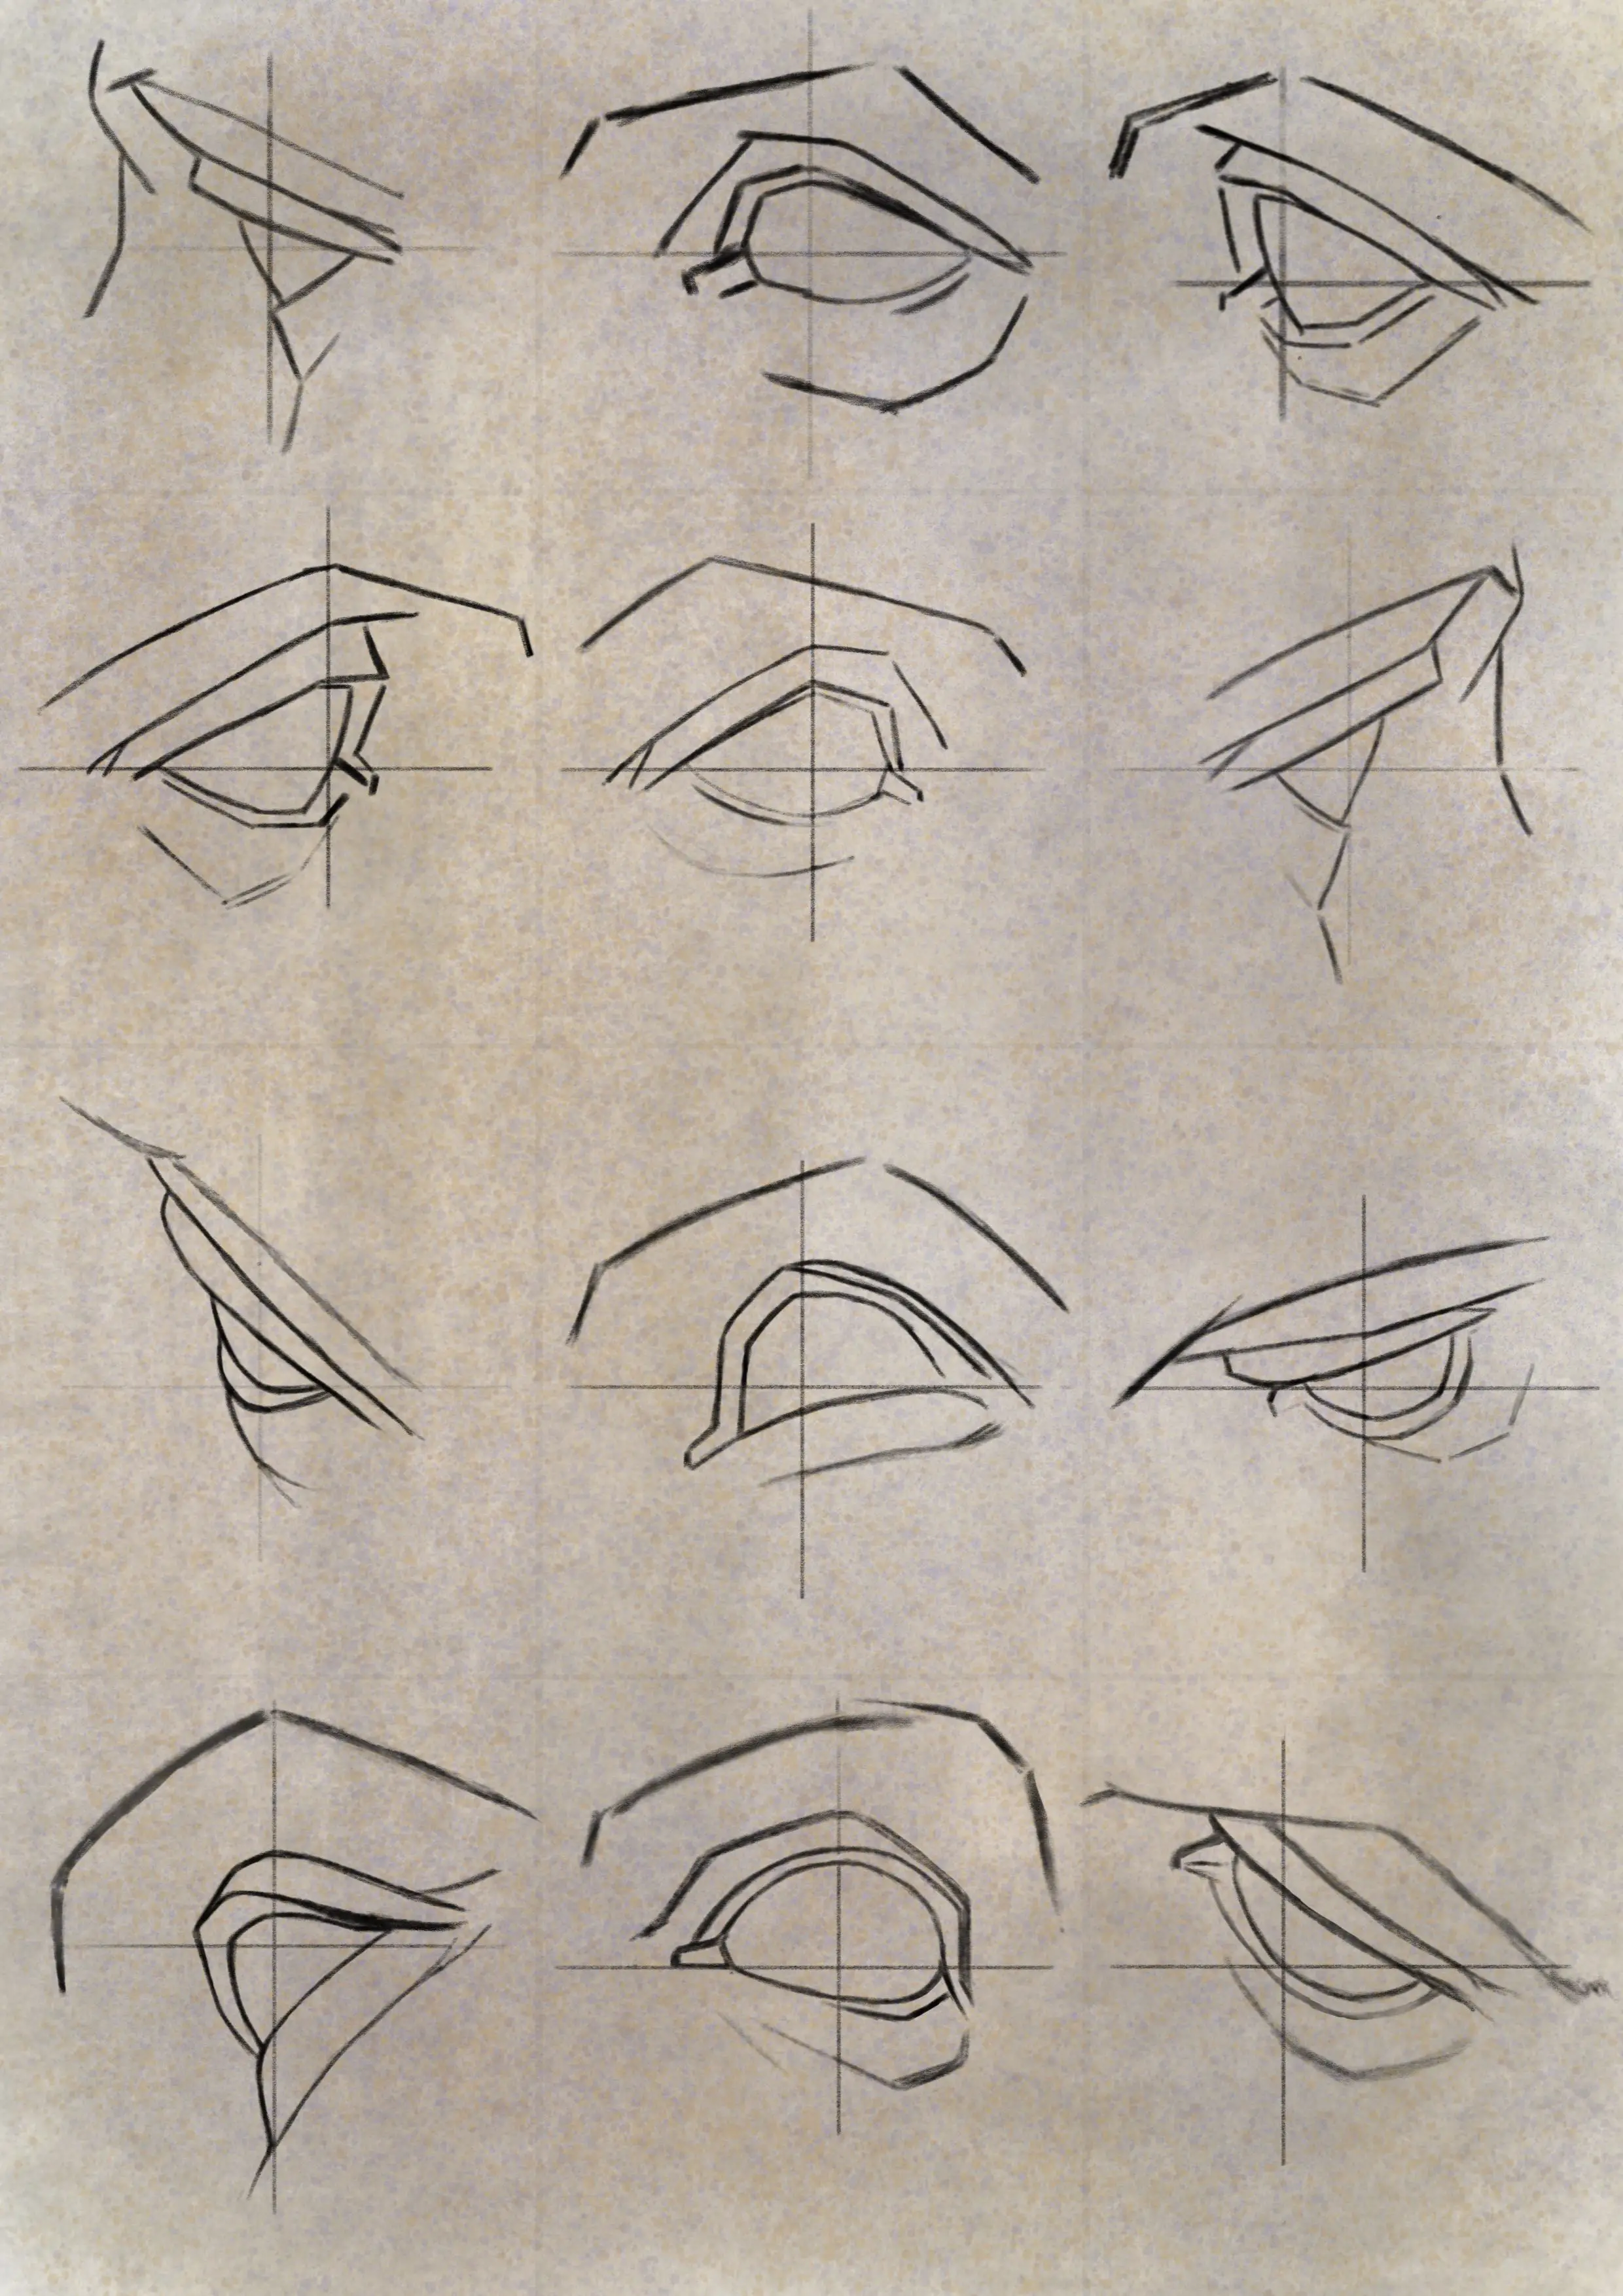
Of course, the human eye is not just visible from the front or the side, there are many other angles from which you may need to draw the human eye. When you encounter one of these angles the best thing you can do is forget that you are drawing an eye and break it down to abstract shapes.
Below are some drawings of the human eye from the Bargue Drawing Course. Notice how they break the eye down into abstract shapes that are easily replicated. I highly recommend you copy these shapes to familiarize yourself with the basic shapes of the human eye.
Placement of Eyes on the Head
Being able to draw the human eye accurately is only half the battle. Just as important is where to put those eyes on a person's head or face. When drawing or painting portraits, correct placement of the person's features is just as important as drawing those features correctly. Even if you don't draw a person's eyes exactly as they appear, you can still get a reasonable likeness if you put those eyes in the right place. Let's examine this in more detail.
Distance Between the Eyes
For most people, when viewing the front of a person's face, the distance between the eyes is approximately one eye-length. So let's say you draw a person's left eye and you want to know how far away the right eye should be. Just measure the eye you have drawn from the outer edge to the tear duct and this measurement will show you the distance from the tear duct of the left eye to the tear duct of the right eye.
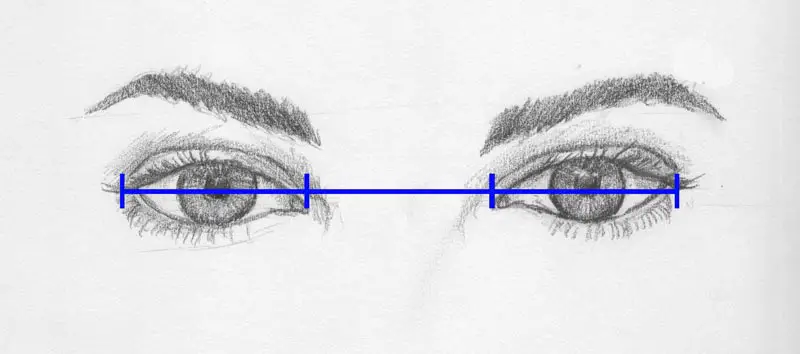
Bear in mind that this is an approximation as you will find many people who buck this measurement. Some people may have eyes that are slightly closer together, others further apart. Asian people tend to have smaller eyes that are further apart than what is found in Caucasian models. Also, if the person has their head slightly turned or tilted, this will affect the measurement.
It's also good to know that the total width of the human head near the center of the skull is generally about five eye-lengths across.
This approximate measurement should be treated as a starting place from which to judge the uniqueness of the person you are drawing.
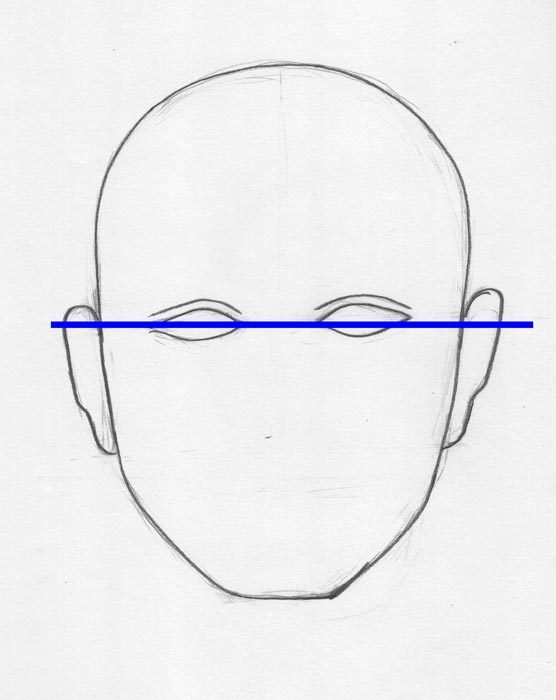
Placement of Eyes on the Human Head
Now that you know how far apart your eyes should generally be, you need to know where to put them on the person's head. From the front, the eyes have a vertical position right in the middle of the entire head when measuring from the top of the skull to the bottom of the chin.
You can easily determine this placement by drawing a cross on the outline of the skull with the horizontal line of the cross right in the middle as shown below.
The Eyes and Other Facial Features
With the eyes established correctly on the head, you can now move on to indicating the other facial features in comparison to the eyes. If you haven't yet, you can indicate the upper and lower eyelids and the eyebrows. If done correctly you should begin to see a likeness of the person you are drawing.
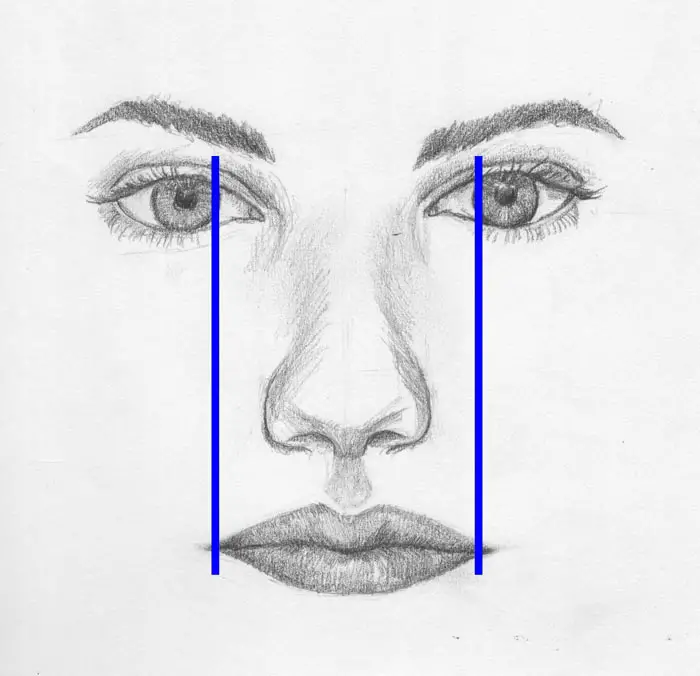
With the eyes properly established you can use the eyes to determine the location of other facial features. Once again, looking at the front of the face, vertical lines drawn straight from the tear ducts will give you the outer edges of the nose.
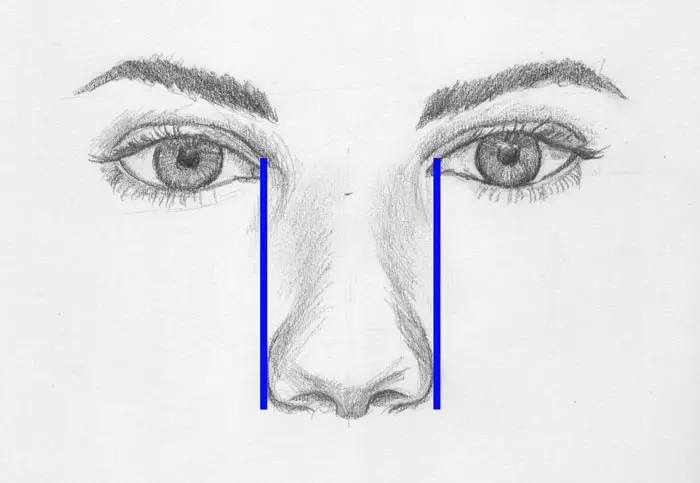
Vertical lines drawn straight down from the inner edges of the irises will show you the width of the mouth.
Once again, these measurements are averages and you will always find faces that do not conform to these rules. It's precisely these exceptions that help make us all unique in appearance.
Drawing Eye Color
If you are drawing with a grayscale medium such as pencil or charcoal, you may not give any consideration to eye color, but you should. A seasoned artist will be able to express eye color even with a pencil. Blue eyes will appear lighter in value while brown eyes, will be darker.
Light eyes will usually show more of the spoke-like pattern in the iris whereas this pattern may be barely, if at all visible in dark eyes.
It's tempting to leave the whites of the eyes as pure white, but they are rarely ever white. Remember that the eyeball is a sphere, and therefore it will have the same type of light and shadow that a ball has. So if you have a strong light source coming from the right, the left side of the eye will be slightly darker. Capturing this will give your eyes an incredible sense of form and realism.
Drawing Highlights in Eyes
Depending on the light source that is illuminating your subject, the eyes in your subject may have some type of highlight. If the light is a soft, weak light you may not notice any highlight at all. If it's a strong light source then you should see some type of highlight in the eye.
Highlights are useful in that they help your subject look alive. They take on numerous shapes, usually replicating the shape of the light source that is producing them. And they will have different levels of size and brightness.
When drawing highlights remember that they are an enhancement, and should never dominate the eye or become a distraction. Always make sure that they serve the artistic purpose of your drawing. If, once drawn they look too big, or the shapes are just awkward, change them. Don't be afraid to depart from a literal interpretation in order to end up with a better drawing.
Many highlights are not squares, they can take on all kinds of shapes and have a variety of edges and even lost edges.
Also, even if it doesn't appear like this in your subject, make the highlight in one eye slightly darker or less dominant than the other eye. Logically you will want the highlight that is closest to the light source to be brighter or more dominant. This will give your eyes more a sense of realism. If you are drawing or painting in color, don't make the highlights white. Try to determine the color or temperature of the light source and paint the highlights accordingly.
Shadows and the Supraorbital Arch
The supraorbital arch is the top part of the eye sockets in the human skull. The actual eyes rest within the eye sockets and the supraorbital arch protrudes forward, above the eyes. Depending on the light source, this arch will create a shadow over the eyes, especially when in bright overhead light.
So what does that have to do with drawing eyes? Well, if you are drawing a human face from a distance, getting this shadow correct can really aid in capturing the likeness of the person you are drawing. In this situation, you probably don't need to concern yourself as much with details like the shapes of the eyelids, rather you can focus on getting the shape of this shadow correct. If your figure is a significant distance away you can just draw this shadow and get a strong likeness.
Where are the Eyes Looking?
There is an old saying which has its origin in the Gospel of Matthew, the eyes are the window to the soul. Our eyes communicate way more than any of us would like to think. We look at each other's eyes when we talk. We can usually determine another's emotions based on their eyes. If someone looks in a particular direction it's a good bet the other people in the room will look in that direction also.
Bear this in mind when you are drawing eyes. No matter how large the composition, if you draw a person in it, there is a good chance that their eyes will automatically become the focal point. You can use this to your advantage. Eyes looking straight at the viewer will have a captivating effect. Eyes looking off the side or into the composition can add a sense of mystery or direct the viewer to that spot in the drawing or painting.
When you add eyes to a drawing, you automatically add life and another dimension that cannot be achieved with any other subject.
Practice Drawing Eyes
If you struggle with drawing eyes, the best thing you can do is draw a lot of them. Break them down to their simplest shapes and get those shapes correct before you add any detail or shading. Search for human eyes on the internet and do practice drawings. I also advise you to draw eyes from life as nothing compares with drawing a living person looking back at you. You can also draw your own eyes in a mirror. Do this every day and in no time you will become a master at drawing eyes.
Jason Tako is a nationally known fine artist who specializes in western, wildlife, plein air, and Historical Native American subject matter. He spent his learning years sketching the wetlands and wooded areas of rural Minnesota. He has been featured in Plein Air Magazine and Western Art Collector Magazine and he was the Featured Artist for the 2020 Southeastern Wildlife Expo. See his work at www.JasonTako.com and his demonstrations on his YouTube Channel.
Warning: Undefined array key "preview" in /home3/mysketc2/public_html/wp-content/plugins/oxygen/component-framework/components/classes/comment-form.class.php on line 75
Warning: Undefined array key "preview" in /home3/mysketc2/public_html/wp-content/plugins/oxygen/component-framework/components/classes/comment-form.class.php on line 79