Oil Painting Without Solvents-What Artists Need to Know
Using solvents to thin oil paint or clean brushes can present health problems for certain artists. But one does not need to abandon oil painting or resort to water-based oil paints due to intolerance of solvents. In this article, we will explore oil painting without solvents and what artists need to know.
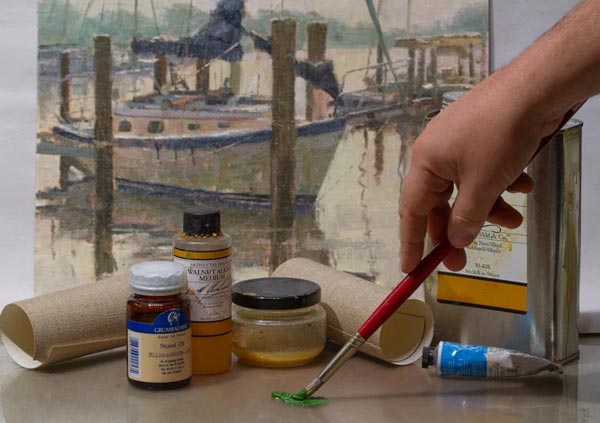
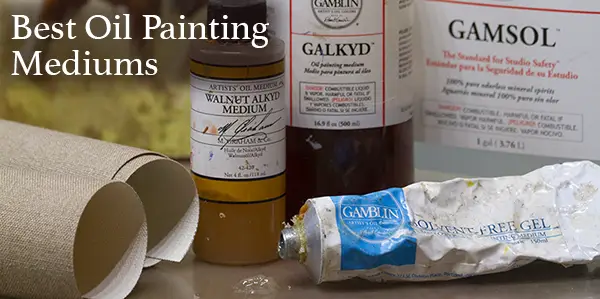
Solvent-free oil painting can be done by thinning the paint with non-toxic mediums such as oils, natural alkyds, and even citrus-based thinners. Oil paint made from linseed or safflower oil does not produce harmful vapors and pigment toxicity is the same in both oil paint and water-based paint.
Below we will discuss some of these options in detail and what you need to know about each. I will also have links on my Resource Page showing where some of these items are available.
IMPORTANT NOTE: I'm using general descriptions for many painting mediums. When I say something such as linseed oil is non-toxic, it's not a guarantee since it's impossible to describe every manufacturer's production and refinement methods, and product misuse can make something non-toxic become toxic. Always check the brand label to confirm any possible toxicity or limitation of the medium.
Also, when trying a new product, I recommend purchasing a small amount and testing it first. People react differently to different things, and while something may be certified non-toxic, it doesn't mean you won't have a negative reaction to it.
One more note about oil paint toxicity. Many people mistakenly believe it's the oil paint itself that's toxic, and switching to acrylics or watercolor will remove all toxins, but this is false. As stated above, oil paint is just pigment in an oil binder, just as watercolor is just pigment in gum arabic. It's not the oil binder that's toxic, its pigments like cadmium or cobalt, and these are toxic whether the binder is oil or gum arabic.
So Cadmium Red watercolor is just as toxic as Cadmium Red oil paint. But bear in mind many pigments are non-toxic, and even the toxic pigments will not be toxic to you unless your skin is exposed to them or you sand a dry painting and breathe in the particles. Also, pigments do not turn into a breathable vapor unless your spray your paint onto the canvas.
Generally Two Ways to Thin Oil Paint: Solvents and Oil
Traditionally there have been two ways for an artist to thin oil paints: oil mediums, and solvents. Oil mediums include vegetable-based oils made from linseed, poppy, safflower or walnut. Solvents include turpentine and mineral spirits AKA white spirits.
The Different Oils Used for Oil Painting
Vegetable-based artist-grade oils are generally non-toxic. They're derived from the plant they are named after. So unless you have any allergies, using one of these oils is a good substitute for solvents. Oils do not produce fumes. In fact, they will absorb oxygen during the drying process.
Some artists may wonder which oil is best to use for oil painting. Let's look at each one.
Linseed Oil
Linseed oil is the primary oil used in most oil paint. It's permanent and very stable, providing a solid foundation. It generally dries within 5 days, depending on the paint thickness, pigment, air temperature, and type of surface it's applied to. The one drawback is it can yellow over time. This is more noticeable in lighter and cooler colors. As a result, some manufacturers will use a different type of oil such as walnut, poppy, or safflower for these colors.
Walnut Oil
Walnut oil is a pale yellow-brown color. It dries a little slower than linseed and is very resistant to yellowing and cracking. Colors in walnut oil can have a more brilliant appearance. It was used by some renaissance masters and is a great choice for artists who want to keep their studio solvent-free.
Safflower Oil
Safflower oil is paler in color than linseed oil and has less of a tendency to yellow over time. Its drying time is slower than linseed oil. Unlike linseed oil, which dries by forming a top skin, safflower tends to dry evenly throughout the entire film. This causes it to have a more sticky feel during the drying process which may not be preferred by some artists.
Some express concern over safflower's long-term stability, but analysis has shown it's held up well over the centuries and is used by many top paint manufacturers.
Poppy Oil
The slowest drying time of the bunch, poppy oil is great for artists who like to work wet on wet. It can give your paint a nice buttery feel. However, it should be used in small amounts as there are questions about its long-term durability, and if you plan to layer your paints avoid using it in your initial layers.
Oil Painting with Stand Oil, Alkyds and Others
Over the centuries artists and chemists have experimented with heating oil and exposing it to the elements to alter is viscosity and drying time. This altering usually does not result in any toxicity, but as stated above always consult the manufacturer's label.
Stand Oil
Stand oil is linseed oil that has been thickened by heating. The result is a thicker medium that has less of a tendency to yellow with a slower drying time than regular linseed oil. When applied, it spreads out reducing brushstroke texture and dries with a smooth finish, similar to enamel. It's great for glazing and usually low or non-toxic and like most oils, it will not emit any harmful fumes.
Sun Thickened Oil
This is an oil that has been exposed to sunlight to change its viscosity to a thick, syrup-like consistency similar to stand oil but with faster drying time. Like stand oil, it has less of a tendency to yellow. Unlike other mediums, you can apply it to your pigment with a much higher pigment to oil ratio without any breaking. You can easily make this stuff yourself. Check out Michael Harding Oil Colors to learn more.
Alkyds
Most alkyd oil paints are made with an alkyd resin binder. They dry quickly and create a very permanent surface.
Some alkyds can be toxic, others non-toxic, depending on the manufacturing process and ingredients. Gamblin's Galkyd is less toxic than others but it does release Volatile Organic Compounds (VOC's) and petroleum distillate that may cause some people to have issues. I personally use it (with adequate ventilation), but someone who is concerned about harmful vapors may want to avoid it.
M. Graham & Co. makes walnut alkyd that is certified non-toxic. The Walnut alkyd dries very fast and leaves a glossy surface. It also doesn't have much of a smell which is great for people with sensitive noses. I love using this stuff if I have to touch up an area that needs to dry very quickly and glossy.
Natural Mediums and Thinners for Oil Painting
In recent years there has been a push to create alternatives for non-toxic oil painting. Here is what you need to know about some of these options.
Citrus-Based Turpentine
There are now several citrus-based turpentines on the market such as Zest-It and Seville Citrus Turpentine. They are technically turpentine, but these are derived from orange peels rather than pine trees or forest waste (which are the sources of traditional turpentine). They are also technically non-toxic provided they are used correctly. Always read the label.
I have never used Zest-It, which is made in Great Britain, but reviews say it has a mild citrus scent and doesn't seem to cause the same issues most people have with traditional solvents. They also say it does a nice job of thinning oil paint. There are reports of skin sensations such as tingling, but this may have been due to people leaving it on their hands long-term causing it to eliminate the natural oils on the skin.
IMPORTANT NOTE: No painting medium should be left on your skin for long periods of time. Even completely natural solutions can cause skin irritation if there is long-term exposure. Wipe your brush handles often as medium running from the bristles down the handle is one of the biggest sources of skin exposure. Another solution is to paint while wearing latex gloves.
Oil of Spike Lavender
Oil of Spike Lavender (Spike Lavender is a type of Lavender flower) has been used since the 16th century. It thins paint well but has a very strong scent and some people report being unable to use it due to the strong smell which can even stay in your oil painting. It is considered non-toxic but studies concerning long-term inhalation are lacking. I would test a small bottle first and use it with sufficient ventilation.
Thinning Oil Paint with Technique
Solvents and oils are not the only way to achieve the thinning of oil paint. You can also do this by laying down thin layers of paint straight from the tube. This may require a sturdy bristle brush and some good old fashioned elbow grease. It's also easier to do with a smooth canvas that has very little texture. The lack of texture means you don't have to work as hard to fill in all the little holes with paint.
You can also scrap excess paint off with a palette knife and then thin it more with a bristle brush.
Be Aware of the Fat Over Lean Principle
The fat over lean principle is very important to remember if you are using any type of oil or petroleum-based medium and paint. The basic concept is that you always want to make certain your top layers of paint have a higher oil content than your bottom layers.
So if you are thinning your paint with oil, the initial layers of pigment should have very little, if any additional oil applied; it should be applied with the consistency straight out of the tube. As you continue to add layers of paint, make sure they contain at least the same amount, but preferably more oil than the previous layer. Be careful not to add too much oil as this will break the pigment and not cover the preceding layer.
Ghosting-Dull Spots in Your Oil Painting
If you don't follow the fat over lean application method, you risk ghosting in your oil painting. Ghosting is when dull spots of faded color appear after the oil painting has dried. This is because the layers underneath, which incorrectly contain more oil, sucked the little bit of oil out from the top layers down to the lower layers. This can be fixed with a technique called oiling-out, which is basically brushing more oil onto the surface of the dried painting.
The other problem that can occur is cracking. Since the top layer doens't have as much oil, it becomes more brittle. When the lower layers expand or contract due to their higher oil content, the brittle top layer is not able to move along and cracks.
It's also a good idea to paint thick layers over thin layers. Thick layers by default should contain more oil than thin layers. You can glaze thin layers over thick layers, but the thin layer must contain a higher level of oil. Gamblin Oil Colors has a great tutorial on their website about oil paint structure.
Basically, if you use a layered approach to painting, keep your initial layers thin by using a medium that is not oil or petroleum-based (such as a citrus-based solvent), or just apply the paint thinly right out of the tube. Then increase the amount of oil as you proceed. Use the oiling out technique if ghosting appears.
Ventilation for Oil Painting
In theory, if you are not using any solvents or toxic chemicals, you shouldn't need to concern yourself with ventilation. However, it is always a good idea to have some kind of ventilation in your studio, and it is a must if you are using solvents that may contain even slightly harmful fumes. It is recommended that your studio air be changed 10 times per hour.
That brings me to an important note about odorless solvents. Keep in mind the term odorless is usually a misnomer. Even if they don't have an odor (many of the cheap ones have a very strong odor), they still release vapors that may be harmful and require adequate ventilation or could be outright unusable for people with health concerns.
Cleaning Your Oil Brushes Without Solvent
Linseed Oil
I personally use linseed oil to clean my brushes while painting. Bear in mind I use another technique for a final cleaning which I'll talk about below. The great thing about linseed oil is I can keep my brush cleaning jar open while painting and have no fumes or odor (except for the mild smell of the oil, which I don't even notice anymore).
This is not the cheapest method, but I usually buy a gallon of Richeson Shiva Linseed Oil for around $70 and this lasts me for several months or more (see my Resource Page on where to buy this). You can also use other oils like walnut oil to clean your brushes, though the cost will generally be higher.
IMPORTANT NOTE: If you use linseed oil, or any other type of oil as a medium or for cleaning your brushes, always dispose of any paper towels or rags that contain oil in a metal garbage can with a metal lid. Rags soaked with linseed or other oils have been known to spontaneously combust. In my 20 years of painting, this has yet to happen, but I'm not taking any chances and nor should you.
Turpenoid Natural
Weber Turpenoid Natural is certified non-toxic and non-flammable, and it's one of the best brush cleaners out there. If your oil painting brush has become stiff due to insufficient cleaning, Turpenoid Natural is one of your best bets for restoration. Just soak the bristles in it overnight and many times your brush will be ready to use the next day.
I previously used this as my daily brush cleaner but have since stopped. A garbage can full of paper towels soaked with this stuff can emit a strong odor that some people have a difficult time with. I now only use this to restore stiff brushes.
Turpenoid Natural is really meant more for cleaning brushes and not for thinning oil paint as a medium. Obviously, if you are using it to clean your brushes small amounts will make it into your painting, but this shouldn't pose any issues.
Marvelous Marianne's Savvy Soap
I love this stuff, especially for painting trips. This is more for final brush cleaning than it is for cleaning between paint strokes. It's also great for restoring brushes. It's non-toxic, bio-based, and you can even use it to clean your hands.
When I'm painting in the field and need to give my brushes a final cleaning for the day, I'll just squirt some Savvy Soap into my palette, rub the bristles in it, and wipe them with a paper towel. I repeat until they are clean. It's very convenient.
Murphy's Oil Soap
Some purists may cringe at this but I have had no issues giving my brushes a final cleaning with Murphy's Oil Soap. It's economic and works well. I just clean my glass palette, pour some on, and stir the brush bristles around in it, then wipe them clean, repeating as necessary.
Bear in mind Murphy's Oil Soap can cause irritation for some people. I only use it about once or twice a week to clean brushes I'm done using for the time being. It hasn't caused my family or me any issues, but you will probably want to test a small bottle first.
Other Options for Solvent-Free Oil Painting
Starting Your Oil Painting with Acrylic
Since it's usually the initial layers that require thinning with a medium, some artists will lay down their first layers with acrylic paint. Bear in mind this will not work on oil-primed surfaces since you cannot paint acrylic over oil, only the reverse. But if you still want to have the soft, blending capabilities of oil without the issues or ghosting or thinning with solvents, you may want to try this option
Keep in mind that if you want to use the above method, you must buy a separate set of brushes and even a separate palette and palette knives. Once you dip your brushes into oil paint, they cannot be effectively used for water-based paints like acrylic. Oil and water do not mix. Or do they...?
Water-Based Oil Paint
A somewhat newer solution that has been utilized by many is water-based oil paint. Despite what you may think, these are real oil paints and they work both with water and oil. They dry more quickly than traditional oil paint. Since they work with traditional oil paint you could thin them with water and use them for your initial layers. Then you can paint over them with traditional oils or use them exclusively.
I don't have much personal experience with water-based oil paints. I know they can become sticky if you don't use enough water to thin them. They can also freeze, which is only an issue if you plein air paint in cold temperatures. Some brands can be stiff but you will also have this same problem with cheaper traditional oil paint.
My Painting Method and Studio Practice
I don't yet have any issues with solvents, but I have immediate family members who do. My studio is not entirely solvent-free, but I'll share my process.
I use traditional oils for my entire painting process; my brush cleaning process is described above.
When starting an oil painting I will usually thin my paint with Gamsol Odorless Mineral Spirits. I have this in a small jar that I keep covered when I'm not using it since it does emit harmful vapors. I will also turn on the exhaust fan I had installed in my studio. Prior to that, I would open a window and even use a window fan.
Most all of my subsequent painting is done without thinning the paint, but using it straight out of the tube. Bear in mind that good quality paint helps. Buying cheap, stiff paint will force you to have to thin it, which usually results in soupy, unusable paint. See my Resource Page for what brands and colors I use.
At times I will use a medium to rework a dried painting or to glaze it. If I don't mind keeping the paint thin, I'll use Galkyd, which does contain mildly harmful vapors. If my family members are in the studio, I will use walnut oil or safflower oil. If I want the paint to retain some body and thickness, I'll use Gamblin's Solvent-Free Gel, a great alternative!
This is by no means an exhaustive list of everything that is available. There are always new options coming onto the market place, some better than others. Hopefully, this will convince you that you don't need to dump oil painting for health reasons and get you on the path to a viable solution.
Keep painting!
Jason Tako is a nationally known fine artist who specializes in western, wildlife, plein air, and Historical Native American subject matter. He spent his learning years sketching the wetlands and wooded areas of rural Minnesota. He has been featured in Plein Air Magazine and Western Art Collector Magazine and he was the Featured Artist for the 2020 Southeastern Wildlife Expo. See his work at www.JasonTako.com and his demonstrations on his YouTube Channel.
Warning: Undefined array key "preview" in /home3/mysketc2/public_html/wp-content/plugins/oxygen/component-framework/components/classes/comment-form.class.php on line 75
Warning: Undefined array key "preview" in /home3/mysketc2/public_html/wp-content/plugins/oxygen/component-framework/components/classes/comment-form.class.php on line 79