Sketching Exercises To Help Beginners Learn and Pros Improve
When I started drawing, I benefited greatly from certain sketching exercises that not only improved my dexterity but most importantly increased my powers of observation. Below are some sketching exercises that will help you improve your drawing skills.
Rapid Line Sketching Exercises
There are many versions of this type of exercise, below we will cover several. All of them generally include any exercise that combines the rapid movement of the pencil in a systematic pattern.
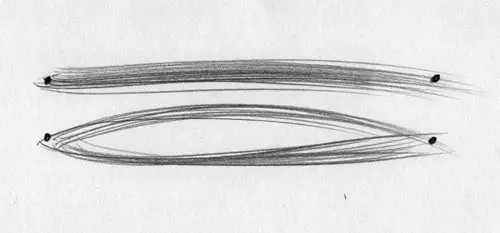
Dot to Dot Line Drawing Exercise
Begin with a sheet of paper. Draw two dots about 6 to 8 inches apart horizontally. Gently place your pencil on the left dot. Using your entire arm all the way up to your shoulder, draw a line to the other dot in a very quick and light manner, trying to hit the second dot.
Repeat this 10 or more times then move down an inch and repeat again. You may not hit the dot every time and that is fine. The object is to loosen up and use your entire arm and improve your aim. Another variation you can try is drawing a slight arc instead of just a straight line and also going from right to left.
See the types of pencils, charcoal, and paper I use on the Drawing and Sketching Resources Page.
Rapid Square Drawing Exercise
Taking the above exercise a step up, this time draw four dots on your paper so they form a square. Starting at the top, draw a quick, light line from the left dot to the right. Then, without rotating the paper, draw another line from the upper right dot to the lower right dot. Next, go from the lower right dot to the lower left, then finish the square from the lower left to the upper left.
Keep repeating on this same square until you cannot see the dots anymore. The object of this exercise is to get comfortable moving your pencil and arm in other directions besides just left to right. This is why it's important not to rotate the paper. Do this exercise again going in a counter-clockwise direction around the square.
Rapid Elipse Sketching Exercise
Now that you have practiced sketching in straight lines, let's on circular motion with ellipses. There are several great variations on this exercise as described below. Just make sure you use your entire arm when you do these; you should be able to feel it in your shoulder. Also, practice holding the pencil gently and working with light pressure.
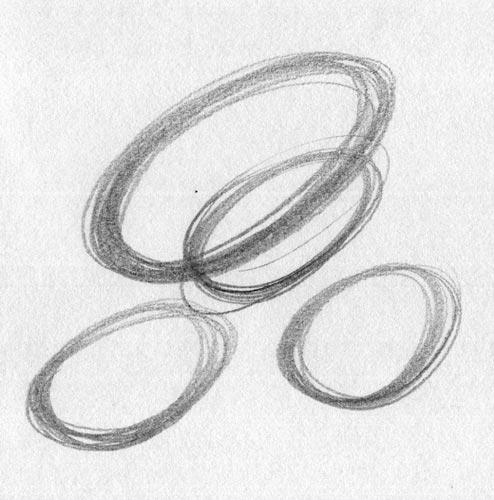
Drawing Circles Exercise
Start with a blank sheet of paper. Holding the pencil lightly on the paper, start moving your whole arm quickly in a circular motion. The circle should be around 4 to 6 inches in diameter. Keep repeating the same circular motion for about 10 seconds then start another one.
You can vary the size from small to large as your progress. Your lines may stray a bit but the object is to keep the path of the lines as narrow as possible while maintaining a rapid, fluid motion. The circles do not have the be perfect circles, ellipses are fine.
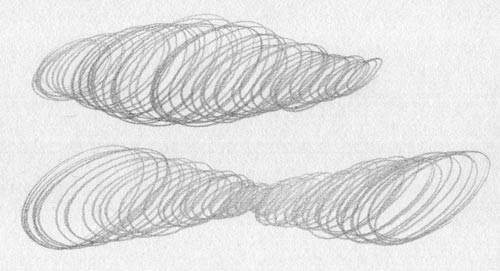
Large to Small Ellipses Exercise
Taking the above exercise to the next level, start near the left side of your paper, and begin drawing a large ellipse about 4 inches in diameter in the same rapid, loose fashion. Slowly move your hand to the right, gradually making the ellipses smaller as you proceed. Continue for about 6 to 8 inches then repeat further down on the paper. Vary the exercise by starting small and progressing to large ellipses then small again, and also try going from right to left on the paper.
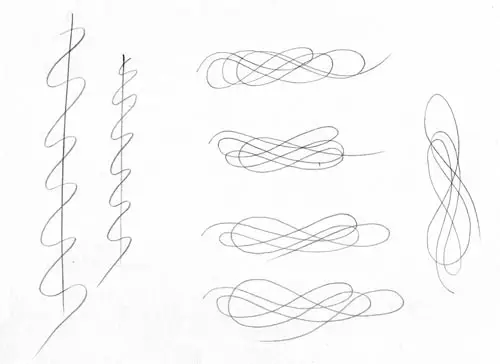
Slalom Sketching Exercises
Derived from the wonderful book "Find the Flow, A Calligraphic Journey, by Gina Jones, the Slalom exercise is a great way to learn to control fluid motion.
Draw a straight vertical line about 8 inches long. Then starting at the top, move downward creating a rounded zig-zag pattern that crosses over the vertical line, continuing to the end of the line. Use your whole arm and practice a rhythmic motion by increasing the pressure on the left diagonal downstroke and through the curve then decreasing pressure on the right diagonal upstroke. See the example below the following section.
Repeat this several times on your sheet of paper. Vary the size of the slalom and the length of the lines. Most of all, use your whole arm.
Interlacing Patterns Drawing Exercise
Also in Gina Jone's book, this exercise is best described with a visual (see below). This exercise is not only great in teaching you fluid motion, but it can also result in beautiful patterns. When doing this exercise, create changes in pressure as if playing classical music, going from high to low volume. I highly recommend Gina's book for this and similar exercises. While the book focuses on Calligraphy, the exercises are also great for drawing.
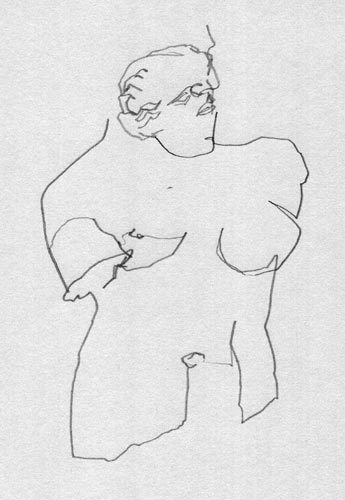
Contour Drawing Exercises
This is a time-honored method for learning to draw and has been described in great detail in numerous books such as Kimon Nicolaides classic, The Natural Way to Draw. See my review of this book.
Select an object or have a model sit for you. Place your pencil on the paper and begin drawing your subject without looking at your paper. Go slowly over the entire form with your eyes and your pencil interlocked in your mind. Don't just draw the outline but draw all the shapes on the subject without lifting your pencil. Pretend you are touching the object with your pencil.
The results will probably look ridiculous (see mine below), but you may be surprised as to how accurate some of the shapes turn out. To this day I will resort to this method when I'm having difficulty drawing certain shapes or objects.
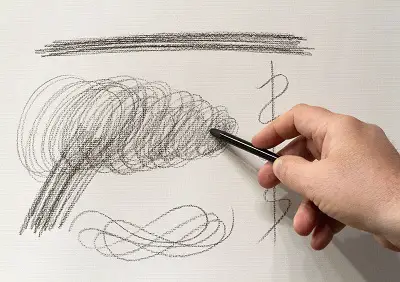
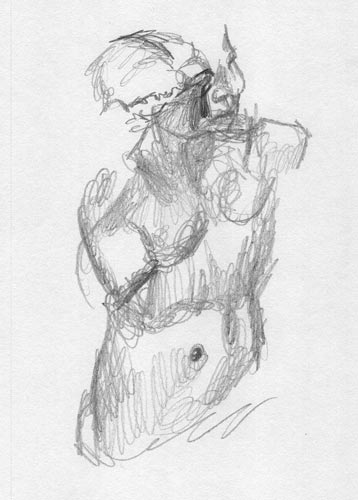
Modeled Drawing Exercises
Similar to the contour drawing, this exercise is great for learning to feel volume and mass in your subject matter.
Use a larger sheet of paper. Start in the center of your subject's form. Begin moving your pencil with a fluid rotating motion. Pretend you are filling in the form with your pencil. As you work your way to the outer surfaces of the form that are further away from you, apply more pressure to the pencil. Lessen the pressure as you move toward the parts of the form that are close to you.
Don't be afraid to press down hard with your pencil, even if it begins to tear the paper. You want to approach this as if you were using your pencil to sculpt the form in clay. Also, try not to look at your paper when doing this. Keep your eyes on the subject.
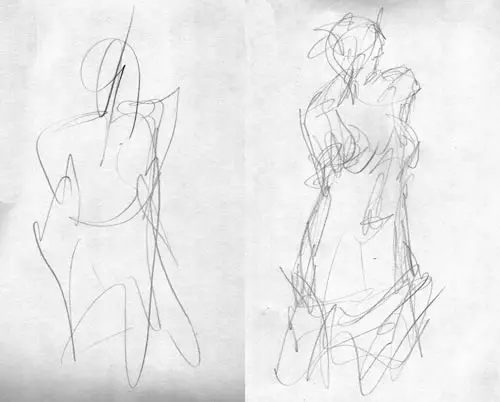
Gesture Sketching Exercises
Gesture sketching is another time-honored method that you will never do away with as long as you sketch. Rather than trying to draw precise outlines or form, gesture sketches try to capture the feeling of movement and energy in the subject matter. The goal is to see the whole form at once and capture its essence in a quick manner. While contour drawing slowly connects individual parts, gesture sees and captures the whole at once.
Start by holding your pencil lightly. Look quickly and energetically at the subject's entire form all at once. Draw your impression of the whole form very quickly and loosely. Try to capture the energy and movement of the shape. Time yourself by doing 5-second sketches. Then go to 15 seconds, then 30, then a minute. The results on paper will be scribbles, but the results in your mind will be anything but.
Memory Drawing Exercises
A very important exercise for increasing your powers of observation and your memory. Look carefully at your subject for one minute, then put it out of sight. Begin sketching what you recall about the subject until you have exhausted your memory. Then take the object back out and compare.
Bear in mind that unless you are doing contour drawing, most all other drawing is technically memory drawing, even if the time between observation and drawing is only a mico-second. This fact makes memory drawing a very important exercise. If anything it may save your neck from getting a lot of kinks.
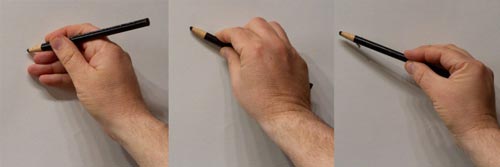
Practice Holding Your Pencil Loosely
While doing these exercises, challenge yourself by holding the pencil in different ways. Most people when they begin drawing hold the pencil as they do when writing. This is fine, but more experienced artists have found that holding the pencil in different ways can help loosen you up even more and prepare you for painting.
Practice Sketching Exercises 20 Minutes a Day
That really depends on how far you want to go and your current schedule. When I did these exercises I would spend several hours a day. Most of this was on contour, modeling, and gesture drawings. I did this for almost a year and have never regretted it.
When I went back to school for graphic design I still maintained a full-time job. I only had about a half-hour a day if that for sketching. But that time was priceless in my development.
If you are just starting, I would recommend a minimum of 20 minutes a day, starting solely with the line and circle exercises each day. Once you get a handle on these, I would reduce the line and circle exercises to just 5 minutes and spend the rest of your time doing contour exercises. After that move onto modeling then gesture then memory.
Drawing Exercises With Other Mediums
You don't have to use a pencil to do these exercises. Anything that will make a mark on paper will suffice. Try them with a ballpoint pen, charcoal, or even with paint.
I would also recommend doing this on the cheapest paper you can find. You can buy large bundles of newsprint paper at very reasonable prices at places like Uline Shipping. The advantage of this is you will not be afraid to let go and "waste" the paper on these exercises. I put "waste" in quotes because while the results on paper may not be impressive, the experience you gain is priceless.
Jason Tako is a nationally known fine artist who specializes in western, wildlife, plein air, and Historical Native American subject matter. He spent his learning years sketching the wetlands and wooded areas of rural Minnesota. He has been featured in Plein Air Magazine and Western Art Collector Magazine and he was the Featured Artist for the 2020 Southeastern Wildlife Expo. See his work at www.JasonTako.com and his demonstrations on his YouTube Channel.
Warning: Undefined array key "preview" in /home3/mysketc2/public_html/wp-content/plugins/oxygen/component-framework/components/classes/comment-form.class.php on line 75
Warning: Undefined array key "preview" in /home3/mysketc2/public_html/wp-content/plugins/oxygen/component-framework/components/classes/comment-form.class.php on line 79