Wet on Wet Oil Painting-The Basics and Beyond
It professional art circles it's called Alla Prima, others call it wet on wet. But no matter what you call it, wet on wet oil painting can give you results that cannot be achieved with other techniques. So what is wet on wet oil painting and how it is done?
A wet on wet oil painting is usually completed in one session. For the best results, the artist should start with a thick over thin technique. Subsequent layers of paint can be applied over thick wet layers by utilizing a gentle paint application with a soft brush or even a bristle brush.
Let's dive into what wet on wet painting is and how to do it without making a big mess.
What is Alla Prima or Wet on Wet Painting?
Wet on wet painting was utilized by Early Netherlandish painters in the mid-15th and 16th centuries, along with Diego Velázquez and Frans Hals. But it really seemed to take off after the invention of the paint tube, which allowed the Impressionists to head outdoors and capture light on location. John Singer Sargent, one of the realist masters of this technique, deserves intense study for wishing to learn alla prima.
The term alla prima is Italian for at first attempt. With most oil painting methods you apply a layer of paint, then wait for it to dry (which can take a while) then apply another layer and repeat until it's done. Wet on dry can drag the completion time of a painting out to days, weeks, or even years depending on the size, subject, and style of the painting, (check out my article on 9 Ways to Make Your Oil Painting Dry Faster.)
With alla prima painting, the paint is applied wet on wet. And while not necessary, the painting is usually completed in one sitting. For larger studio works that take days or even weeks to complete artists can still utilize a wet on wet technique despite the longer completion time. We still discuss this below in more detail.

The Benefits of Wet on Wet Painting
The most obvious benefit of wet on wet painting is that you don't have to wait for days on end for the paint to dry before you add another layer. This not only means you can complete a painting in one sitting, but it also means you can complete more paintings period. While oil painters working wet on dry may only complete a handful of paintings in a year, an artist who paints alla prima can finish hundreds of paintings in a year.
This quick completion time is also great for plein air (on location) painting. Outdoor light can be very fleeting. Even with stable sunlight, you have a maximum of about 3 hours before the light has changed to such a degree that you either have to stop painting or paint from memory. This makes alla prima a very essential option for outdoor painting.
Another benefit of wet on wet painting is that it takes advantage of the beautiful blending opportunities that oil painting has to offer. You can blends different colors together to an almost glassy consistency. You can also easily scrape off mistakes and start again.
The Challenges of Wet on Wet Oil Painting
There are several challenges with wet on wet painting. The first is control. Piling on wet layers of paint can eventually make it difficult to control what is happening on your canvas, especially if those layers are really thick. If you play around too much with those thick layers you will end up with a big mess on your canvas.
The second challenge is over-blending of colors. Since the paint on the canvas is still wet, any paint you put over that can blend into it. This can be advantageous as you can mix colors right on your canvas, but if you are not expecting this, it can be a real problem. We will discuss more about mixing colors on the canvas further below.
The third challenge has to due with judgement and analysis of your work. While completing a painting in one session can give you a feeling of accomplishment, it can also deprive you of the time needed to really analyze your painting for any mistakes or adjustments that need to be made.
When I first got into alla prima painting, I let myself get too hung up on completing the painting in one session. I placed completion time over quality, priding myself that it was all done within several hours. I've since changed my approach. I would rather spend weeks, months or even years on making a painting the best it can be. Who cares if it was done in several hours if it looks bad.
If you are going to work wet on wet, be sure to take as long as needed to make a good painting. What I mean by that is make the fundamentals of good painting your priority. These fundamentals are: composition, drawing, values, color and edges. None of these should ever take a back seat just so you can work within a certain technique or method.
Remember, techniques and methods are the servants of good fundamentals and good results, not the other way around.
Starting Thin and Getting Thick
One of the keys to alla prima painting, and really for any oil painting, is to make sure you keep your first layers thin. While some very experienced artists will start with thicker layers and keep piling it on, it can be maddening to try to make adjustments to thick layers of paint, and unless you know what you are doing, it can turn into a big mess.
A good strategy is to slightly thin your first layer of paint with mineral spirits, or lightly scrub a thin layer onto the canvas with a bristle brush. Get your values and color masses established before your proceed to thicker paint.
One caveat is don't make your initial layer too thin or soupy. Adding paint onto a surface that is saturated with mineral spirits will result in poor adhesion to the canvas and usually leads to a big mess. If the surface is too wet, you may want to let it dry some.
Using a Gentle Hand
When laying down the initial layer of paint onto the canvas, especially heavily textured canvas, you may need to scrub in the colors somewhat aggressively to get the paint to cover the canvas completely. But once the initial layers are on, you will want to use a very light touch when applying the subsequent layers of paint, especially if you don't want the subsequent layers to blend with the initial layers.
For very gentle applications of paint, I like to use what I call the Underhand-Downward Facing Grip. This grip allows you to use the side of your brush to apply the paint (see below). It's nice because you can pile the paint on the brush and gently drag the brush across the canvas. If done right, you will hardly disturb the paint underneath. See my article on different ways to hold a pencil for more ideas. These ideas can apply to painting as well.
Blending and Marbling
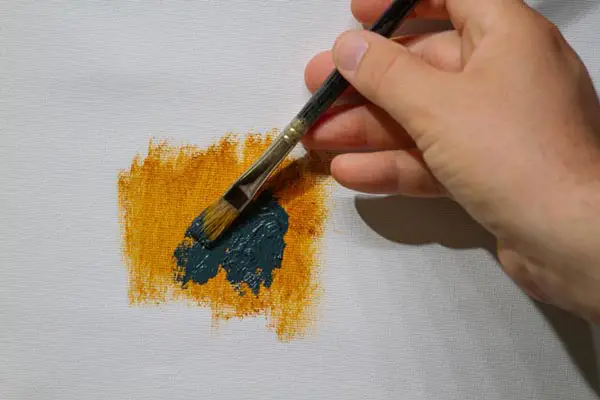
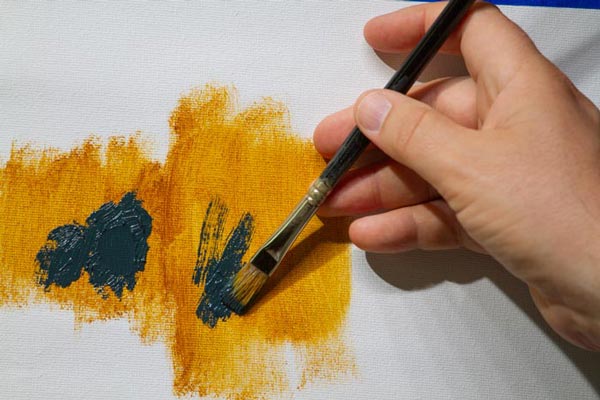
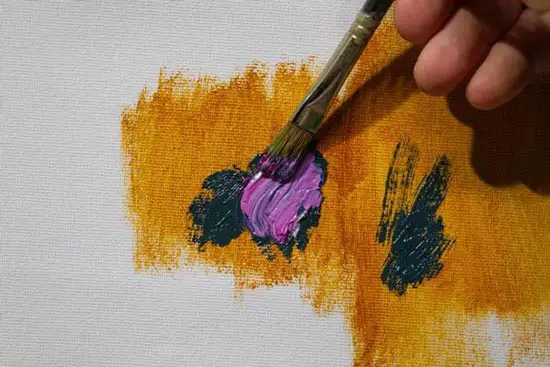
As stated above, wet on wet painting allows you to do some nice blending techniques that are not possible when painting wet on dry. Of course, we have all seen Bob Ross and his famous fan brush blending techniques. But that is not the only way to blend. You can use other types of brushes, palette knives, paper towels, and even your fingers to blend wet paint.
Another cool technique is to paint one color gently and smoothly into another color causing them to merge in a way that doesn't actually blend them into a new color, but rather marbles the paint together for an awesome multi-color effect.
Types of Brushes
Any brushes you use for oil painting can be used for wet on wet painting. Many oil painters tend to favor hog bristle brushes. However, alla prima painting works nicely with softer, badger hair or imitation badger hair brushes. These soft brushes work well with wet paint and are wonderful for blending and that gentle paint application discussed above.
See the Resources Page for my recommendation on oil painting brushes.
Palette Knife Painting
Wet on wet painting is great for palette knife painting. When you paint with a palette knife, the paint you apply must have some body to it, in other words, it cannot be thinned since it won't stick to the knife to be applied to the canvas. Applying nice, buttery paint to canvas can seem a bit like frosting a cake, and it's a lot of fun.
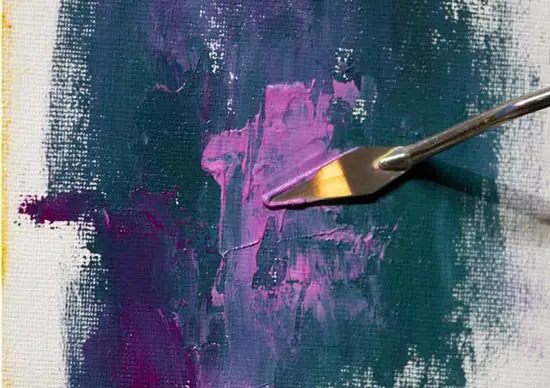
The palette knife can also give you textures and effects that you cannot get with a brush. I've done entire paintings with a palette knife and for some artists it's their entire arsenal. Give it a try when painting alla prima, especially for vegetation.
Mixing on the Canvas
While most mixing is done on a palette when working wet on wet you can mix your oil paint right on the canvas instead. However, if are you still new to oil painting I would recommend mixing on the palette for a while until you are confident with your color mixing, or experiment with some scratch-canvas so you don't ruin a painting you want to turn out well.
I usually mix on the palette, but I will mix on the canvas to make slight adjustments to my colors.
Compensate For What's Already on the Canvas
When painting wet on wet, if you are going to do any type of mixing on the canvas, or if you are going to apply new paint onto wet paint with any amount of pressure, be sure you are compensating for what's already bee laid down.
For example, let's say you want to make your sky, which is still wet, a little darker blue. Since the applied sky color probably has a lot of white paint in it, that wet white paint will lighten any color that is added to it. So you will want to mix a slightly darker blue than what you think you will need. This can be a little tricky and many times requires some adjusting before you get the color correct.
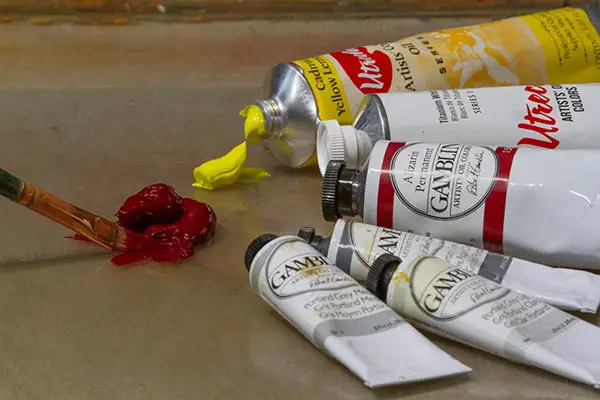
Use High Quality Paint
You will have much more success with wet on wet painting, and painting in general if you use quality paint. Trying to paint with stiff paint or paint that has the consistency of whipped cream will make alla prima painting more difficult and even a miserable experience.
If you are not sure where to find good, quality oil paint, check out my resources page to see what brands I use.
Using Slow-Drying Oils
Artists working alla prima usually like to keep their paint wet for as long as possible. You can make this happen by using paints that are made with safflower or walnut oil. These oils dry slower than linseed oil. M. Graham oil paints are made with walnut oil and tend to stay wet longer than other brands.
Another technique is to add poppy oil to your paint. Poppy oil has the slowest drying time of all other oils. So if you want to keep your oils wet for as long as possible, add some poppy oil to them.
Working Wet on Wet and Not Alla Prima
I've been using the terms wet on wet and alla prima interchangeably. While they usually do mean the same thing, there is a slight distinction. Almost always an alla prima oil painting is done wet on wet, but not all wet on wet oil painting needs to be done alla prima.
If you want to paint wet on wet on an oil painting that cannot be completed in one session, there are some techniques that will allow you to still paint wet on wet.
The first is scraping and reapplying. Many suspect this is how John Singer Sargent was able to complete such large canvases in what appears to be a wet on wet approach. Let's say your painting session is over and you have your sky blocked in but the mountains have to wait. You just scrape off the part of the sky colors that adjoin the mountains. Then on your next session, you repaint that section of the sky and proceed to the mountains.
This approach allows you to have the benefit of being able to manipulate the sky and mountain edges with wet paint. Since the sky is generally one color, you don't have to worry as much about those edges, you just have to remix the sky color exactly. Scraping off some of the sky paint during the previous session keeps one area from have thicker textures than the other area.
The one drawback to this approach is that it basically forces you into a finish as you go approach. To work with wet paint at all times on a large, complex canvas, you have to work in smaller sections and complete those sections before the paint dries.
Of course, you are not restricted to a wet on wet approach. If you need to make adjustments on dry paint then do it. Remember that technique should always be the servant of the results, not the reverse.
There are artists who will complete very large canvases in one session. Joaquin Sorolla became a master at this. But I've known artists today who use this same approach. Tim Bell is a modern master of this technique, completing very large plein air canvases withing several hours or less. Bear in mind that this requires a loose approach that focuses more on light and form rather than tight drawing and detail.
Another option, though a bit riskier is to store your unfinished painting in a very cool place, or even in a freezer, provided you have a freezer large enough. Freezing greatly slows the oxidation process that dries oil paint. I store my unused paints in the freezer and some pigments will stay wet for weeks (see my article).
If you decide to try this approach, be sure that the support you are painting on can handle storage in freezing temperatures. Do this by taking perhaps an old painting that is destined for the garbage can and placing it in the freezer. Take it back out after several days, or however long you intend to use this method and see how it holds up.
I would not recommend storing your painting outside in the winter time unless it's in an unheated shed where it will have some protection from the elements. Again, test this approach with an old painting you don't care about.
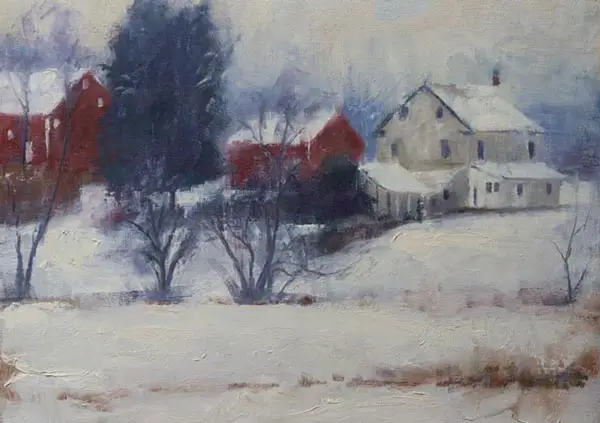
Creating a Wet on Wet Style
As stated above, wet on wet painting can give you effects and options not possible with wet on dry painting. Many artists who use the wet on wet approach tend to paint in a looser, more impressionistic style. Those who like very tight detail may find wet on wet painting to be a hindrance. Also, painting lots of detail takes time, and time dries paintings, no matter what.
If you are going to paint wet on wet, allow yourself to be open to the looser style that wet on wet painting offers. If you are a tight painter, wet on wet can still offer subtle blending techniques not possible with wet on dry painting. I personally use both approaches. Whichever approach gives you your intended results is the approach you should use.
The most important thing to do is experiment with an open mind that is not obsessed with results, but rather with discovering. Give yourself the freedom to destroy some canvas without having the justify the results. It's not wasting money. Learning is never a waste of money. Every good artist throughout history has done this. And you may find a whole new world of possibilities.
Keep painting!
Jason Tako is a nationally known fine artist who specializes in western, wildlife, plein air, and Historical Native American subject matter. He spent his learning years sketching the wetlands and wooded areas of rural Minnesota. He has been featured in Plein Air Magazine and Western Art Collector Magazine and he was the Featured Artist for the 2020 Southeastern Wildlife Expo. See his work at www.JasonTako.com and his demonstrations on his YouTube Channel.
Warning: Undefined array key "preview" in /home3/mysketc2/public_html/wp-content/plugins/oxygen/component-framework/components/classes/comment-form.class.php on line 75
Warning: Undefined array key "preview" in /home3/mysketc2/public_html/wp-content/plugins/oxygen/component-framework/components/classes/comment-form.class.php on line 79