
Eight Things You Must Know to Sketch Realistic Clouds
Clouds can add a nice touch to your landscape drawings, but making them look realistic can be fairly elusive. So how do you sketch clouds and make them look realistic? We will discuss eight things you must know to sketch realistic look clouds.
Know Cloud Families And Their Shapes
There are essentially four different types of clouds for the artist to be aware of. These are Cumulus, Cirrus, Stratus, and Nimbus. There are half-steps in between these such as Altocumulus, but you don't need to get too wrapped up in the exact scientific terms in order to draw or paint clouds. Just be aware of the basics as outlined below.
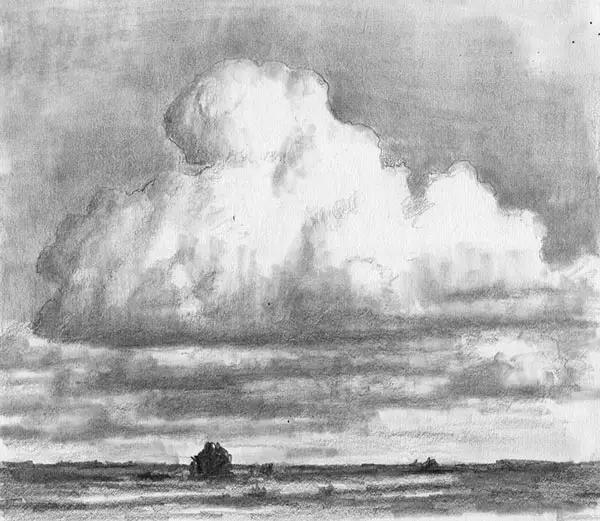
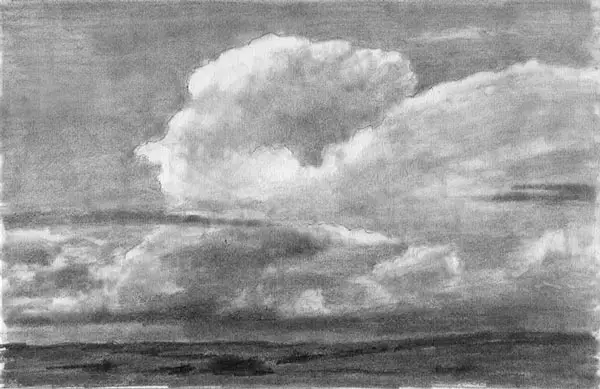
Cumulus clouds are probably the most popular, and the ones artists tend to think of when it comes to drawing or painting clouds. They have a flat base with a fluffy dome that makes one think of cotton balls. These clouds are lower in the atmosphere.
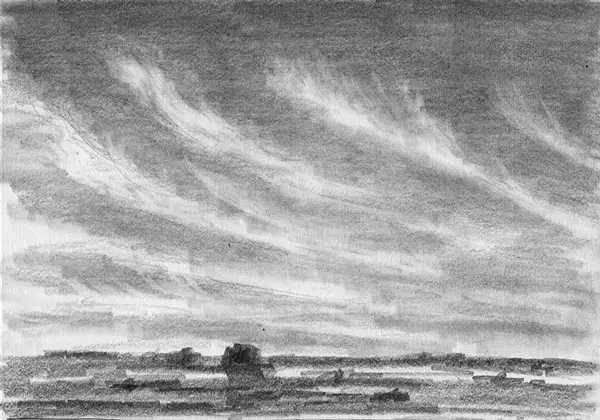
Cirrus Clouds are thin and wispy, similar to hair blowing in the wind. They have a beautiful elegance about them and can be very challenging to paint and even more challenging to draw. They tend to be high up in the atmosphere.
Stratus clouds are very low-level clouds, sometimes they are at ground level in the form of fog. Sometimes these clouds don't have much shape as they are made of sheets of moisture. Think of an overcast day where all you see in the sky is grey or low heavy clouds.
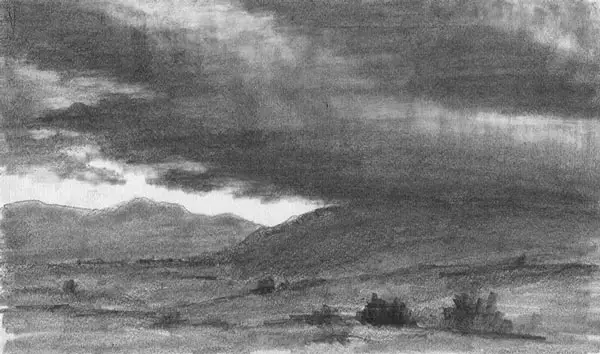
Nimbus clouds are heavy clouds that produce rain. They can be incredibly tall. Think of storm clouds that seem to almost touch the ground and rise very high up with imposing, beautiful billowing patterns. Sometimes they can almost resemble the mushroom cloud of a nuclear explosion.
Draw Clouds And Not Symbols
While each cloud family has an essential shape, there is great variety within those shapes. The temptation is to draw symbols to represent clouds (or anything else). We did this in elementary school. I would draw a flat line with three humps on top and other kids would draw what was essentially a bumpy circle.
This is great for children and even for children's illustrations, but if you want your clouds to look realistic you must move beyond this symbolic approach and progress to an observational approach. You must abandon drawing preconceived shapes and draw what clouds actually look like by observing them in all their wonderful variety and harmony.
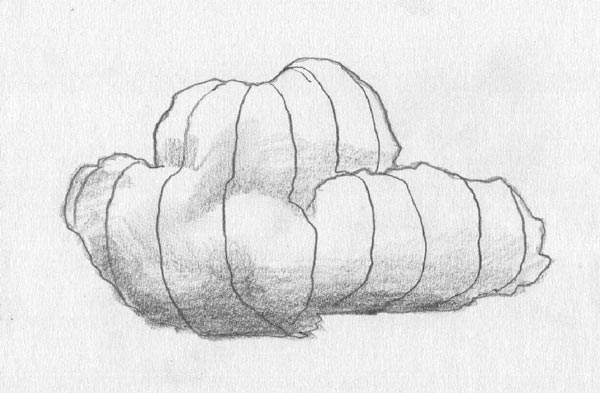
Focus On The Volume Of Clouds Rather Than Detail
When you draw just symbols of clouds they can end up looking flat, like they are just pasted onto the sky. Don't forget that clouds have volume. You are not looking at a puffy flat shape, rather it's a three dimensional mass of moisture that resembles more of a sphere. Of course, this applies more to cumulus clouds than to cirrus clouds.
One key to making clouds appear as if they have volume is to pay attention to the values of their edges. Many beginning artists will draw or paint the edges of a cumulus cloud pure white, but this is not the case.
Remember, the edges of a cloud are a sphere that turns away from you. Therefore in almost every case the edge of the cloud should never be the lightest part, but should slightly darken to emphasize its volume. The exception is when the cloud is backlit by the sun, in which case the edges will contain a rim-lighting effect.
Another reason why the edges of clouds darken slightly is that from the viewer's perspective there is less mass in this area. Since clouds are made of translucent moisture, whatever is behind them will be more visible in the thinner areas of the cloud. This is also why very small or thin clouds will be slightly darker than large ones.
One very important thing to emphasize on drawing a cloud's volume, it is way more important to capture the volume of the entire cloud rather than the volume of it's smaller billows. Large cumulus clouds can contain many small billows. Trying to capture every single one can destroy the form of the whole cloud. Simplify the cloud by showing the form of the whole and add some smaller billows here and there for interest and to emphasize form.
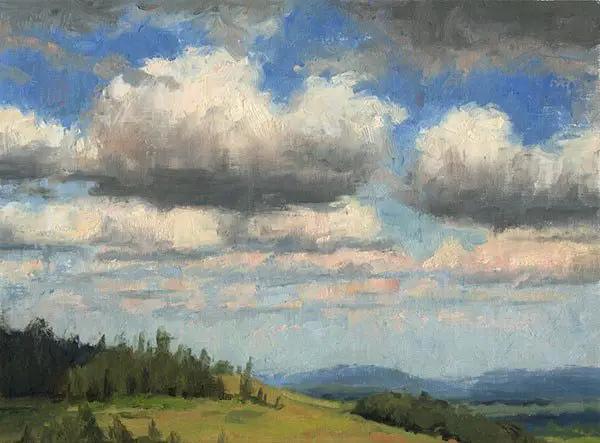
Make Sure Your Clouds Have Light Values
Clouds float. They are made of water or ice. This may sound obvious but many artists will draw or paint their shadow areas with very dark values. This comes from the mistake of not considering the value structure of the entire landscape and the principles of angles and consequent values as outlined in John F. Carlson's Guide to Landscape Painting (see my review of this great book).

When you make the shadows of clouds too dark they end up looking more like rocks than clouds. In general, the shadows of clouds should never be darker than the trees of a landscape. There are exceptions to this rule, such as very dark storm clouds with foreground trees illuminated by late afternoon sunlight, but in general, cloud shadows should be fairly light in value.
Another exception to this rule is studies of clouds alone, especially backlit clouds. If you're drawing only the sky, dark values have their place, if anything to provide interest and keep the drawing from looking washed out. But once you introduce landscape elements, dark values in clouds can look out of place.

Draw Your Clouds With Soft Edges
This doesn't always appear to be the case, and there are times when firm outlines are required to define clouds, but those outlines should never dominate a cloud. They should be used sparingly with thinner, lighter lines. These outlines can even be lost at times, especially in the shadow areas. This will give your cloud the feeling of belonging in the sky rather than being pasted on.
One trick I do to make sure I maintain a light feeling in my clouds is to begin softly outlining them with the side of my pencil using the pickup grip (see my article on the six ways to hold your pencil). Applying looser lines with very little pressure helps maintain the mental awareness that clouds float and should be treated with a very light touch.
If I'm painting clouds I'll make sure to gently blend the edges ever so slightly with a clean brush to keep them from getting too hard.

Draw Clouds Overlapping Each Other
When drawing a group of clouds, make sure some of them are overlapping. This will give your sky a three-dimensional feeling. Overlapping is significant no matter what you are drawing and shows a higher level of maturity in your work.
Given that clouds are made of water, they are constantly merging and splitting. Overlapping can also emphasize this aspect of clouds. It is also a nice compositional tool for breaking up the outline of a cloud that may be too dominating or is leading the eye out of the composition.
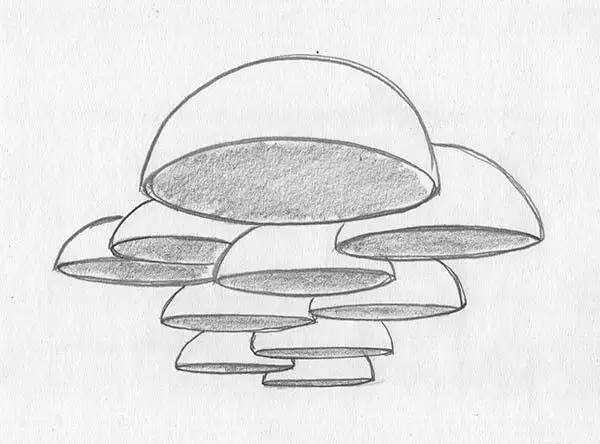
Draw Clouds According To The Rules of Perspective
This is most obvious in clouds such as cumulus clouds. Say you are standing on a large, flat plain and looking into a sky filled with cumulus clouds. Even though they all move parallel to each other, clouds will appear to recede into a vanishing point on the horizon in the same way objects on the ground do. This vanishing point will generally be a single point in the middle of your horizon line.
All else being equal, the clouds that are further away will get smaller than the clouds that are close. But bear in mind that all clouds are not equal in size, so you may have smaller clouds that are closer and a mammoth cloud further in the distance.
With cumulus clouds, the key is usually to focus on the flat bottoms of the clouds. At the risk of sounding too symbolic, you could almost think of those bottoms as round disks that have a thinner ellipse on the distant clouds and a more round ellipse on the clouds that are closer. In other words, the close the cloud is to you, he more of its underside will be visible. With distant clouds, you will see barely any of the undersides (see below).
Knowing this and knowing how to depict it in your art will not only give your clouds a more realistic look, it will help give depth to your drawing or painting.
Be Aware That Clouds Are Moving And Changing
Even though they can appear right above you out of nowhere, clouds always appear to be coming from somewhere and going somewhere. The wind takes them along and also determines their shape. Sometimes the wind is gentle and the clouds appear to barely move or change, other times the wind is strong and will tear the clouds apart as it pushes them speedily along.
Suggesting movement in your drawing or painting will help prevent your sky from looking static and dull. This can be done by arranging your clouds to suggest movement. This is a very subtle thing as overdoing it can cause your drawing to look contrived.

The best thing you can do it take some time outside and study clouds by sketching them. In our instant gratification culture, this may not seem too appealing, but there are no shortcuts or magic tricks that can replace experience and hard work. Intimate knowledge of nature can only be attained by becoming intimate with nature, and this requires spending time studying nature.
Doing this will also help you become more familiar with how clouds change yet retain their characteristics. This is the best cure for symbolic drawing, a problem with so many inexperienced artists.
Sketch Clouds From Life
I recommend that you spend an afternoon outside with a cheap sketchbook or sheets of cheap paper, and sketch clouds. Begin by drawing their outlines, then move to shading. Try to feel the volume and form of the entire cloud, almost as if you were sculpting it with clay using the modeled drawing technique (previous article). Capture the lighting on the entire form. If there is time then move onto some of the little internal billows.
Pro Tip: When the sky is filled with clouds don't try to draw every cloud you see. Zero in on one or two next to each other and sketch just them. Once those clouds have moved on or completely changed shape, move onto another one.
You will find out very fast how quickly clouds can change, even on a calm day. You will probably end up with many unfinished sketches and that is totally fine. The objective is not to go home with something you can proudly post on social media, rather you want to go home with experience, knowledge, and the feeling of clouds.
Do this on a repeated basis and you will be surprised at how quickly you will be able to draw realistic looking clouds. Also, it's a nice way to spend an afternoon outside. Who among us as a child didn't sit in a grassy field and stare up at the sky, or at least dream about it?

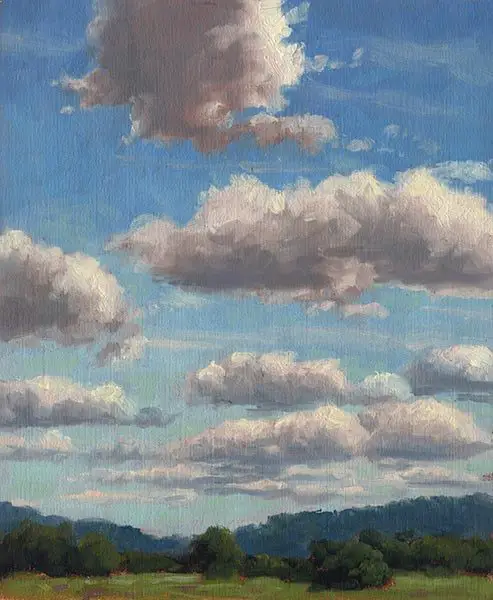
Clouds Change Color As They Recede
If you are doing paintings of clouds, there are several very important things you must be aware of. The first is that the darks of clouds get lighter and cooler the further away the cloud is. The second is that the light (white) parts of clouds get slightly darker and warmer the further away the cloud is.
Say you are looking at a sky filled with cumulus clouds. When you look at the clouds that are very close to you, the tops of those clouds will look more white than the tops of the clouds on the horizon. The tops of the distant clouds will look more pink or orange and as a result, will be slightly darker since pink/orange is darker than white. Bear in mind that you will not want to use pure white on the close clouds, they are just whiter/cooler than the distant clouds.
It's opposite for the base/shadow parts of clouds. The base of the clouds that are closest to you will be cool, but not as cool as the bases of the clouds nearer to the horizon. Those distant bases will also be slightly lighter in value.
So when I'm painting clouds, the tops/whites of the distant clouds will have slightly more red or orange than the closer clouds, of which may be white with just a touch of Yellow Ochre and/or Cadmium Lemon. The bases of the distant clouds will have more white and blue, while the closer clouds will have slightly more blue to darken it, along with some Alizarin and a touch of Yellow Ochre or Cadmium Orange to slightly warm it up (see my palette colors here).

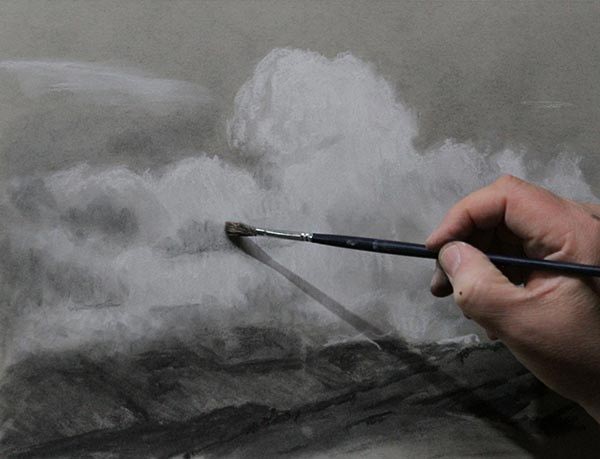
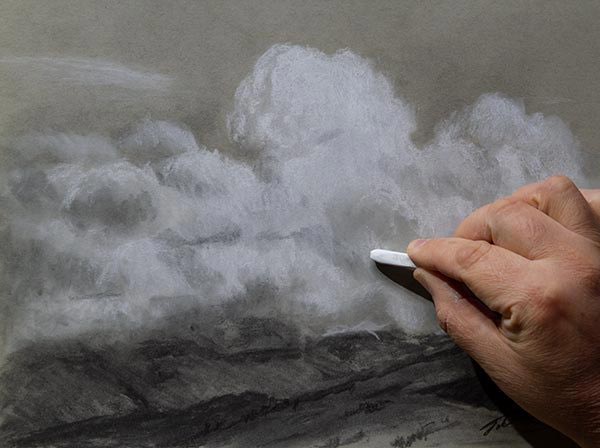
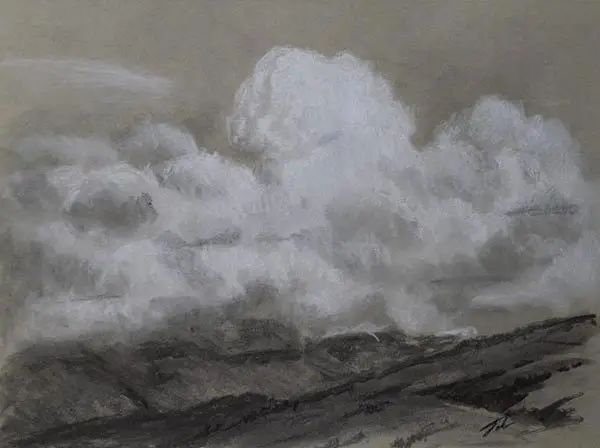
Cloud Drawing Demo in Charcoal
In this short demo below I'm drawing a nimbus cloud over some mountains using white compressed and black vine charcoal on toned gray paper. Charcoal is great for clouds given it's blending capabilities. The nice thing about drawing on toned paper is that you don't need to fill in a tone for the blue sky. See the video of this demonstration on my YouTube channel.
Check out the Resources Page to see what art materials I use and where they are available.


I hope it helps the next time you are sketching clouds.
Take care and keep sketching!
Jason Tako is a nationally known fine artist who specializes in western, wildlife, plein air, and Historical Native American subject matter. He spent his learning years sketching the wetlands and wooded areas of rural Minnesota. He has been featured in Plein Air Magazine and Western Art Collector Magazine and he was the Featured Artist for the 2020 Southeastern Wildlife Expo. See his work at www.JasonTako.com and his demonstrations on his YouTube Channel.
Warning: Undefined array key "preview" in /home3/mysketc2/public_html/wp-content/plugins/oxygen/component-framework/components/classes/comment-form.class.php on line 75
Warning: Undefined array key "preview" in /home3/mysketc2/public_html/wp-content/plugins/oxygen/component-framework/components/classes/comment-form.class.php on line 79